Tech Support
Configuration Guides
Diversifying cyber threat intelligence (CTI) sources is a critical step in safeguarding your organization against evolving threats. To help with this process, we provide step-by-step configuration guides to streamline the integration of Malware Patrol’s CTI with a range of critical and popular industry tools, including firewalls, proxies, AVs, IDS/IPS, and TIPs.
By leveraging these guides, your organization can harness the full potential of our intelligence, fortifying your defenses against evolving threats and bolstering your overall cybersecurity posture. Stay vigilant, stay secure, and let Malware Patrol be your trusted partner in safeguarding your digital landscape!
For additional assistance, send an email to support ( @ ) malwarepatrol.net. [Please note that support for Basic Defense blocklists is very limited. Responses may take several days to a week, depending on our team’s availability. Our Business Protect and Enterprise commercial customers receive priority support.]
AWS Route 53 - DNS Firewall (DNS Firewall & Enterprise Customers)
There are many security tools available, each serving a unique purpose in safeguarding your digital environment. Among them, the DNS firewall is one of the most effective and well-established. It acts as a critical line of defense against cyber threats by filtering and blocking access to malware and phishing websites, and data exfiltration points among others malicious resources. This prevents users from inadvertently visiting dangerous sites or falling victim to cyber attacks.
Amazon Route 53 is a Domain Name System (DNS) service that connects user requests to Internet applications running on AWS or on-premises. Among the features offered is the protection via the Route 53 Resolver DNS Firewall. It allows the use of AWS Managed Domain Lists, as well as, custom Domain Lists. This step-by-step guide shows how to integrate Malware Patrol’s Malicious Domains threat intelligence with the AWS Route 53 Resolver DNS Firewall.
Add Malware Patrol’s Malicious Domains List to Amazon Route 53 Resolver DNS Firewall
You’ll need your Malware Patrol subscription username and password to proceed.
Malware Patrol uses CloudFormation to create all the necessary AWS systems that keep a Route 53 Domain list updated with Malware Patrol data. Basically, it creates an S3 bucket and a Lambda function that every hour downloads and updates the Malicious Domains feed, importing it into the Route 53 Domain List.
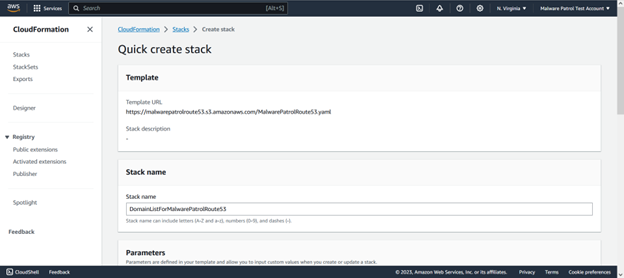
The process is simple. Please sign into your AWS Management Console and click the following link:
URL will be provided by your account manager
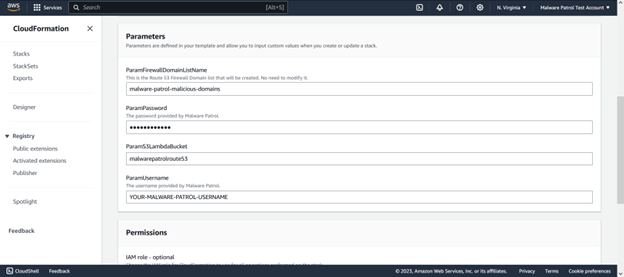
When you click on this link, you should input your Malware Patrol username and password and click “Create Stack”. Please don’t modify any other field on that page. The following resources are generated automatically:
- CloudFormation stack: DomainListForMalwarePatrolRoute53
- EventBridge rule: ScheduleForMalwarePatrolRoute53
- Bucket: domainlistformalwarepatr-s3bucketformalwarepatrol-RANDOMNUMBER
- Lambda Function: LambdaForMalwarePatrolRoute53
- DNS Firewall Domain List: malware-patrol-malicious-domains
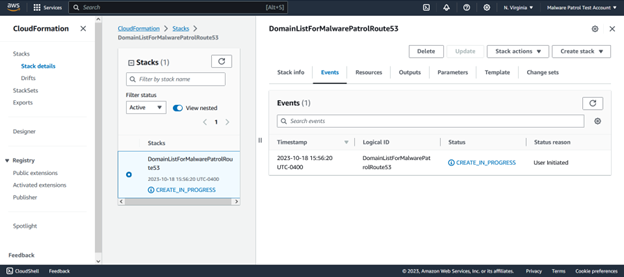
The following screenshots show the process that begins once you have clicked on the link above.
In the parameters section, enter your customer username and password.
In the capabilities section, you must acknowledge the IAM resources-related information. Click “Create Stack”.

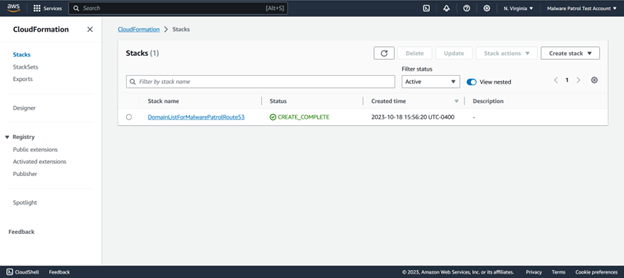
The stack will show as being in progress for a few moments.
Once it is complete, you will see the following screen:
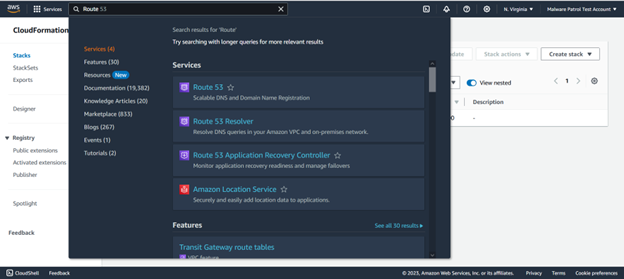
Navigate to your Route 53 console. You can do this by searching Route 53 in the search bar at the top of the screen.
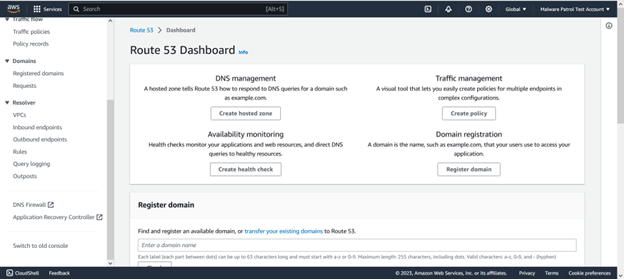
From your Route 53 dashboard, select DNS Firewall from the left side menu.
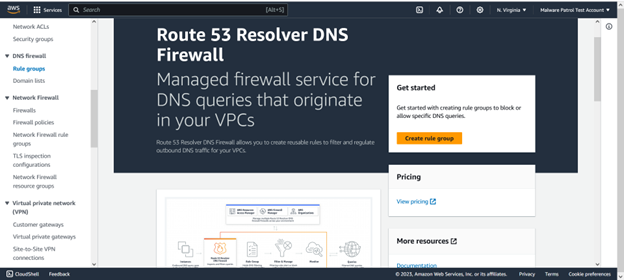
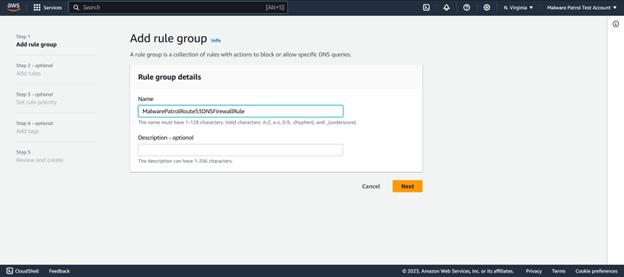
Click on Rule Groups from the DNS Firewall entry on the left side menu and then click Create rule group.
Give the rule group a name and click Next.
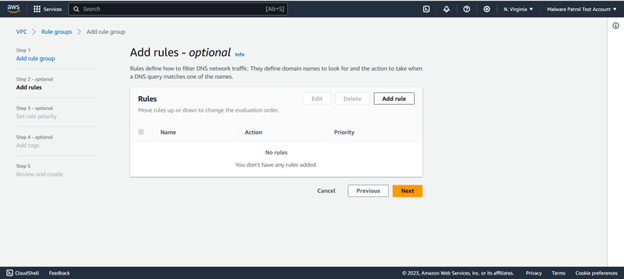
Select Add rule.
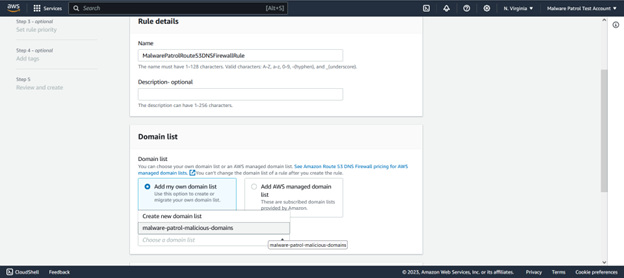
Name the rule and select “Add my own domain list”. Under “Choose or create a new domain list”, select the Malware Patrol list.
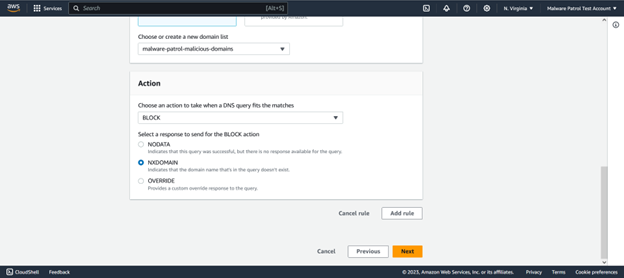
For Action, drop down and select BLOCK and then select NXDOMAIN. Click Add rule.

Congratulations, your Malware Patrol Malicious Domains threat list is active and ready to protect your organization against the latest threats!
The next steps will vary by organization. Generally, you will want to enable firewall protection for your VPC(s). An Amazon resource outlining this process can be found below.
Notice that the newly created Domain List may take more than an hour to populate depending on how long it takes for AWS to execute the Lambda function. After that, updates will be automatically pushed every hour.
Amazon Route 53 Resources
- Managing Your Own Domain Lists: “You can create your own domain lists to specify domain categories that you either don’t find in the managed domain list offerings or that you prefer to handle on your own.
- Configuring logging for DNS Firewall: “You can evaluate your DNS Firewall rules by using Amazon CloudWatch metrics and the Resolver query logs. The logs provide the domain list name for all alerts and blocking actions.”
- DNS Firewall rule groups and rules: “This section describes the settings that you can configure for your DNS Firewall rule groups and rules, to define the DNS Firewall behavior for your VPCs. It also describes how to manage the settings for your rule groups and rules.”
- Enabling Route 53 Resolver DNS Firewall protections for your VPC: “You enable DNS Firewall protections for your VPC by associating one or more rule groups with the VPC. Whenever a VPC is associated with a DNS Firewall rule group, Route 53 Resolver provides the following DNS Firewall protections […]”
If you encounter any problems with your Route 53 DNS Resolver Firewall integration, please contact your account manager or send an email to support ( @ ) malwarepatrol.net.
BIND9 RPZ - DNS Firewall (DNS Firewall & Enterprise Customers)
BIND is the world’s most used DNS server and can be configured as a DNS Firewall using RPZ zone files. Response Policy Zone (RPZ) enables DNS administrators to selectively block name resolution of Internet resources known to be used by cyber criminals.
Malware Patrol provides seven zone files compatible with BIND9 RPZ:
- COVID-19 Newly Registered Domains
- C2s
- Cryptominers
- DGAs
- DNS-over-HTTPS Servers
- Malware
- Phishing
DNS queries for domains in these zones return a special page that advises users why the access was blocked. You can implement any or all zone files at your discretion. Follow these simple steps to configure your BIND9 instance and protect the internal network, computers and users.
Please be advised that the usage of the “malware” RPZ zone may result in blocking large well known websites that are actively hosting malware and ransomware samples. The use of the “DGAs” and “C&Cs” zone files is less likely to deny access to renowned websites.
1) Make sure your BIND9 is installed and working properly. There are several resources on the Internet that can help you install it depending on your platform. If you are experiencing trouble, start at: https://www.isc.org/downloads/bind/. You should also be able to use distribution specific tools like apt-get and yum. For example: apt-get install bind9.
2) Determine the path to the configuration files used by BIND. This most likely will be /etc/bind or /etc/named. One way to find the path is to issue this command: find / -name named.conf
3) Notice: the path /etc/bind will be used throughout this How To, please adapt the commands shown here appropriately if your path is different.
4) Change to the directory that contains BIND configuration files, for example: cd /etc/bind
5) Set up cron jobs to regularly download the appropriate zone file(s) to the BIND configuration directory. URLs for the zone files can be found in your Business Protect data feeds page. The DNS RPZ Firewall data feeds are updated every hour. You can use the MD5 hashes to validate the file’s integrity.
Add the following lines to “named.conf.default”-zones, according to the zones you want to use:
zone "mp_rpz_c2" {
type master;
file "/etc/bind/mp_rpz_c2.db";
};
zone "mp_rpz_covid19" {
type master;
file "/etc/bind/mp_rpz_covid19.db";
};
zone "mp_rpz_crypto_miner" {
type master;
file "/etc/bind/mp_rpz_crypto_miner.db";
};
zone "mp_rpz_dga" {
type master;
file "/etc/bind/mp_rpz_dga.db";
};
zone "mp_rpz_malware" {
type master;
file "/etc/bind/mp_rpz_malware.db";
};
zone "mp_rpz_phish" {
type master;
file "/etc/bind/mp_rpz_phish.db";
};
Add the following lines to “named.conf.options” under the “options” section, according to the zones you want to use:
response-policy {
zone "mp_rpz_c2";    zone "mp_rpz_dga";    zone "mp_rpz_malware"; };
Restart BIND with the following command: service bind9 restart
To make this set up effective, you should configure your customers’ DNS server(s) to point to this BIND instance. This can be easily achieved via DHCP. Still, customers may manually configure their systems to use external DNS servers, therefore bypassing this protection mechanism. To avoid that, apply firewall rules that properly deny traffic to external DNS servers.
This should be all you need to do. After that, browsers and applications that query your DNS server to resolve malicious domains will receive a safe response and will not reach bad content.
If you experience any difficulties configuring BIND9 to use Malware Patrol, please make sure it is working properly and contact our tech support at support (@) malwarepatrol.net.
BIND9 (Enterprise Customers)
Bind is the world’s most used DNS server.
Malware Patrol provides a zone file compatible with Bind9. Its usage as a DNSBL (DNS blacklist) denies access to domains that are involved in malware and ransomware activities. DNS queries for malicious domains return the loopback address (127.0.0.1) preventing access to download malicious binaries, to relay stolen data and to contact command and control servers. You can follow these simple steps to configure your Bind9 instance and protect the internal network, computers and users from getting infected by malware.
Please be advised that we have noticed that Bind on CentOS 7 is somehow limited in the number of zones it can load and therefore doesn’t work well with our blocklist. If you experience trouble loading the zone file, Bind exits unexpectedly, this may be the reason, contact our tech support.
1) Make sure your Bind9 is installed and working properly. There are several resources on the Internet that can help you install it depending on your platform. If you are experiencing trouble, start at: https://www.isc.org/downloads/bind/. You should also be able to use distribution specific tools like apt-get and yum. For example: apt-get install bind9.
2) Determine the path to the configuration files used by Bind. This most likely will be /etc/bind or /etc/named. One way to find the path is to issue this command: find / -name named.conf
3) Notice: the path /etc/bind will be used throughout this How-To, please adapt the commands shown here appropriately if your path is different.
4) Change to the directory that contains Bind configuration files, for example: cd /etc/bind
5) Download Malware Patrol’s zone file:
wget -O /etc/bind/blackhole.malwarepatrol.zone ‘https://malwarepatrol.net/pub/20160707/blackhole.malwarepatrol.zone’
6) Add the following line to the end of the file /etc/bind/named.conf
include “/etc/bind/blackhole.malwarepatrol.conf”;
7) Execute the first update:
/usr/bin/wget –no-check-certificate -qO- ‘_URL_TO_BIND_BLOCK_LIST_’ | sed ‘s/mbl.zone.file//etc/bind/blackhole.malwarepatrol.zone/g’ > /etc/bind/blackhole.malwarepatrol.conf
notice 1: don’t forget to change the command line if your path is not /etc/bind
notice 2: don’t forget to change the _URL_TO_BIND_BLOCK_LIST_ paramenter to your custom URL. To find the correct address, log in to your account, right click on the “download” link for the Bind blocklist and choose “Copy link location”
8) Restart Bind with the following command: service bind9 restart
9) Configure a new cronjob to update the Bind zone every hour:
MM * * * * /usr/bin/wget –no-check-certificate -qO- ‘_URL_TO_BIND_BLOCK_LIST_’ | sed ‘s/mbl.zone.file//etc/bind/blackhole.malwarepatrol.zone/g’ > /etc/bind/blackhole.malwarepatrol.conf ; service bind9 restart
To make this set up effective, you should configure your customers’ DNS server(s) to point to the new Bind. This can be easily achieved via DHCP. Still, customers may manually configure their systems to use external DNS servers, therefore bypassing this protection mechanism. To avoid that, apply firewall rules that properly deny traffic to external DNS servers.
If you experience any difficulties configuring Bind9 to use Malware Patrol, please make sure it is working properly and contact our tech support at support (@) malwarepatrol.net.
Cisco ASA FirePOWER (Enterprise Customers)
“With Cisco ASA with FirePOWER Services, you consolidate multiple security layers in a single platform, eliminating the cost of buying and managing multiple solutions. This integrated approach combines best- in-class security technology with multilayer protection integrated in a single device that is less costly than piecemeal security solutions.” (http://www.cisco.com/c/dam/en/us/products/collateral/security/asa-firepower-services/at-a-glance-c45-732426.pdf)
Malware Patrol provides threat data compatible with Cisco ASA FirePOWER security intelligence feeds. There are three types of feeds that can be applied:
-
IP addresses: includes IP addresses of malware C&Cs as well as those resolved from malware and ransomware DGAs.
-
URLs: includes partial URLs used by malware and ransomware to contact command and control systems and drop zones.
-
Domains: includes registered active domains generated via DGAs for malware and ransomware.
You can follow these simple steps to configure your Cisco ASA FirePOWER to filter malicious IPs and protect the internal network, computers and users from getting infected by malware. The same procedure can be followed to filter URLs and domains.
1) Log in to Cisco FirePOWER Management Center.
2) Choose Objects > Object Management.
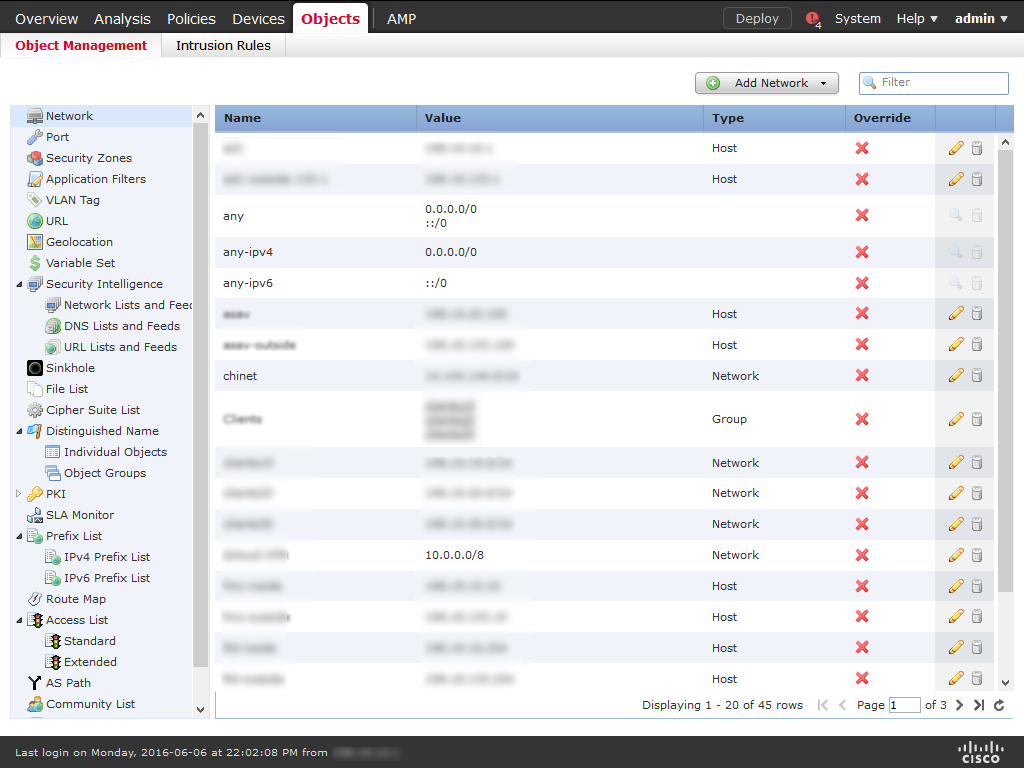
3) Expand the Security Intelligence node, then choose Network Lists and Feeds.
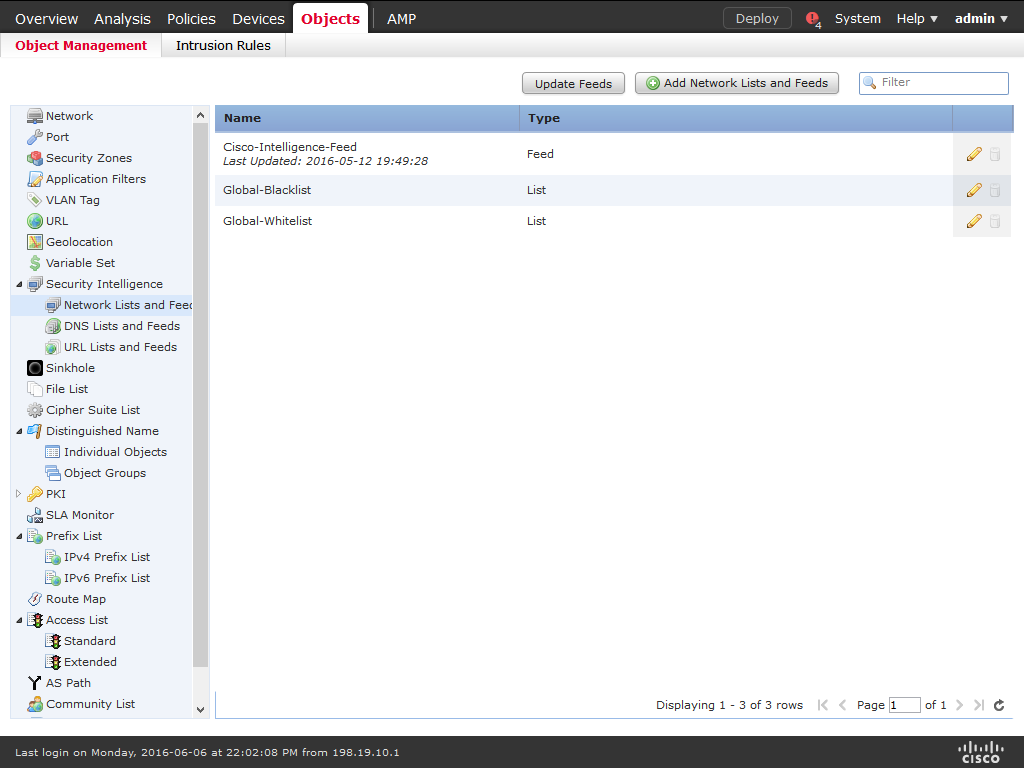
4) Click Add Network Lists and Feeds.
5) Enter a name for the feed (ex: MalwarePatrol_malicious_IPs).
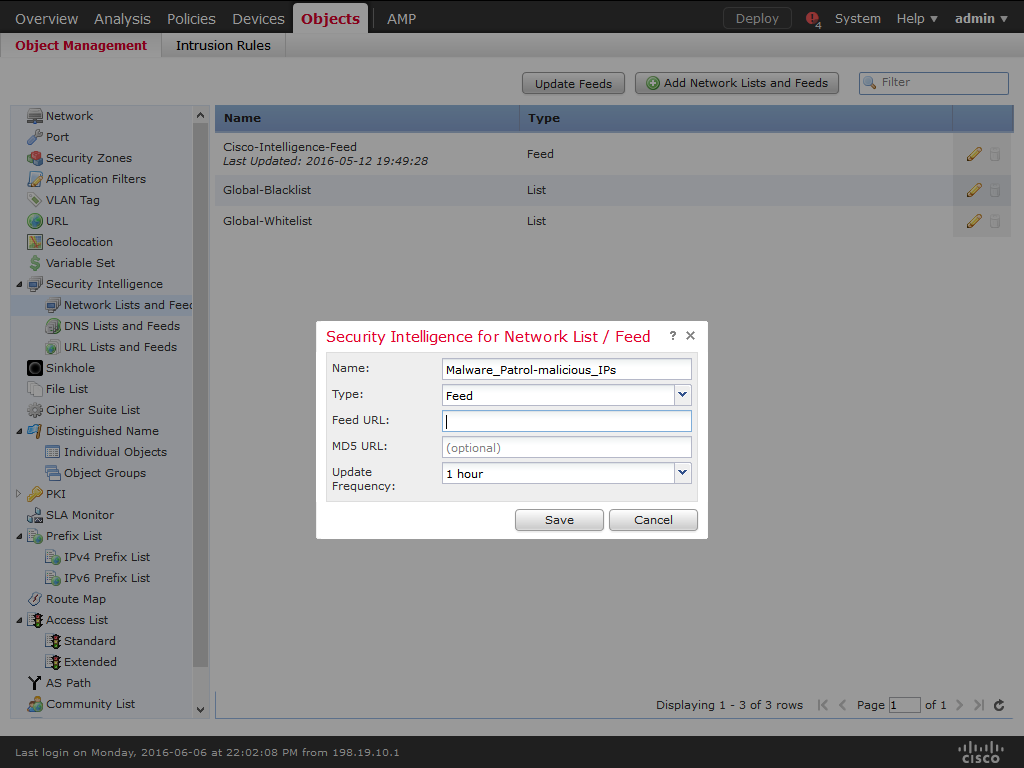
6) Choose Feed from the Type drop-down list.
7) Enter the corresponding feed URL that can be found logging in to the Malware Patrol website.
8) Enter the corresponding feed MD5 URL that can be found logging in to the Malware Patrol website.
9) Choose the Update Frequency, we suggest one hour.
10) Choose Save.
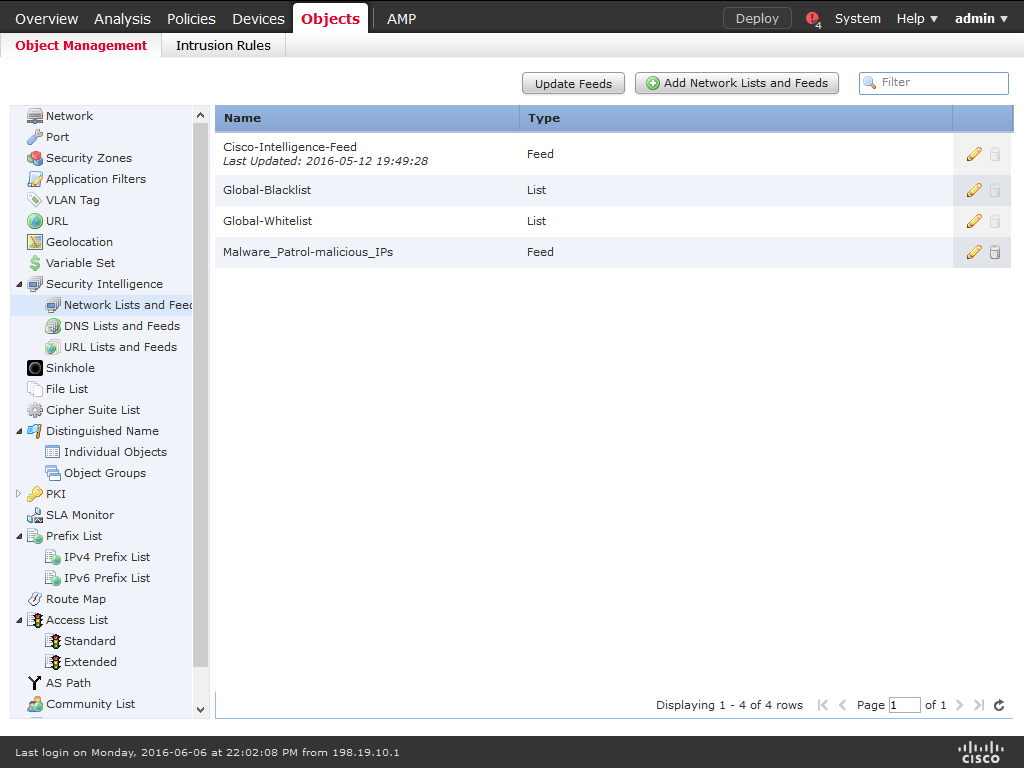
11) Click Update Feeds.
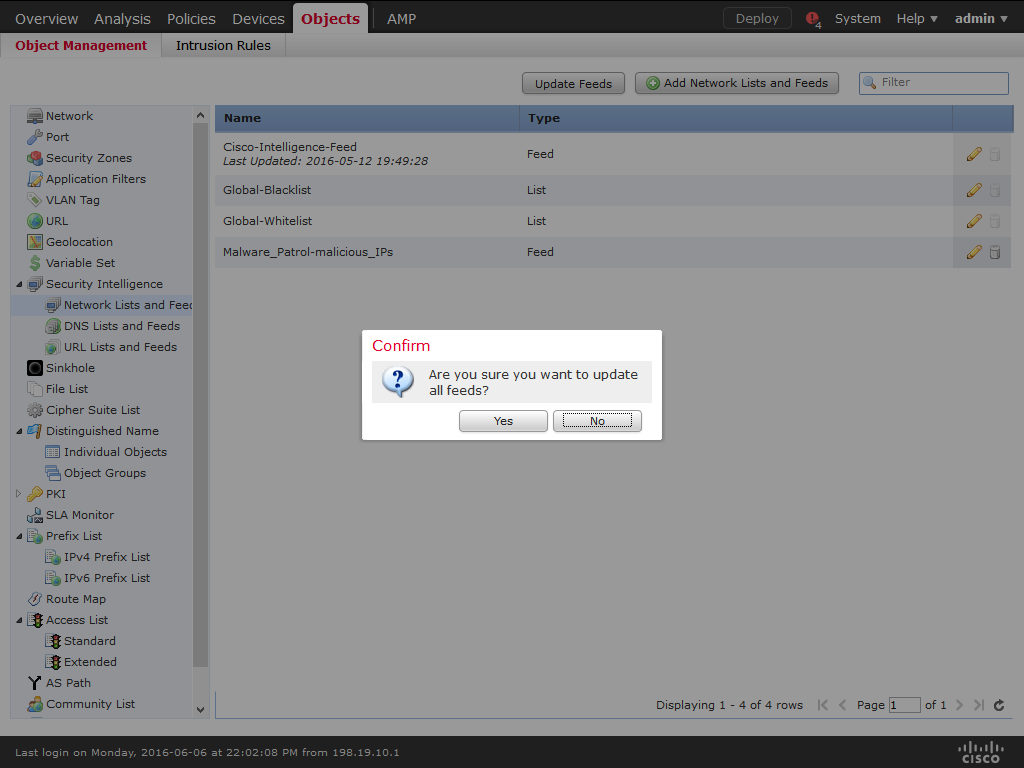
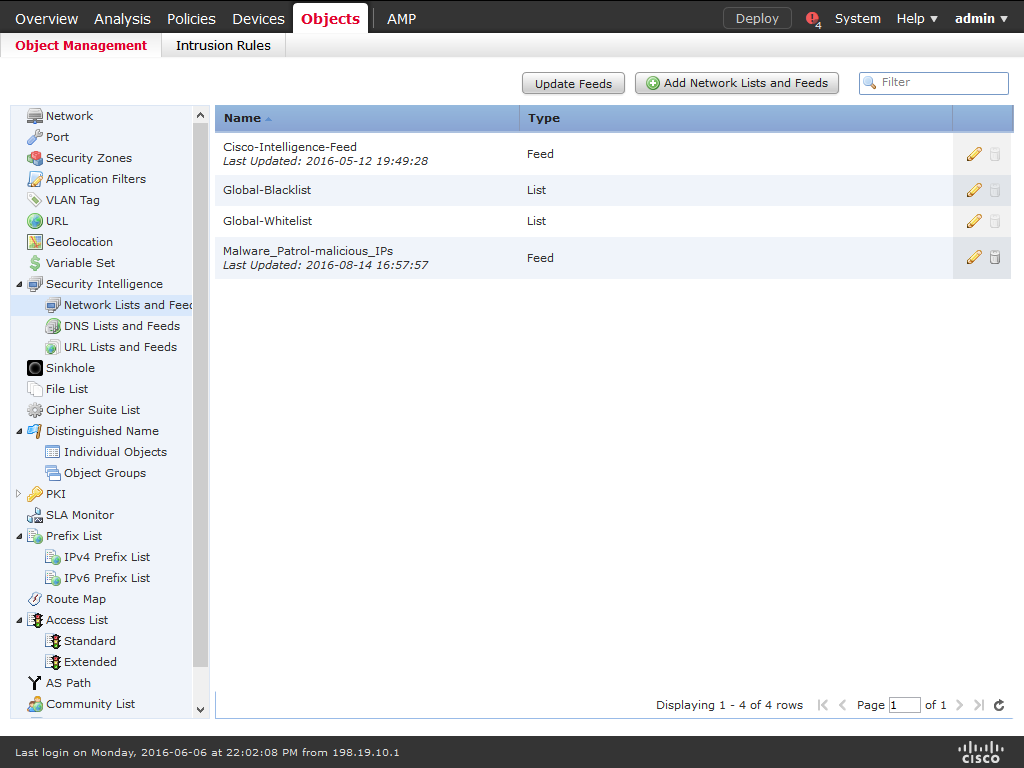
12) Cisco ASA FirePOWER will automatically update the data feed at the chosen interval.
13) Choose Policies / Access Control and click New Policy.
14) Enter a meaningful Name and Description to the policy. The Default Actionmust be Block all traffic. On Available Devices select the devices that will be affected by the policy and click Add to Policy. When you are done, click Save.
15) A new policy will be created. Click on Security Intelligence.
16) On Available Objects / Networks select the object created previously (ex: MalwarePatrol_malicious_IPs), choose a zone from Available zones (Any is the default) and click on Add to Blacklist.
17) The object and corresponding policy were created successfully. You can follow the same steps to use the other data feeds we provide.
If you experience any difficulties configuring Cisco ASA FirePOWER to use Malware Patrol data feeds, please make sure it is working properly and contact our tech support at support (@) malwarepatrol.net.
ClamAV (All Customers)
“ClamAV is an open source ant-virus engine for detecting trojans, viruses, malware & other malicious threats.”
Malware Patrol provides signatures compatible with ClamAV. You can follow these simple steps to configure your ClamAV instance and protect the internal network, computers and users from getting infected by malware.
1) Make sure your ClamAV instance is installed and working properly. There are several resources on the Internet that can help you configure ClamAV in your platform. If you are experiencing trouble installing and configuring ClamAV, start at: http://www.clamav.net/documents/installing-clamav. You should also be able to use distribution specific tools like apt-get and yum to install ClamAV. For example: apt-get install clamav.
If you have Extremeshok’s clamav-unofficial-sigs properly installed, skip to step 14.
2) Install curl. For example: apt-get install curl
3) Install rsync. For example: apt-get install rsync
4) Install unzip. For example: apt-get install unzip
5) cd /tmp
6) wget -O clamav-unofficial-sigs.zip ‘https://github.com/extremeshok/clamav-unofficial-sigs/archive/master.zip’
7) unzip /tmp/clamav-unofficial-sigs.zip
8) cp /tmp/clamav-unofficial-sigs-master/clamav-unofficial-sigs.sh /usr/local/bin
9) chmod 755 /usr/local/bin/clamav-unofficial-sigs.sh
10) mkdir -p /etc/clamav-unofficial-sigs
11) cp /tmp/clamav-unofficial-sigs-master/config/master.conf /etc/clamav-unofficial-sigs/
12) cp /tmp/clamav-unofficial-sigs-master/config/user.conf /etc/clamav-unofficial-sigs/
13) cd /etc/clamav-unofficial-sigs/
14) edit /etc/clamav-unofficial-sigs/master.conf appropriately
malwarepatrol_enabled=”yes”
malwarepatrol_receipt_code=”YOUR-RECEIPT-NUMBER”
malwarepatrol_product_code=”32″
Use 32 if you have a Free Guard account, 34 for Basic Defense monthly, 33 for Basic Defense yearly, and 37 for Basic Defense EDU/Contributor (Free) accounts. Business Protect and Enterprise customers will access via links in their customer portals.
malwarepatrol_list=”clamav_basic” # clamav_basic or clamav_ext
malwarepatrol_free=”yes”
Set to yes if you have a Free Guard account or no if you are a Basic Defense customer.
clam_user=”clamav”
clam_group=”clamav”
user_configuration_complete=”yes”
15) Clean unnecessary files: rm -rf /tmp/clamav-unofficial-sigs*
16) Execute the first update: /usr/local/bin/clamav-unofficial-sigs.sh
17) Configure a new cronjob to update ClamAV signatures every hour: MM * * * * /usr/local/bin/clamav-unofficial-sigs.sh
If you experience any difficulties configuring ClamAV to use Malware Patrol blocklists, please make sure it is working properly and contact our tech support at support (@) malwarepatrol.net.
FortiGate Configuration Guide (Enterprise Customers)
FortiGate NGFWs deliver industry-leading enterprise security for any edge at any scale with full visibility and threat protection. Organizations can weave security deep into the hybrid IT architecture and build security-driven networks to achieve:
- Ultra-fast security, end to end
- Consistent real-time defense with FortiGuard Services
- Excellent user experience with security processing units
- Operational efficiency and automated workflows
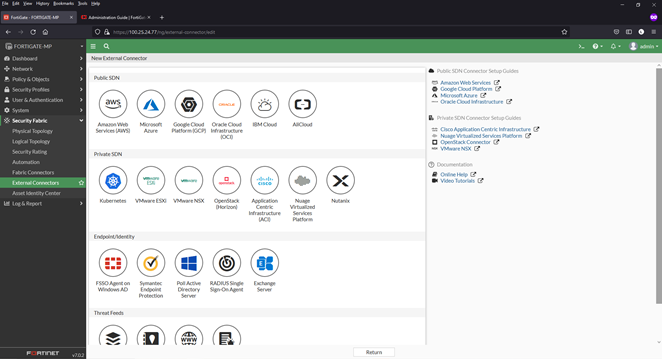
Malware Patrol offers (5) feeds formatted for integration into the FortiGate Security Fabric (External Connectors/Threat Feeds). Customers can choose the feed(s) that meet their needs:
- DNS-over-HTTPS (DoH) Servers (domains)
- Malicious Domains
- Malicious Hashes
- Malicious IPs
- Malware/Ransomware URLs
Watch the following video to learn more about the integration of Malware Patrol data feeds and Fortinet.
We have written configuration instructions for both connecting and enabling protection with Malware Patrol feeds. Please note that some of the functionalities covered in this guide require a subscription, such as FortiGuard AntiVirus for using Malicious Hashes.
Also, following the instructions in the FortiGate Administration Guide, we have mostly modified default settings and policies whenever adding Malware Patrol’s feeds. For logging or other purposes you may wish to create new ones instead. Additional resources are included at the end of this guide, including a link to FortiGate’s manual.
Adding external threat data feeds to FortiGate
1) From inside the FortiGate interface, select Security Fabric > External Connectors. For this configuration guide, we have already added the Malware Patrol Malicious Hashes feed as an example, seen below.
2) Click “Create New”

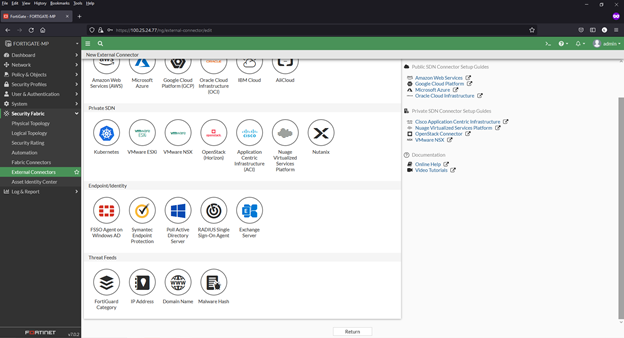
3) Scroll down to “Threat Feeds” section
4) Select feed type to be added. Options are:
a. FortiGuard Category (for URL lists)
b. IP Address
c. Domain Name (for this example)
d. Malware Hash
5) Complete the following in the fields on the next page:
- Feed name: We will use Malware Patrol Malicious Domains
- URL: You can find the URL of the Malware Patrol Malicious Domains data feed in the evaluation or customer portal
- Login credentials: Username and password for Malware Patrol evaluation or customer portal
- Refresh rate: We use 61 minutes as our feeds are updated hourly
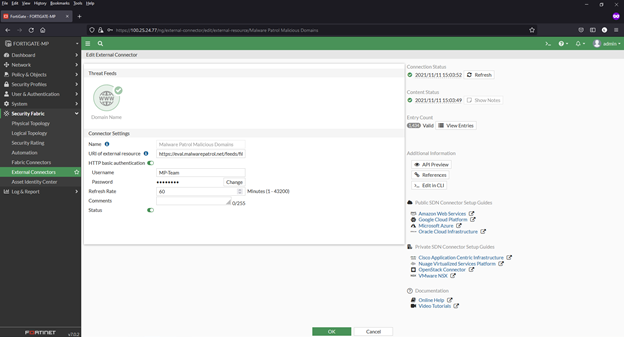
6) Click “OK” to save. You will now see the new feed added to the list of connectors.
7) Click “Create New” to add any additional feed(s) you have. Instructions for each are the same as the previous example. For the examples in this how-to, we use the names below:
a. FortiGuard Category (for URL lists) – Malware Patrol Malicious URLs
b. IP Address – Malware Patrol Malicious IPs
c. Domain Name – Malware Patrol Malicious Domains
d. Malware Hash – Malware Patrol Malicious Hashes
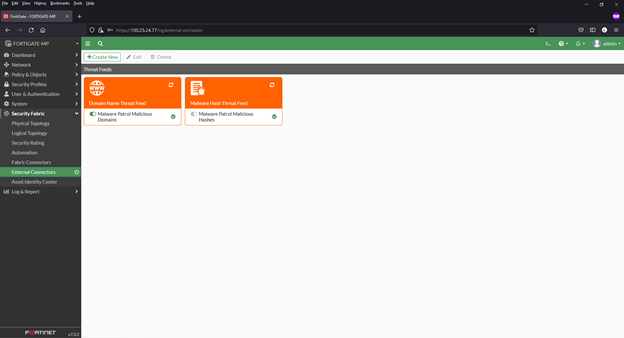
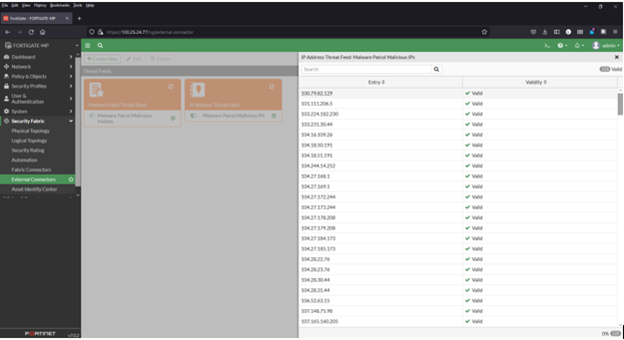
8) Click the refresh button and hover over any feed to see details, including number of valid/invalid entries

9) Click “View Entries” to see the feed’s entries
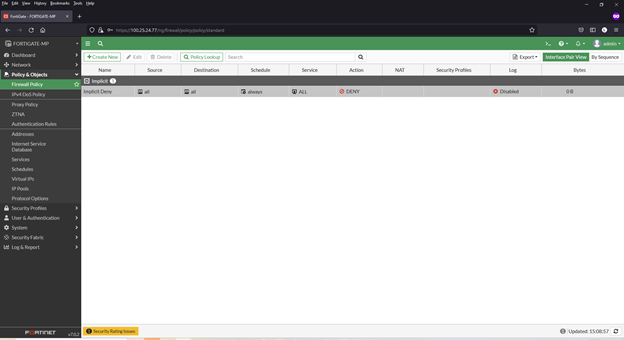
Adding IP data feeds to firewall policies
1) Navigate to Policy & Objects > Firewall Policy
2) Click “Create New”
3) Complete the following in the fields on the next page:
- Name: We will use Malware Patrol IP Deny List
- Select incoming and outgoing interfaces: per your needs/environment
- Source: All
- Destination: Malware Patrol Malicious IPs list (menu appears on right, scroll down)
- Schedule: Always
- Service: All
- Action: Deny
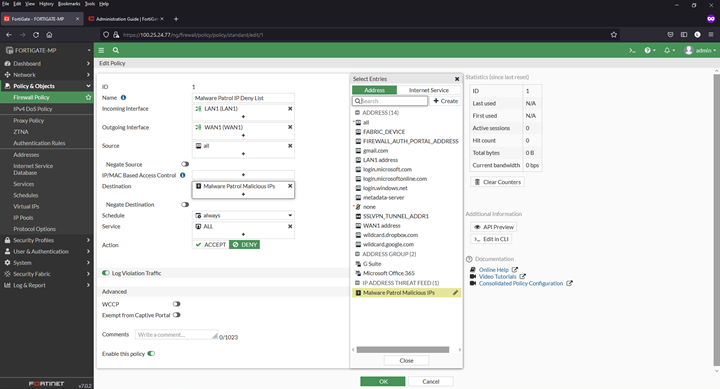
4) Click “OK” to save. New policy will appear in list
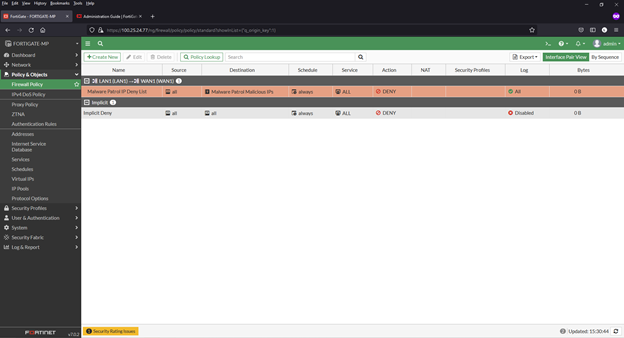
FortiGate policy details: https://docs.fortinet.com/document/fortigate/7.0.2/administration-guide/118003/policies
FortiGate video: https://youtu.be/dpvlQ0xU2NU
Adding an external malware blocklist (hashes) to the AntiVirus
1) Navigate to Security Profiles > AntiVirus
2) Click to edit the default profile

3) Enable “Use external malware block list” (toward bottom of page). Also enable “Quarantine” if desired.
4) Select ‘Specify’ in the “Virus Outbreak Prevention”
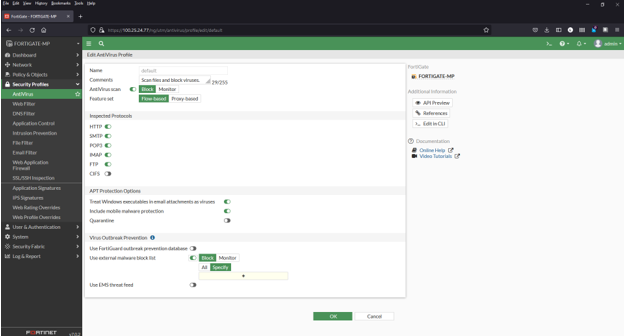
5) Click the + and select the Malware Patrol Malicious Hashes feed from the menu
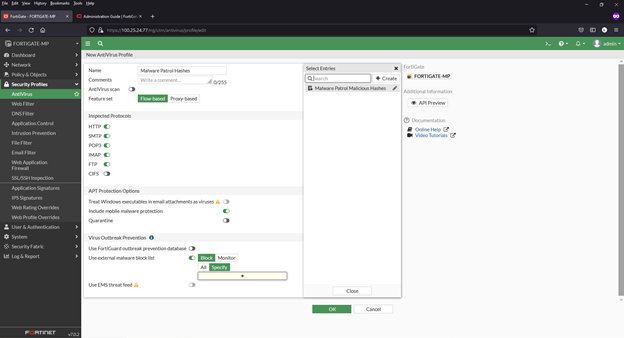
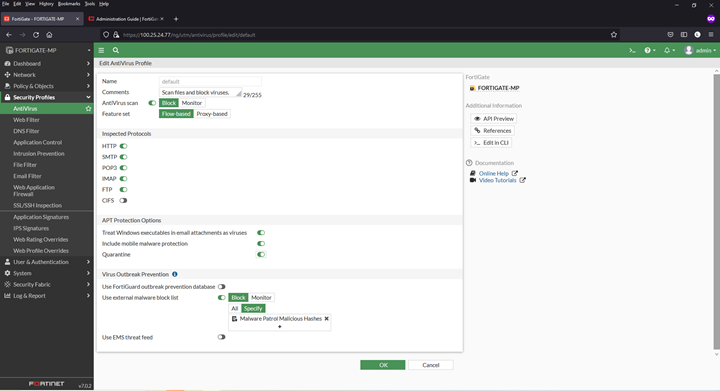
6) Click “OK” to save
FortiGate AntiVirus details: https://docs.fortinet.com/document/fortigate/7.0.2/administration-guide/913906/external-blocklist-file-hashes
Adding a URL blocklist to the web filter
1) Navigate to Security Profiles > Web Filter
2) Click to edit the default profile
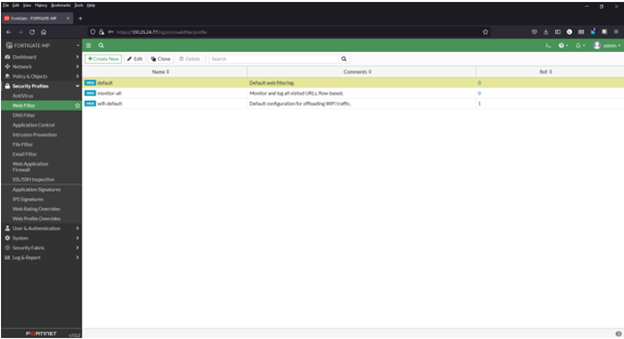
3) Select Malware Patrol Malicious URLs from FortiGuard Category Based Filter menu
4) Right click on “Disable” and select “Block” from dropdown menu
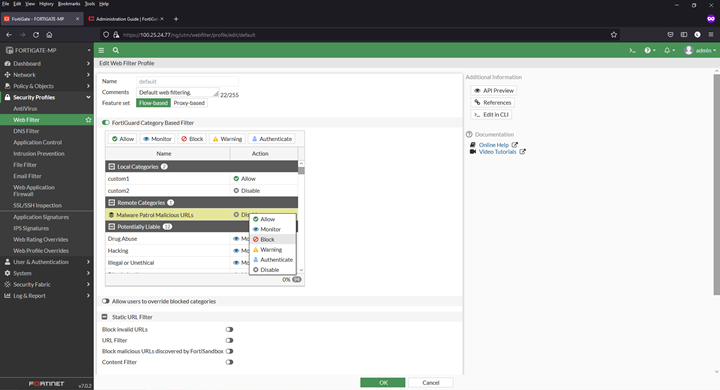
5) Click “OK” to save
FortiGate Web Filter details: https://docs.fortinet.com/document/fortigate/7.0.2/administration-guide/833698/web-filter
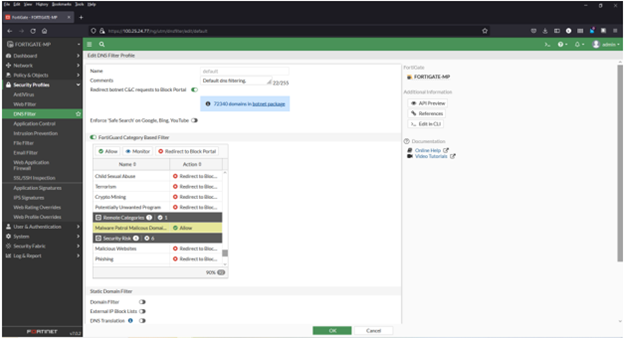
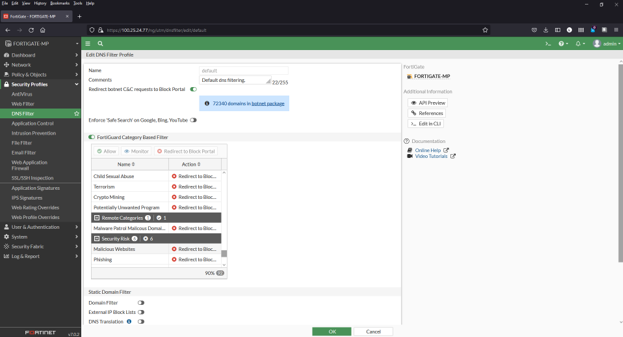
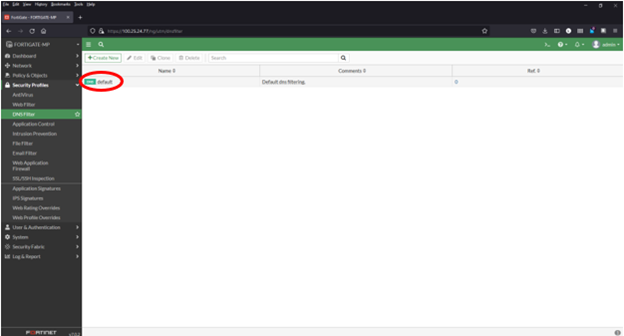
Adding a domain blocklist to the DNS filter
1) Navigate to Security Profiles > DNS Filter
2) Double click to edit the default profile
3) Select Malware Patrol Malicious Domains from FortiGuard Category Based Filter menu (scroll down to “Remote Categories” section)
4) Right click on “Allow” and select “Redirect to Block Portal” from dropdown menu
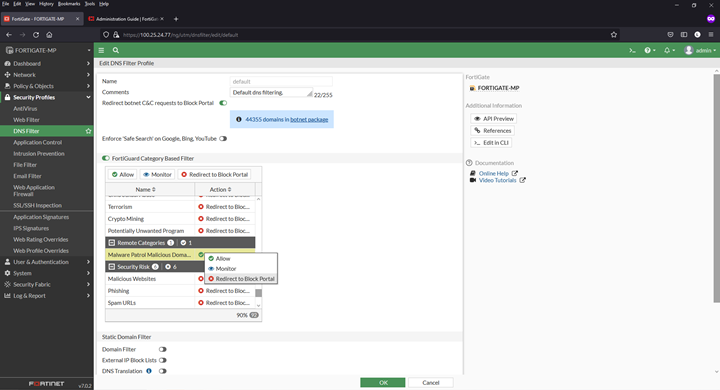
5) Click “OK” to save
FortiGate DNS Filter details: https://docs.fortinet.com/document/fortigate/7.0.2/administration-guide/605868/dns-filter
Additional resources
FortiGate Administration Guide: https://docs.fortinet.com/document/fortigate/7.0.2/administration-guide/954635/getting-started
FortiGate Administration Guide, threat data feeds: https://docs.fortinet.com/document/fortigate/7.0.2/administration-guide/9463
/threat-feeds
Excellent walk-through video for adding and enabling external threat feeds: Configure and use 3rd Party threat feeds on a FortiGate Firewall by GraniteDan https://youtu.be/CarI6_URN90
FortiSIEM Configuration Guide (Enterprise Customers)
Malware Patrol + FortiSIEM
Malware Patrol offers (5) Enterprise* feeds formatted for integration into FortiSIEM. This allows users to combine the quality of Fortinet’s SIEM security platform with the protection from our threat intelligence. Customers can choose the feed(s) that meet their needs:
- DNS-over-HTTPS (DoH) Servers (domains)
- Malicious Domains
- Malicious Hashes
- Malicious IPs
- Malware/Ransomware URLs
*These feeds are not available for free or paid blocklists, or Business Protect customers. Find more details about our Enteprise offerings here.
We offer free evaluations of our Enterprise feeds, including those for FortiSIEM. To request your evaluation, complete our request form.
About FortiSIEM
“FortiSIEM brings together visibility, correlation, automated response, and remediation in a single, scalable solution. It reduces the complexity of managing network and security operations to effectively free resources, improve breach detection, and even prevent breaches. What’s more is that [the] architecture enables unified data collection and analytics from diverse information sources including logs, performance metrics, security alerts, and configuration changes. FortiSIEM combines the analytics traditionally monitored in separate silos of the security operations center (SOC) and network operations center (NOC) for a more holistic view of the security and availability of the business.” “FortiGuard Threat Intelligence and Indicators of Compromise (IOC) and Threat Intelligence (TI) feeds from commercial, open source, and custom data sources integrate easily into the security TI framework. This grand unification of diverse sources of data enables organizations to rapidly identify root causes of threats, and take the steps necessary to remediate and prevent them in the future. Steps can often be automated with new Threat Mitigation Libraries for many Fortinet products. External Threat Intelligence Integrations
- APIs for integrating external threat feed intelligence Malware domains, IPs, URLs, hashes, Tor nodes
- Built-in integration for popular threat intelligence sources — ThreatStream, CyberArk, SANS, Zeus, ThreatConnect
- Technology for handling large threat feeds incremental download and sharing within cluster, real-time pattern
matching with network traffic. All STIX and TAXII feeds are supported”
Adding External TI to FortiSIEM
DNS-over-HTTPS (DoH) Domains
Benefits of the Malware Patrol DoH Data Feed
We developed this feed to help security teams monitor the use of DoH in their environment. Our tools actively search for new DoH servers on a continuous basis to keep this data fresh. DoH allows users to bypass the DNS-level controls and internet usage policies put in place to protect your network against known threats and threat actors are taking advantage of this by using DoH for C2 server connections, for example. As such, both incoming and outgoing DoH traffic should be closely monitored for indications of malicious activity.
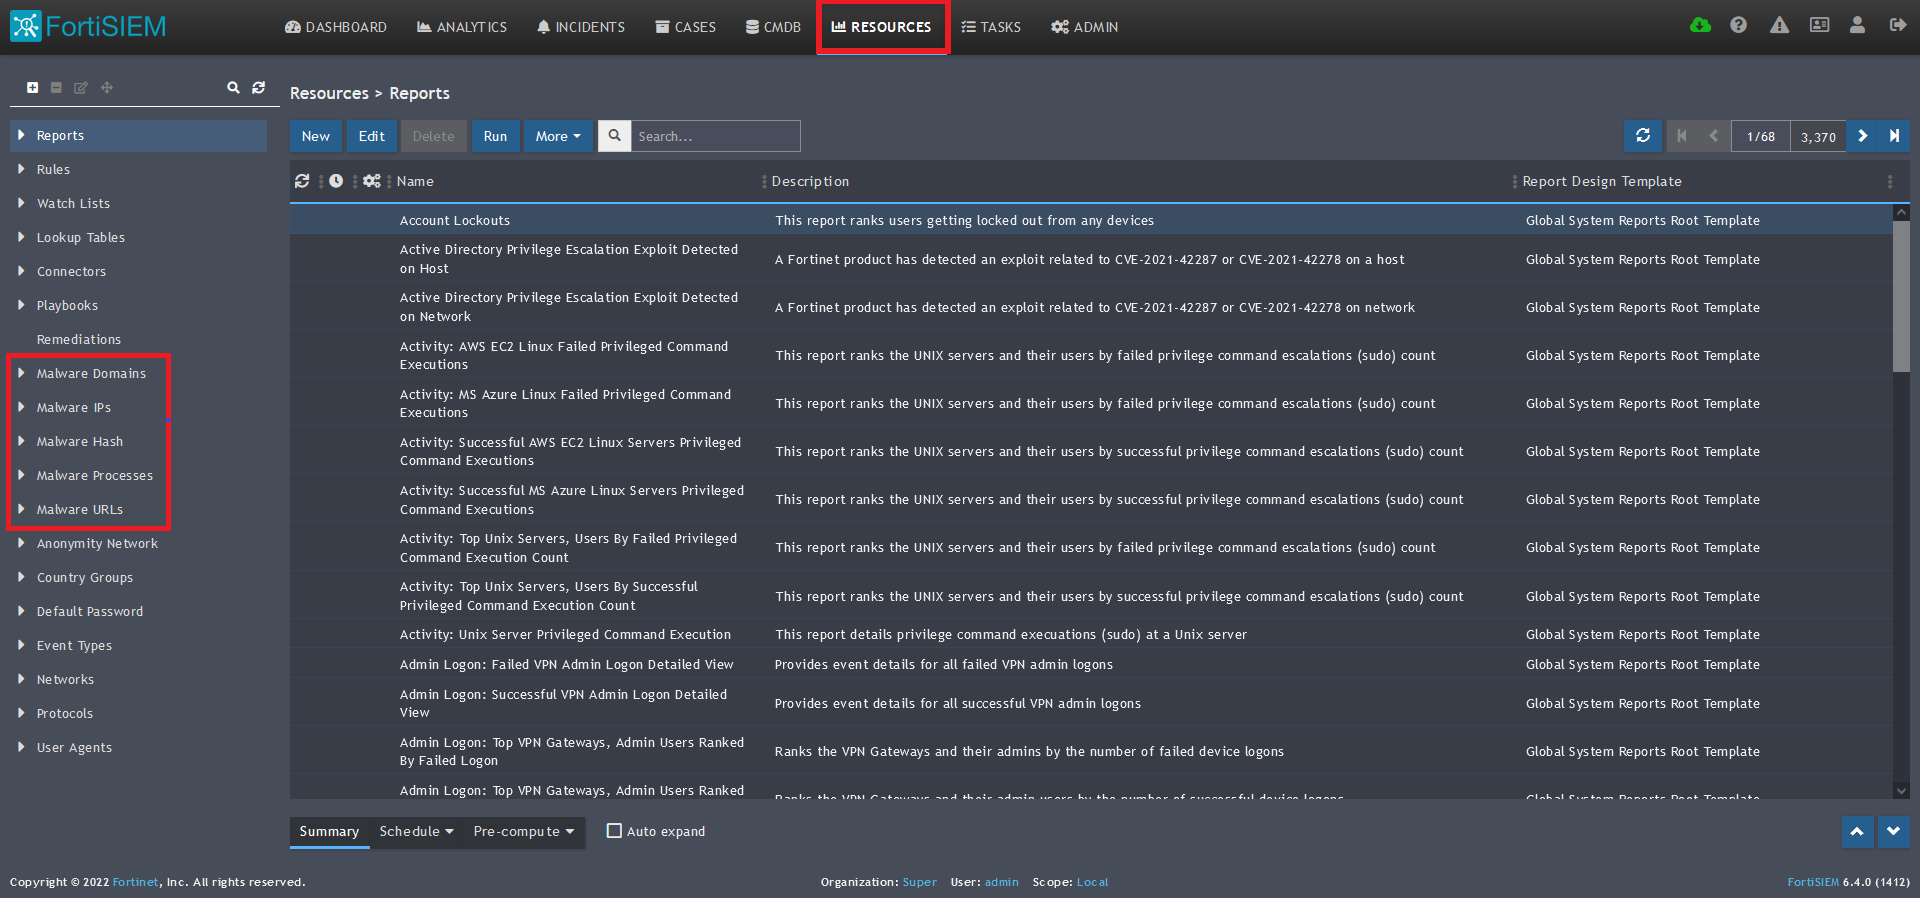
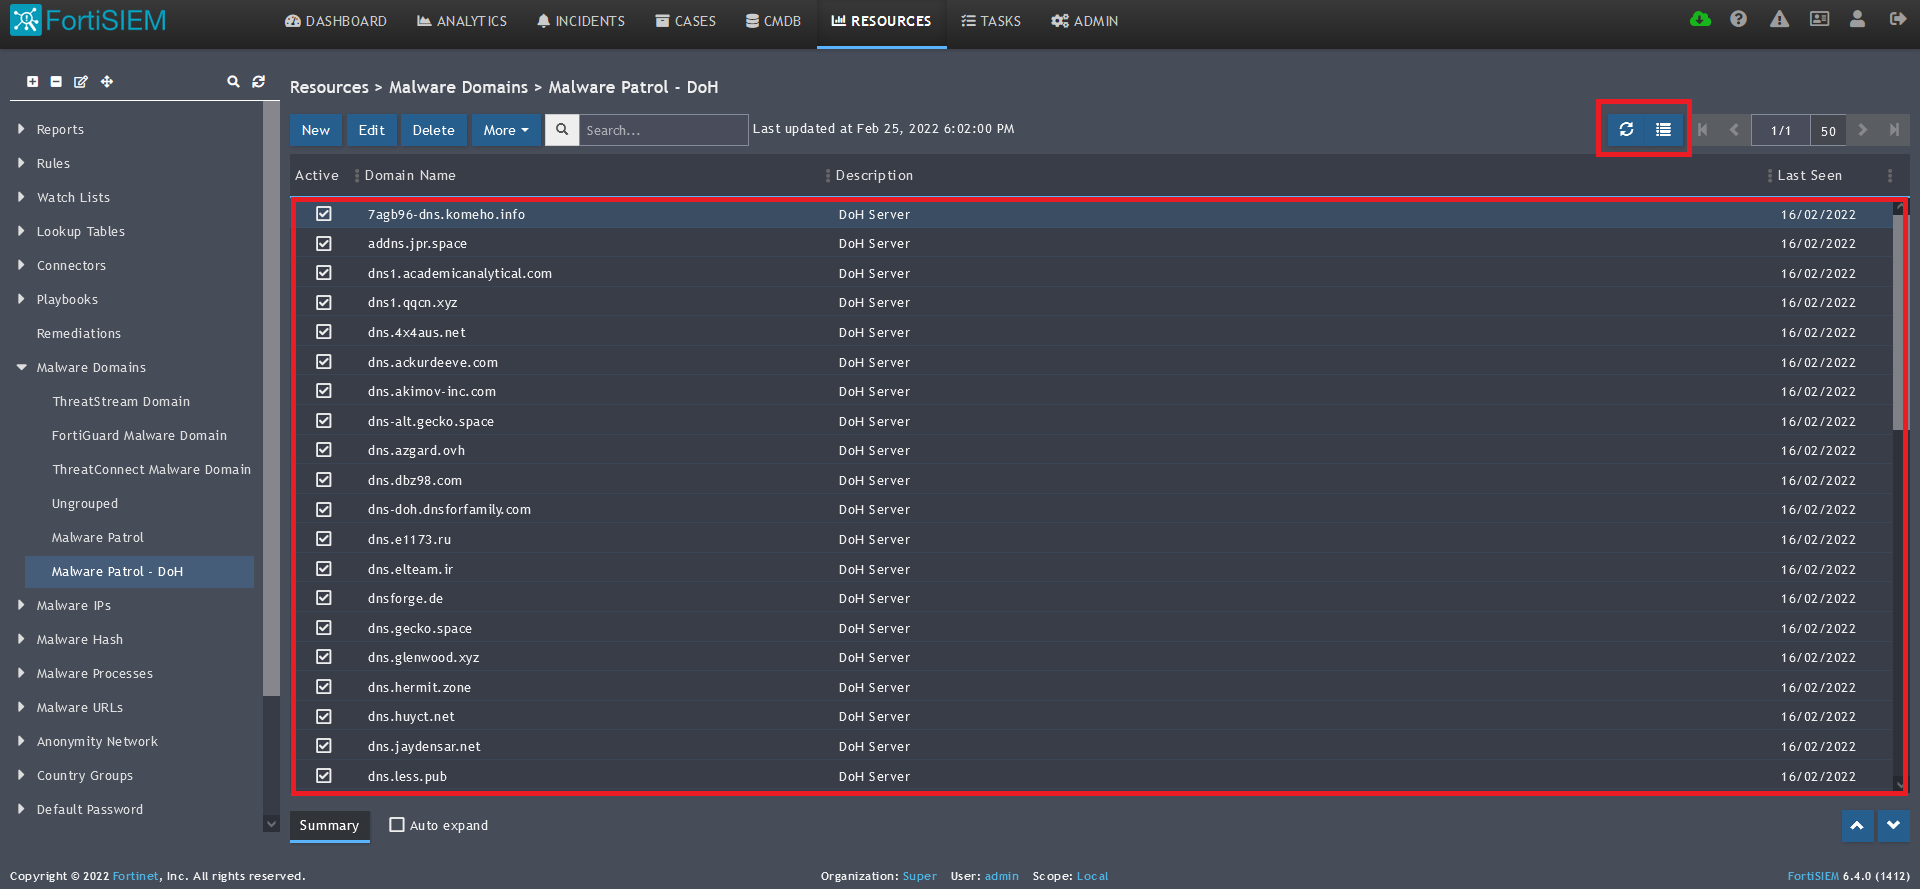
1) From the FortiSIEM dashboard, navigate to Resources in the top navigation menu. On the left side menu that appears, you will see the types of IoC feeds that can be integrated.
2) Select Malware Domains from the menu on the left.
3) Click + button at the upper left-hand side of this side menu to add a new Malware Domains group. 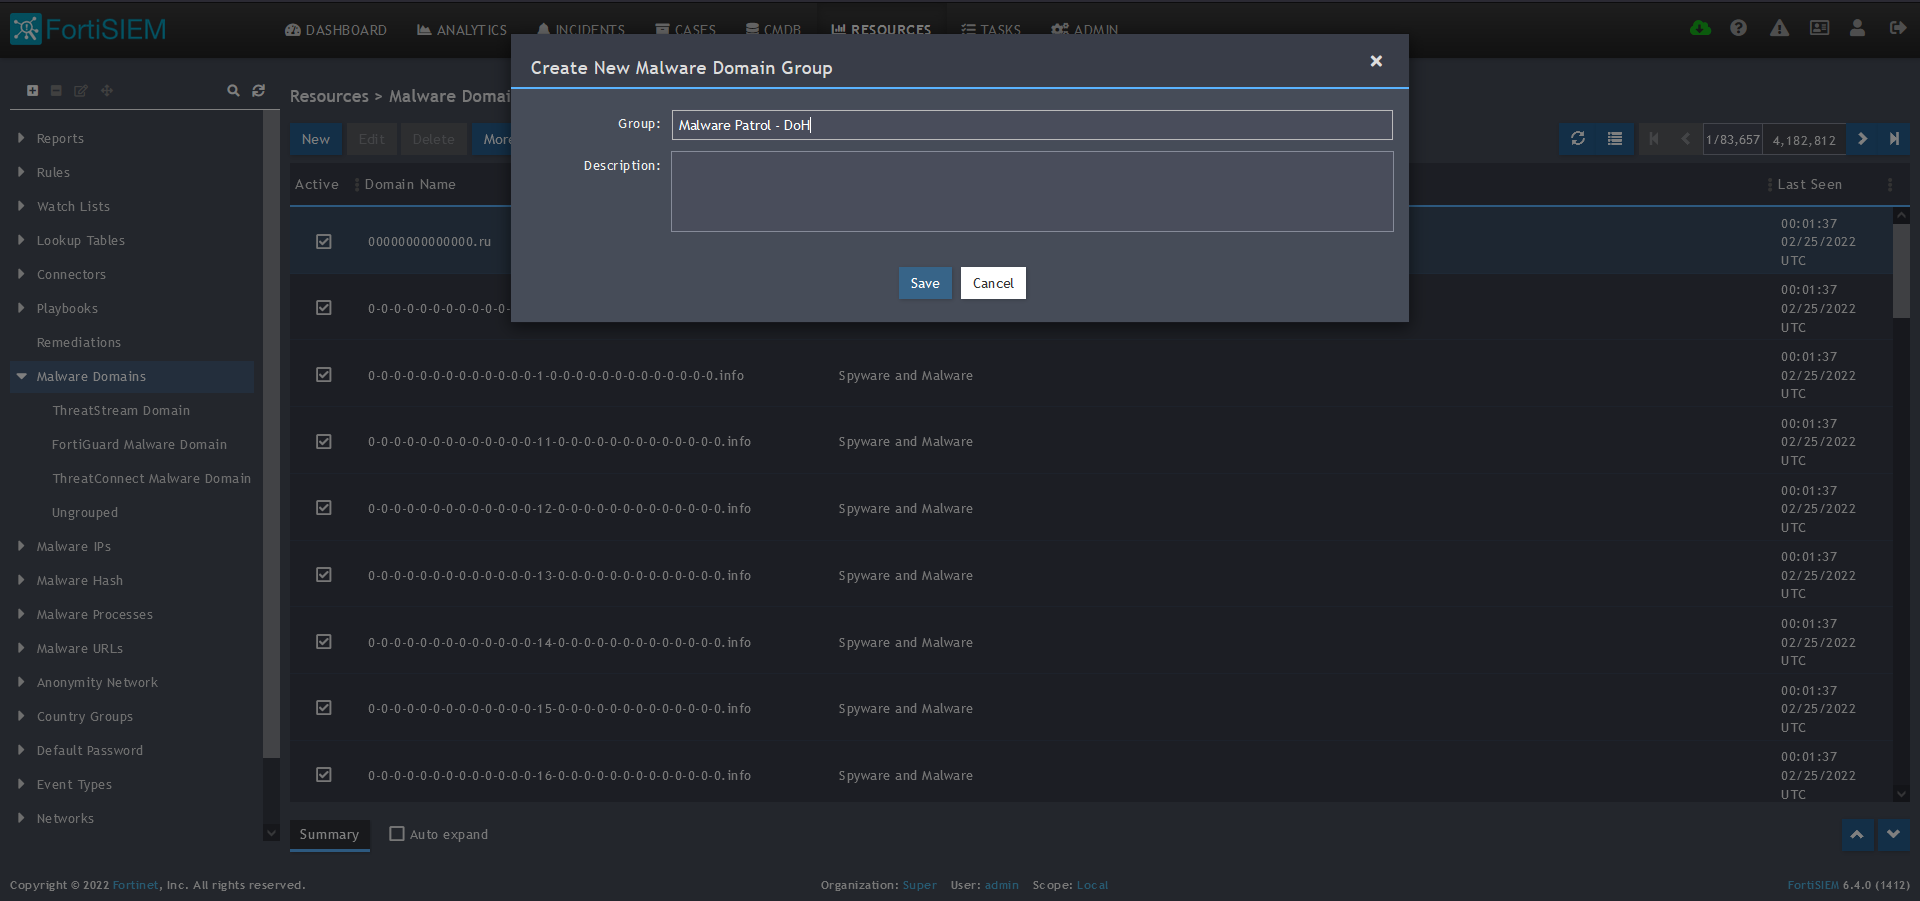
4) Enter a group name. We will use Malware Patrol – DoH to distinguish this feed from the Malware Patrol Malicious Domains previously entered.
5) Click save. The Malware Patrol – DoH group will now appear under the Malware Domains section. 
6) Select/highlight the Malware Patrol group and then More from the top menu.
7) Select Update from the drop-down menu. 
8) On the screen that pops up choose Update via API and click on the edit (pencil) button. 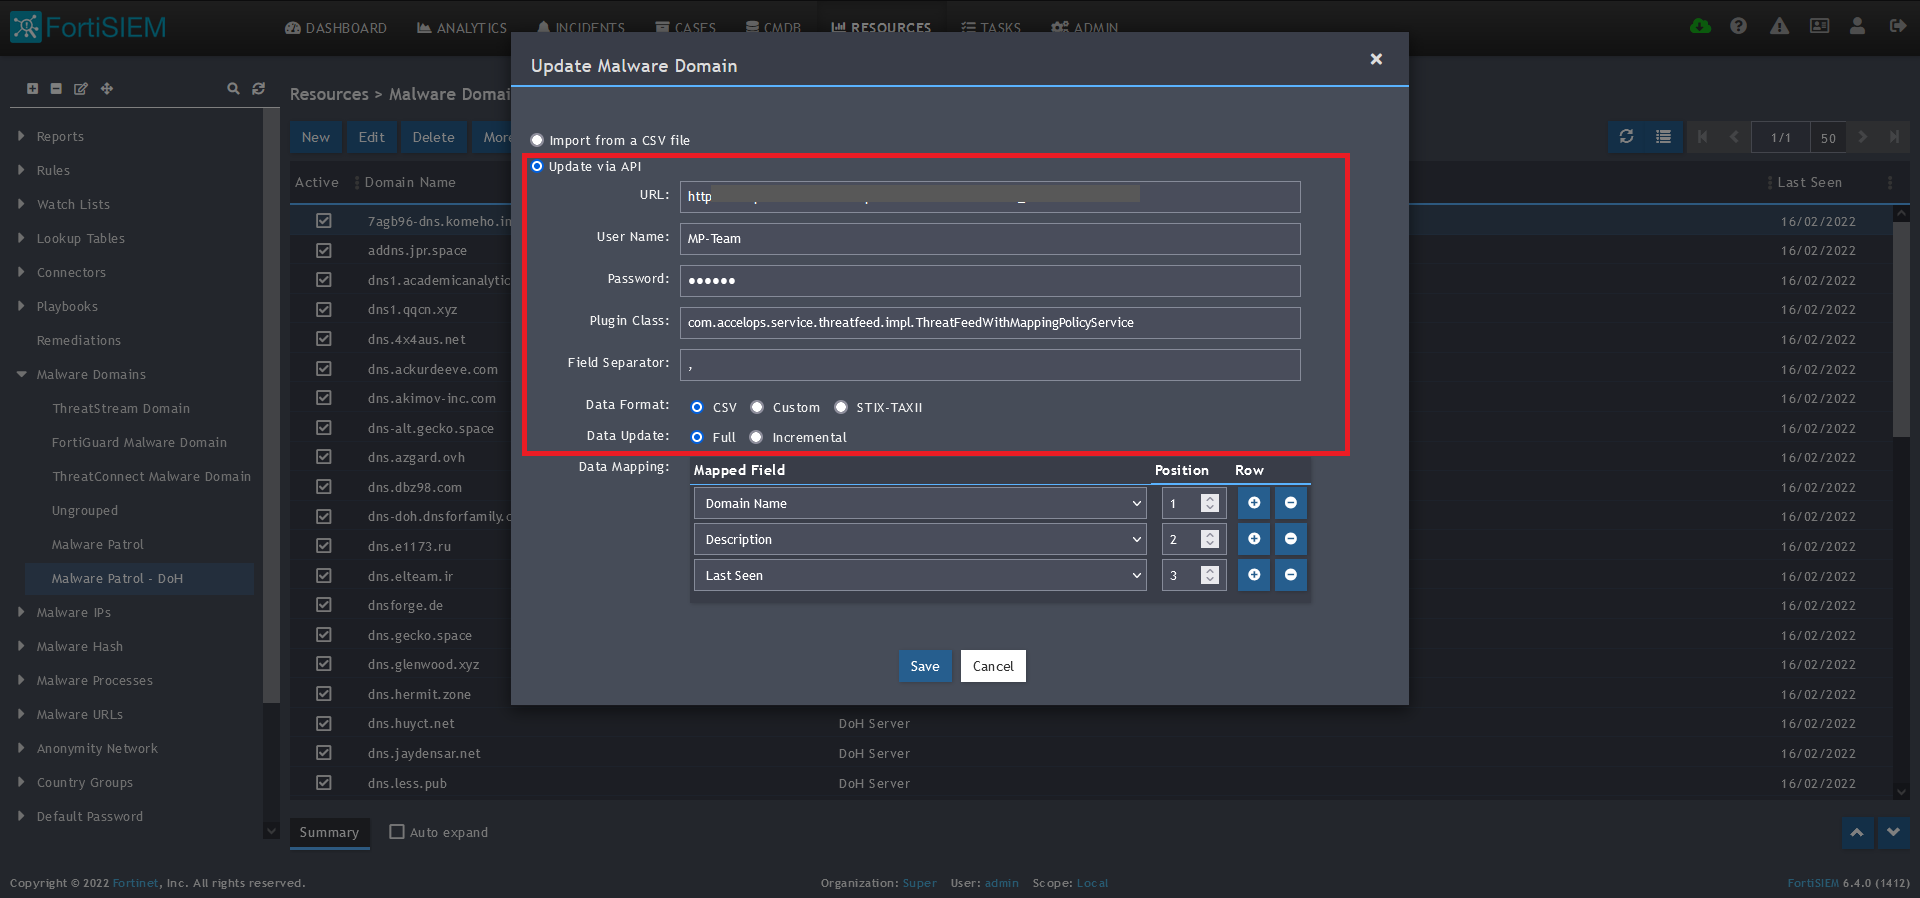
9) Enter the following to set up the feed update:
- URL of your Malware Patrol DoH feed or evaluation feed. This can be obtained by right clicking on the feed’s link in the Malware Patrol customer or evaluation portal.
- Your Malware Patrol portal username and password
- Plugin Class: no changes
- Field separator: ,
- Data format: CSV
- Data update: Full
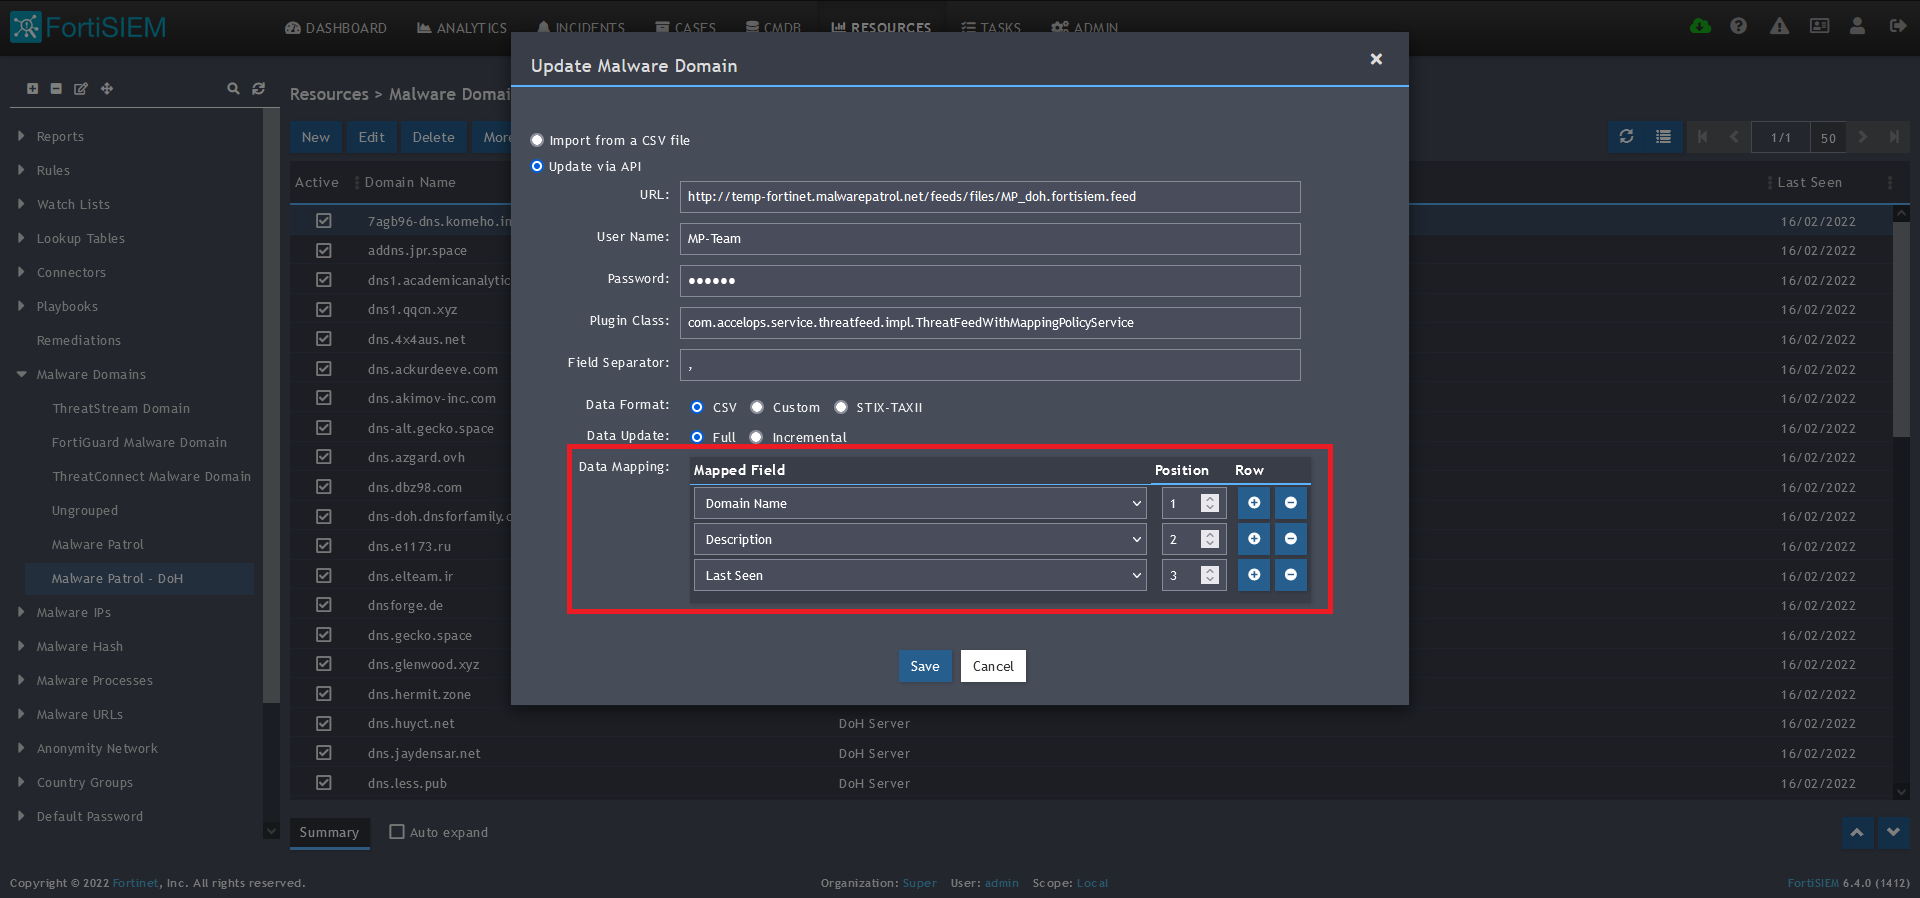 10) In the Data Mapping section, match the following:
- Domain Name, Position 1
- Description, Position 2
- Last Seen, Position 3
11) Click Save 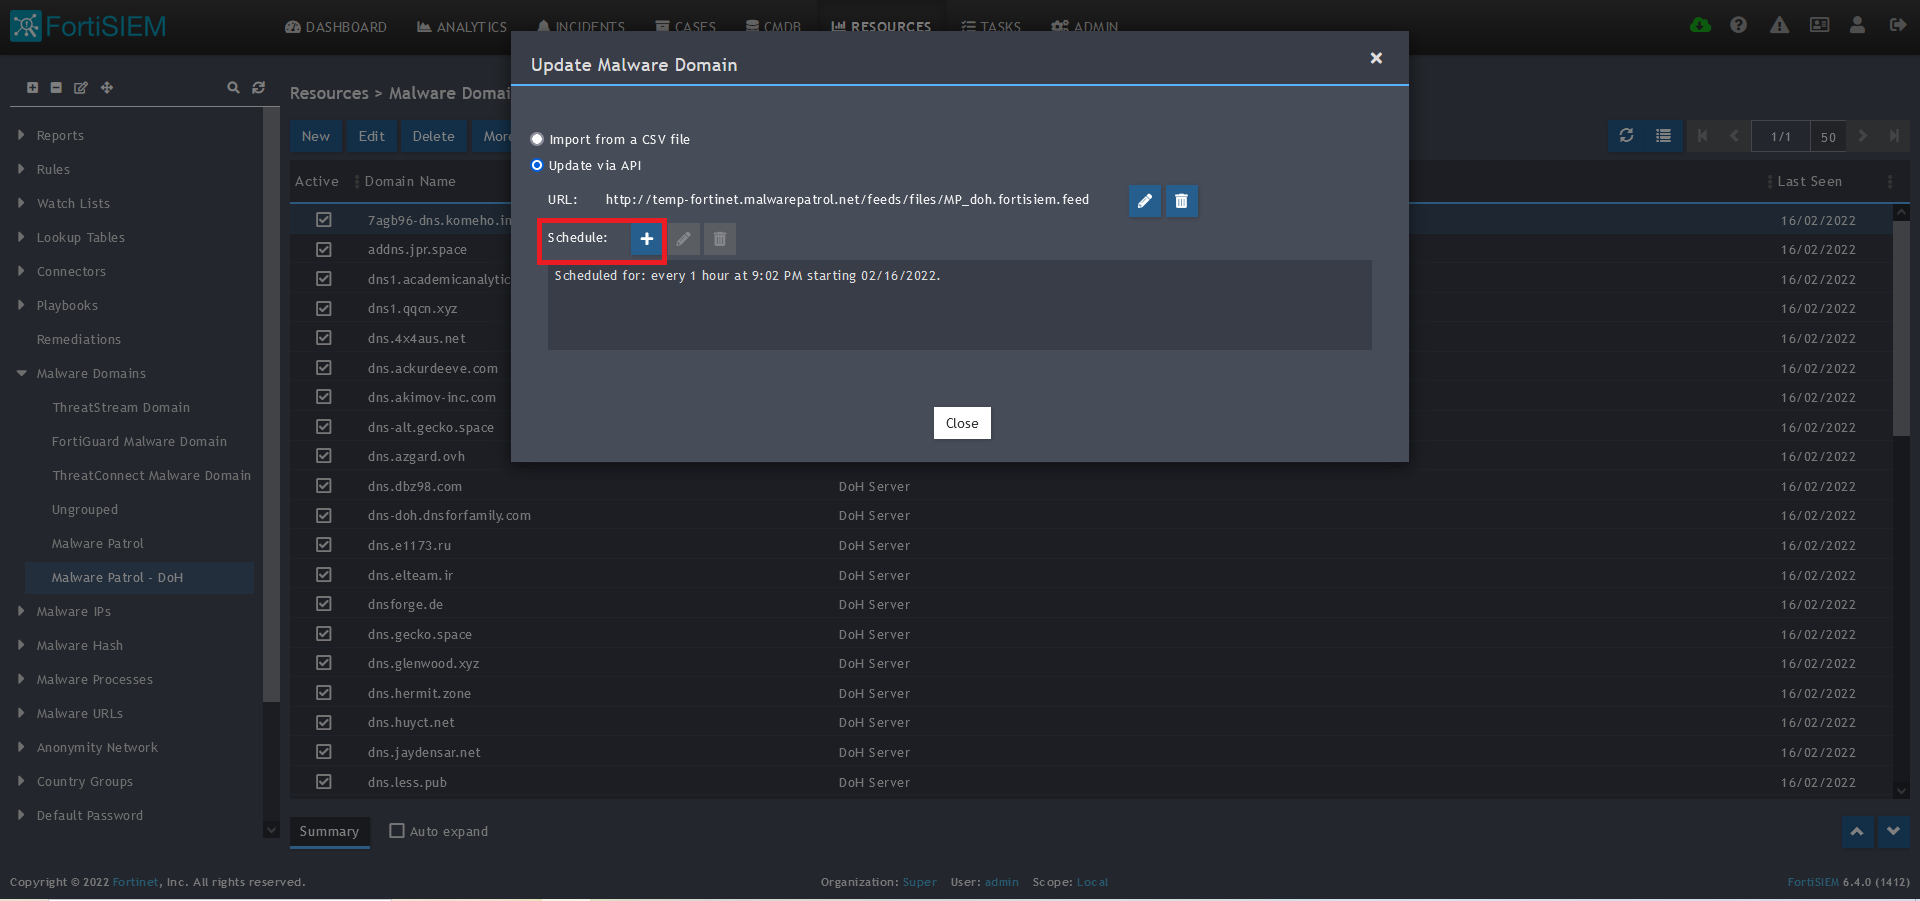
12) Click on the Schedule: + button 
13) On the screen that pops up, enter:
- Start Time: Set a start time a few minutes from the current time. This will cause the data to be updated after your setup is complete
- Recurrence Pattern: Hourly, Every 1 Hour (Malware Patrol feeds are updated on an hourly basis)
- Recurrence:
- Start From: Today’s Date
- End Date: No End Date
- Click Save
 14) The data will populate at the start time set above. If it does not, click the Refresh button at the top of the data display area. Another option is to go back to the schedule settings to verify the time you set for the updates to begin. You can set another time a few minutes in the future.
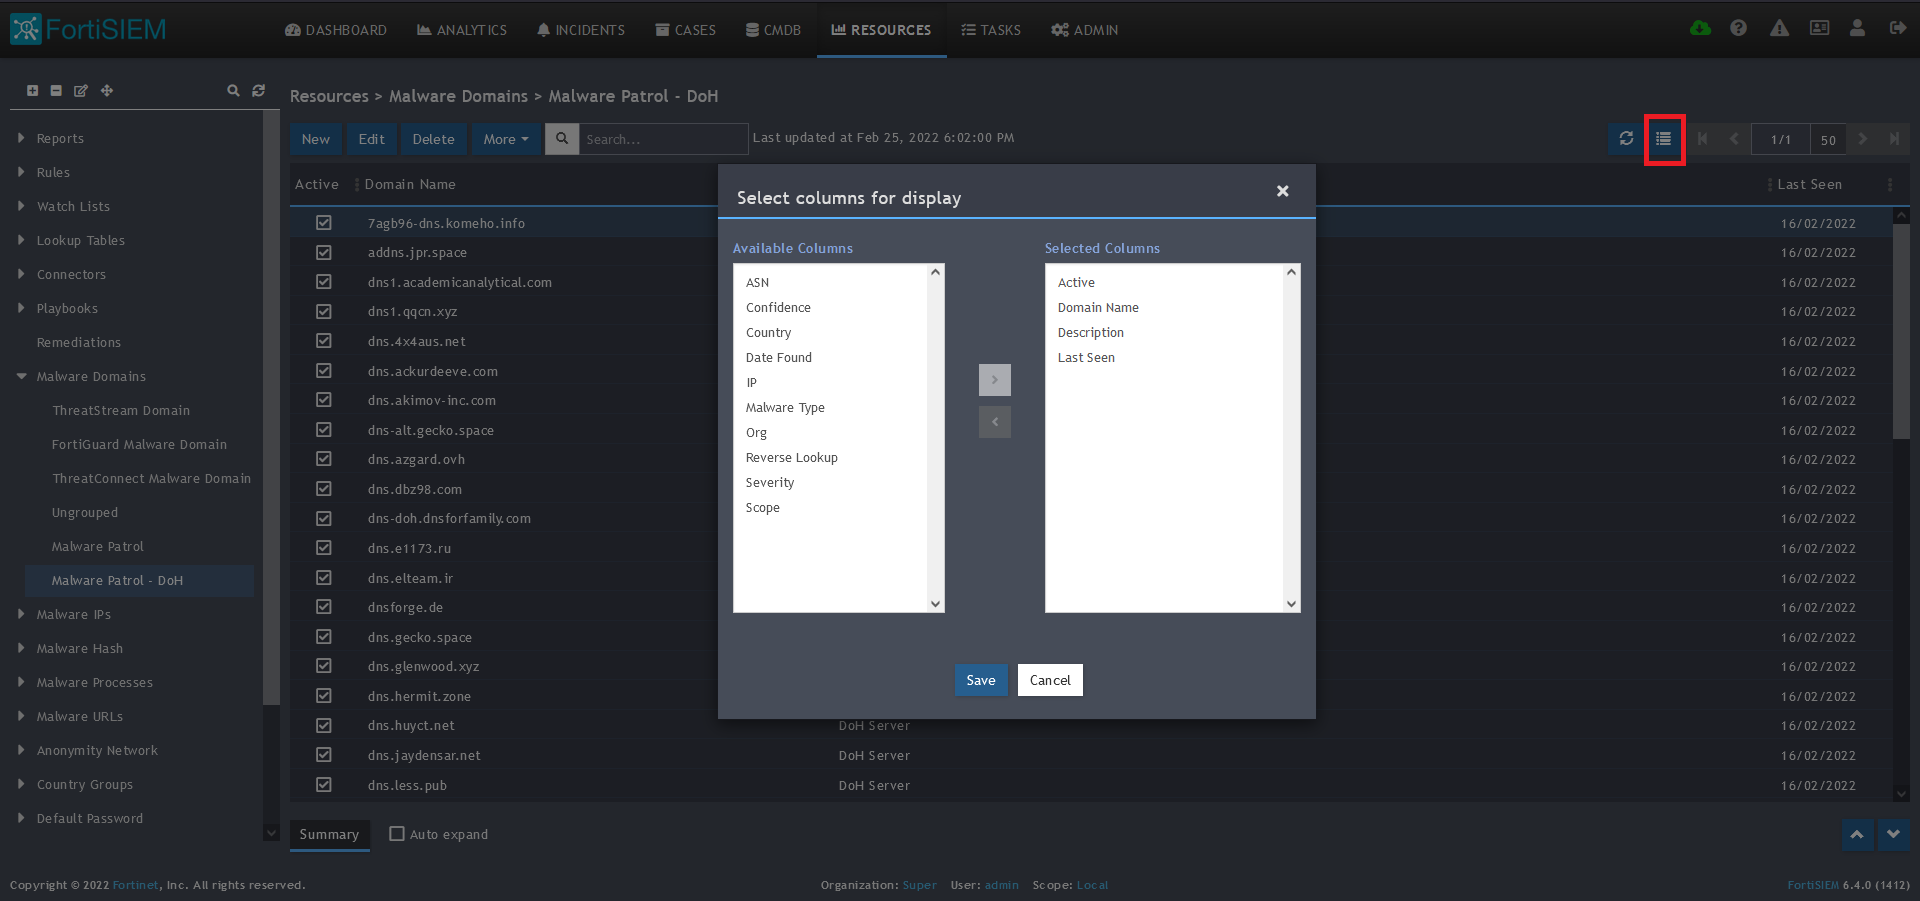
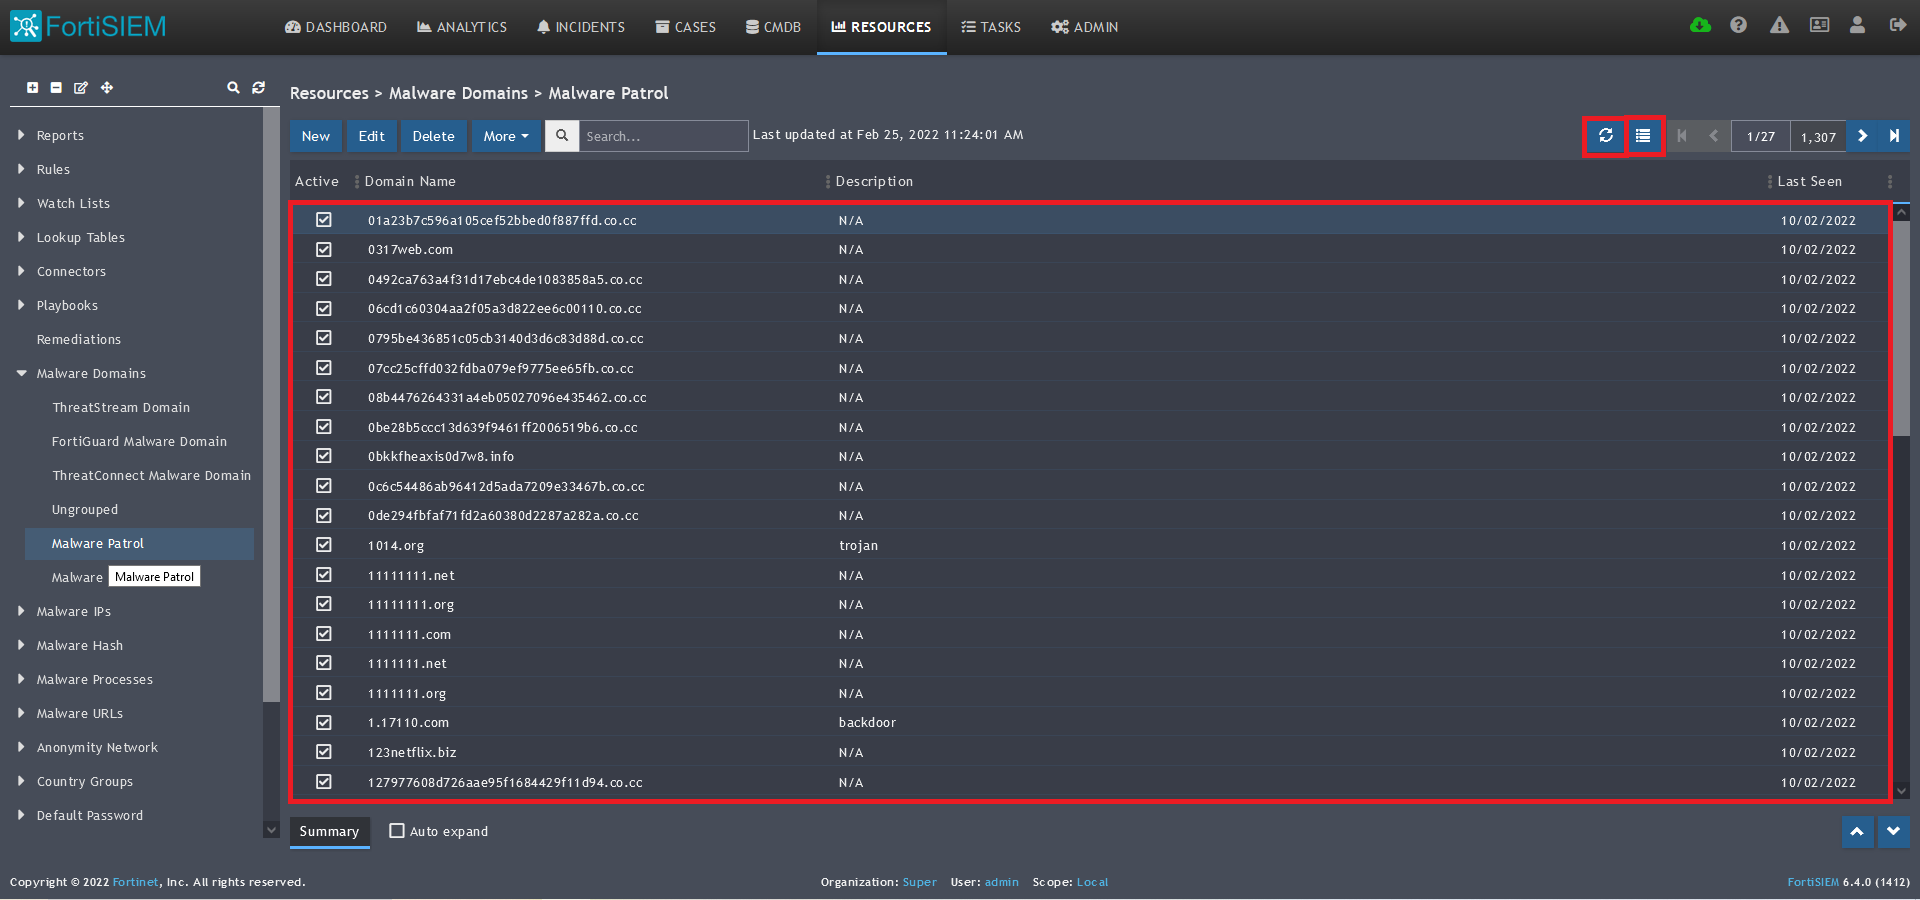
15) To change the columns displayed once the data populates, click on the Select Columns button located beside the refresh button. Use the data mapping information from the setup process to know which fields are available in the Malware Patrol feed.
Malicious Domains
Benefits of the Malware Patrol Malicious Domains Data Feed
This Malware Patrol feed contains domains actively involved in malicious activities. The data is derived from five of our Enterprise feeds: 1) Anti-Mining, 2) Command & Control (C2) Addresses, 3) Domain Names Generated via DGAs, 4) Malware & Ransomware URLs, and 5) Phishing URLs. Network traffic associated with these domains is highly likely to be malicious.
1) From the FortiSIEM dashboard, navigate to Resources in the top navigation menu. On the left side menu that appears, you will see the types of IoC feeds that can be integrated.
2) Select Malware Domains from the menu on the left.
3) Click + button at the upper left-hand side of this side menu to add a new Malware Domains group.
4) Enter a group name. We will use Malware Patrol for this guide.
5) Click save. The Malware Patrol group will now appear under the Malware Domains section. 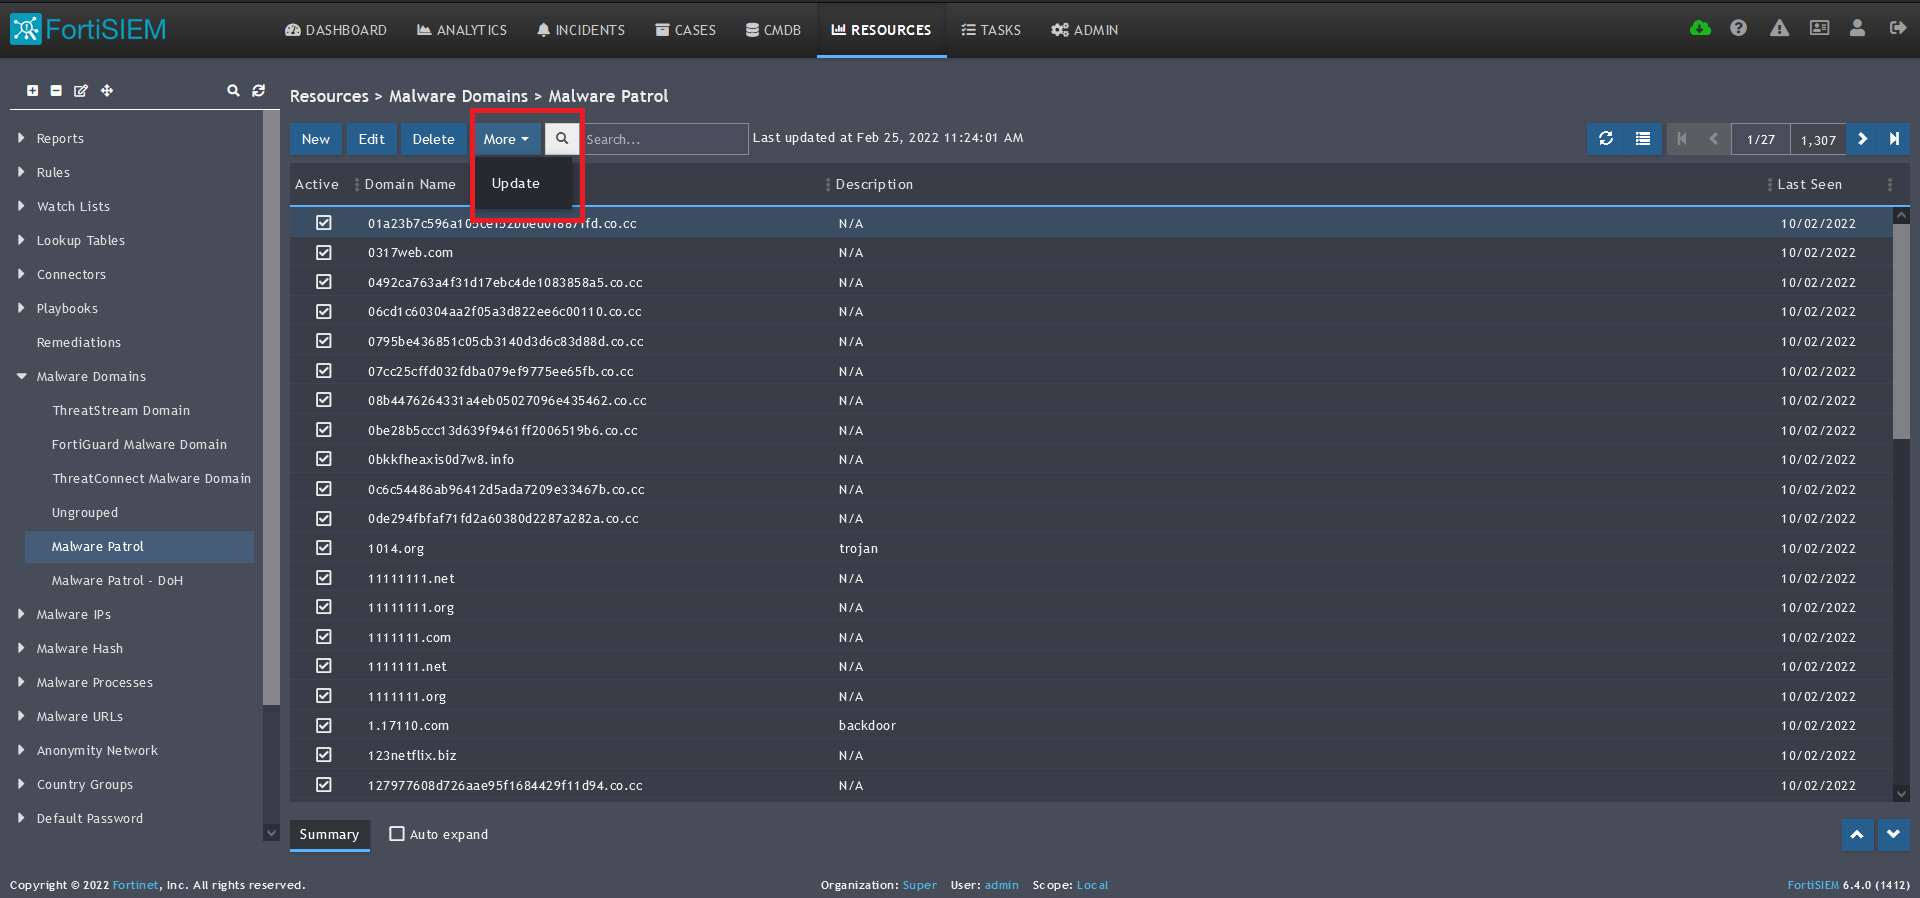 6) Select/highlight the Malware Patrol group and then More from the top menu.
7) Select Update from the drop-down menu.
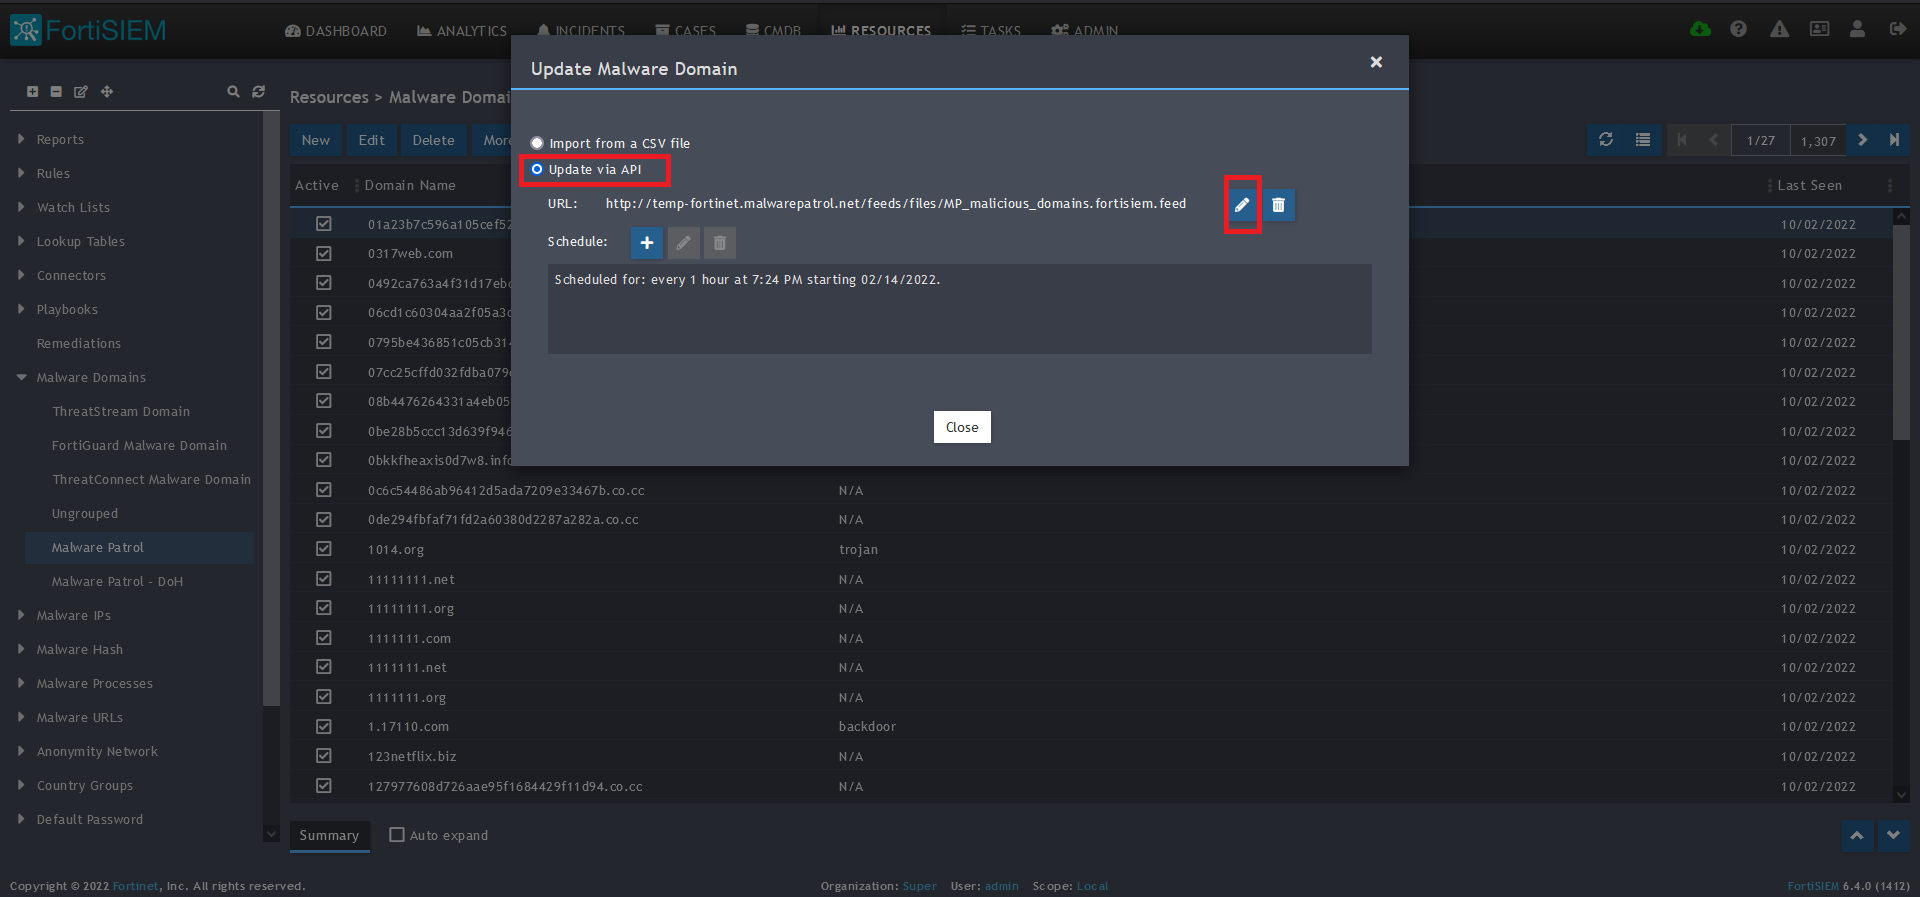 8) On the screen that pops up choose Update via API.
9) Click on the edit (pencil) button for the URL. 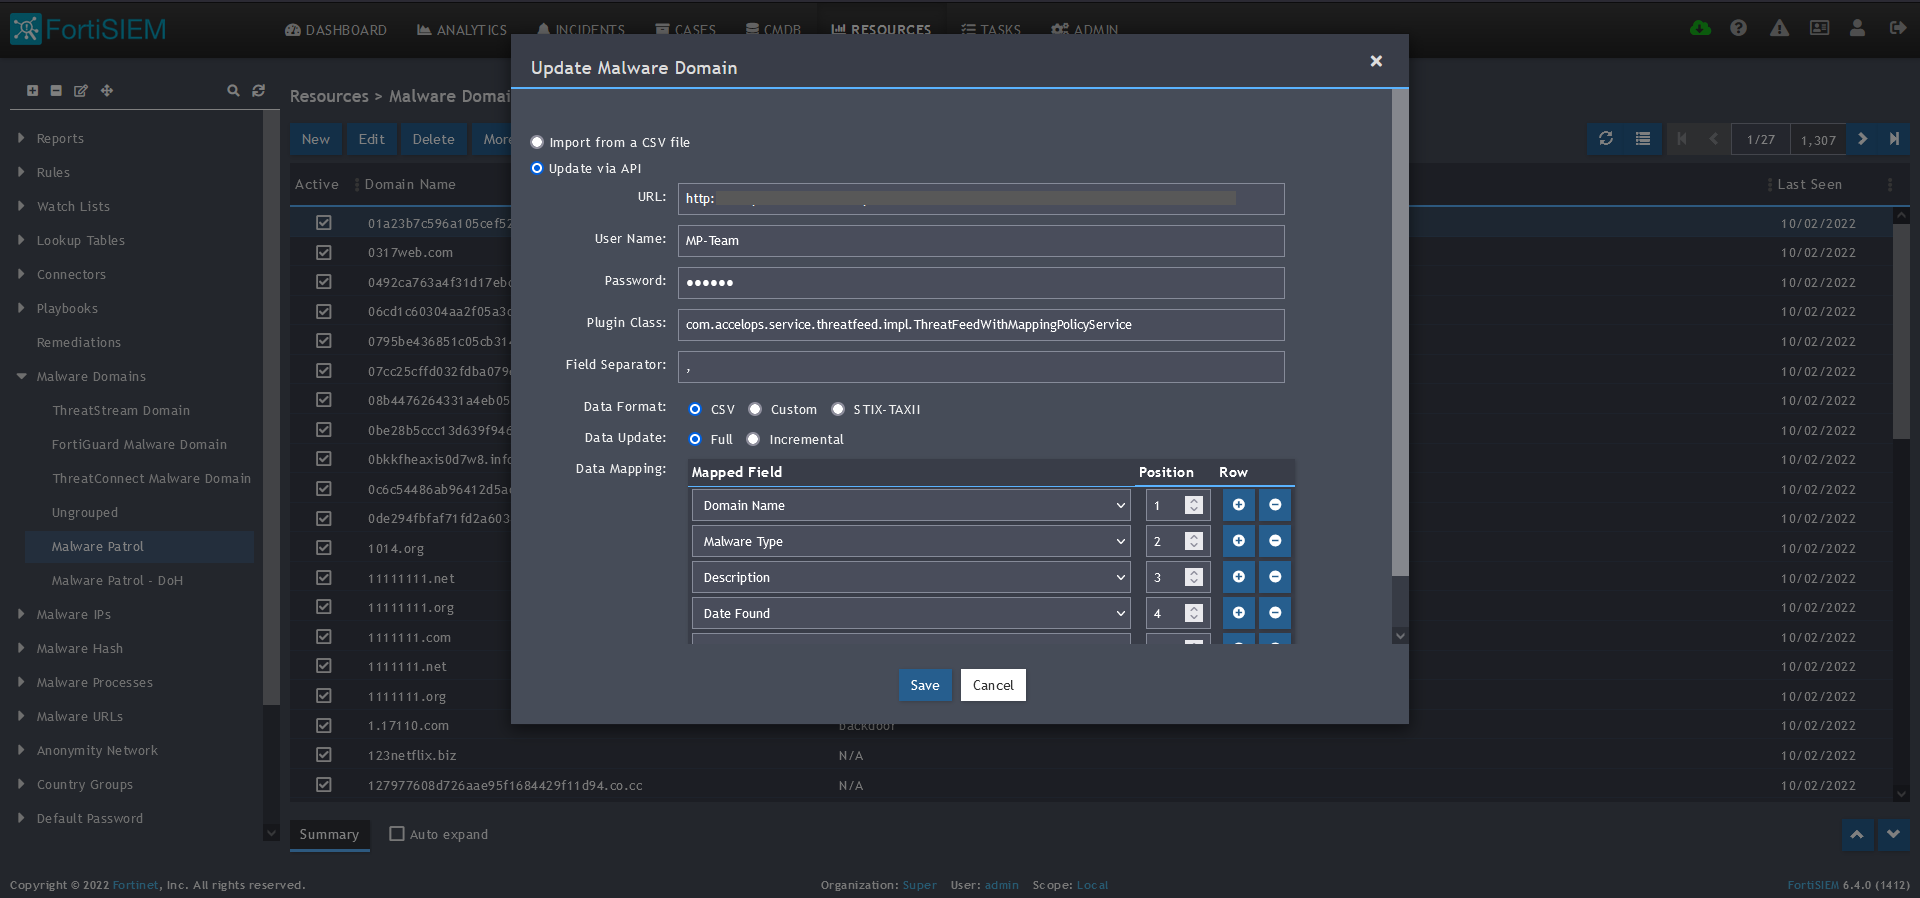
10) Enter the following to set up the feed update:
- URL of your Malware Patrol Malicious Domains feed or evaluation feed. This can be obtained by right clicking on the feed’s link in the Malware Patrol customer or evaluation portal.
- Your Malware Patrol portal username and password
- Plugin Class: no changes
- Field separator: ,
- Data format: CSV
- Data update: Full
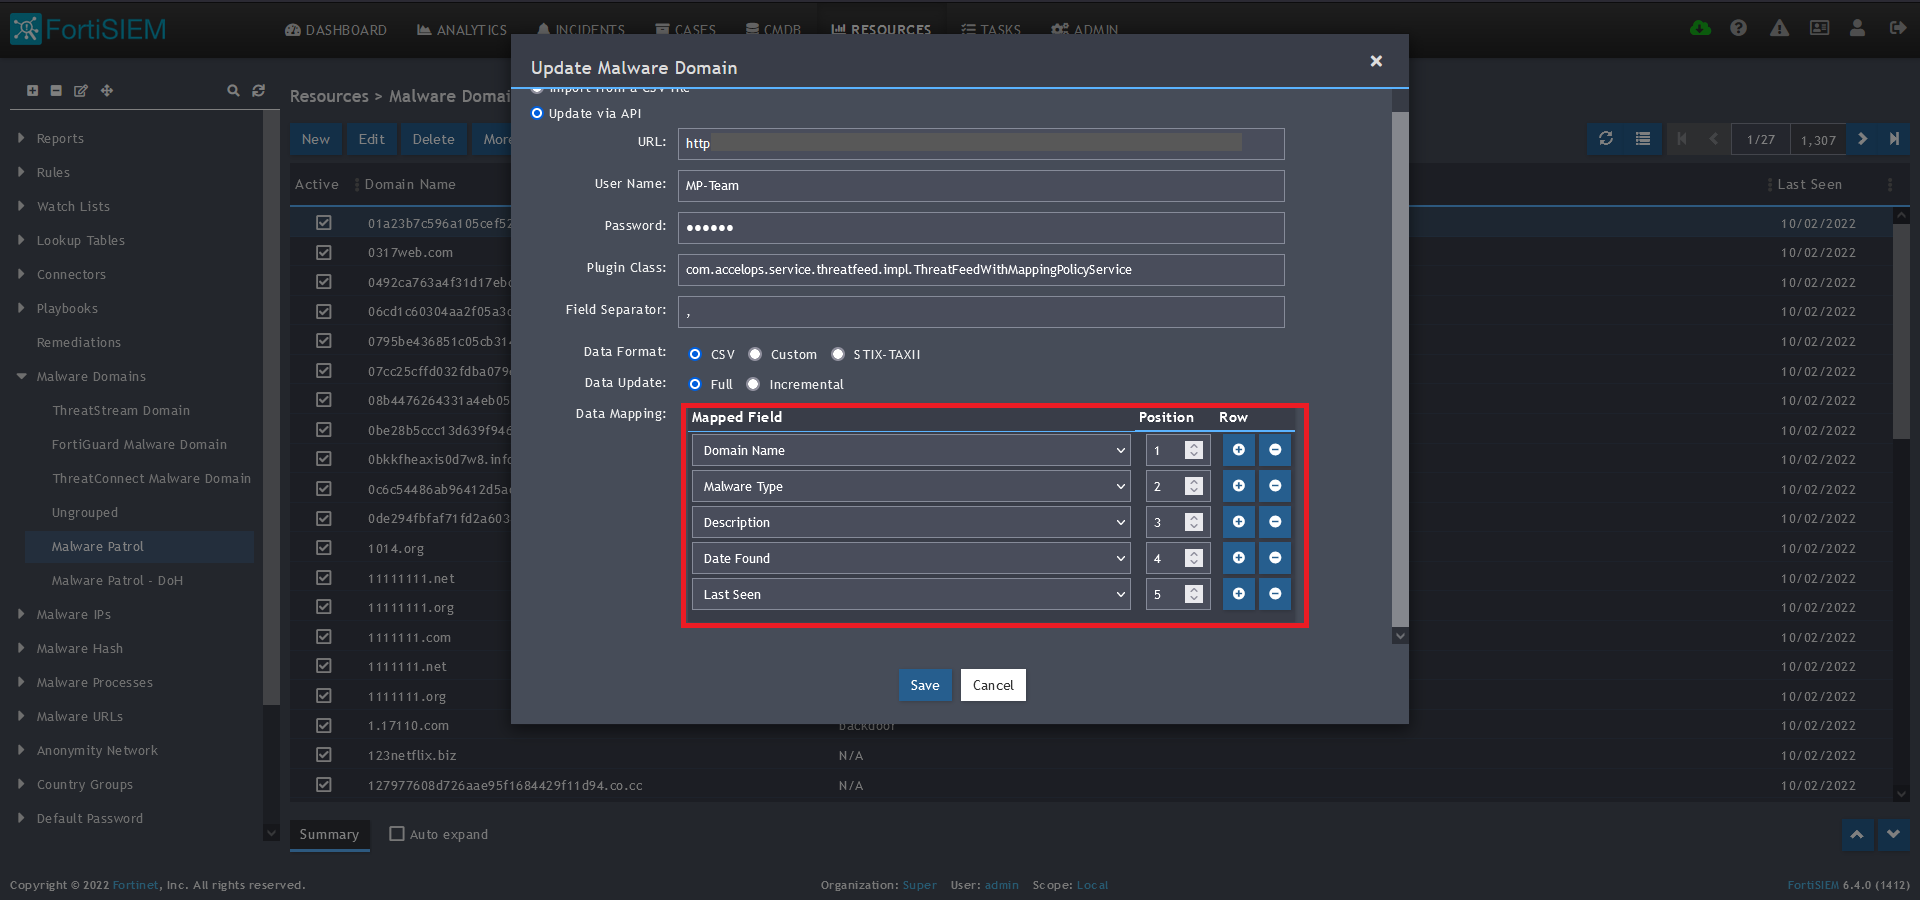 11) In the Data Mapping section, match the following:
- Domain Name, Position 1
- Malware Type, Position 2
- Description, Position 3
- Date Found, Position 4
- Last Seen, Position 5
12) Click Save
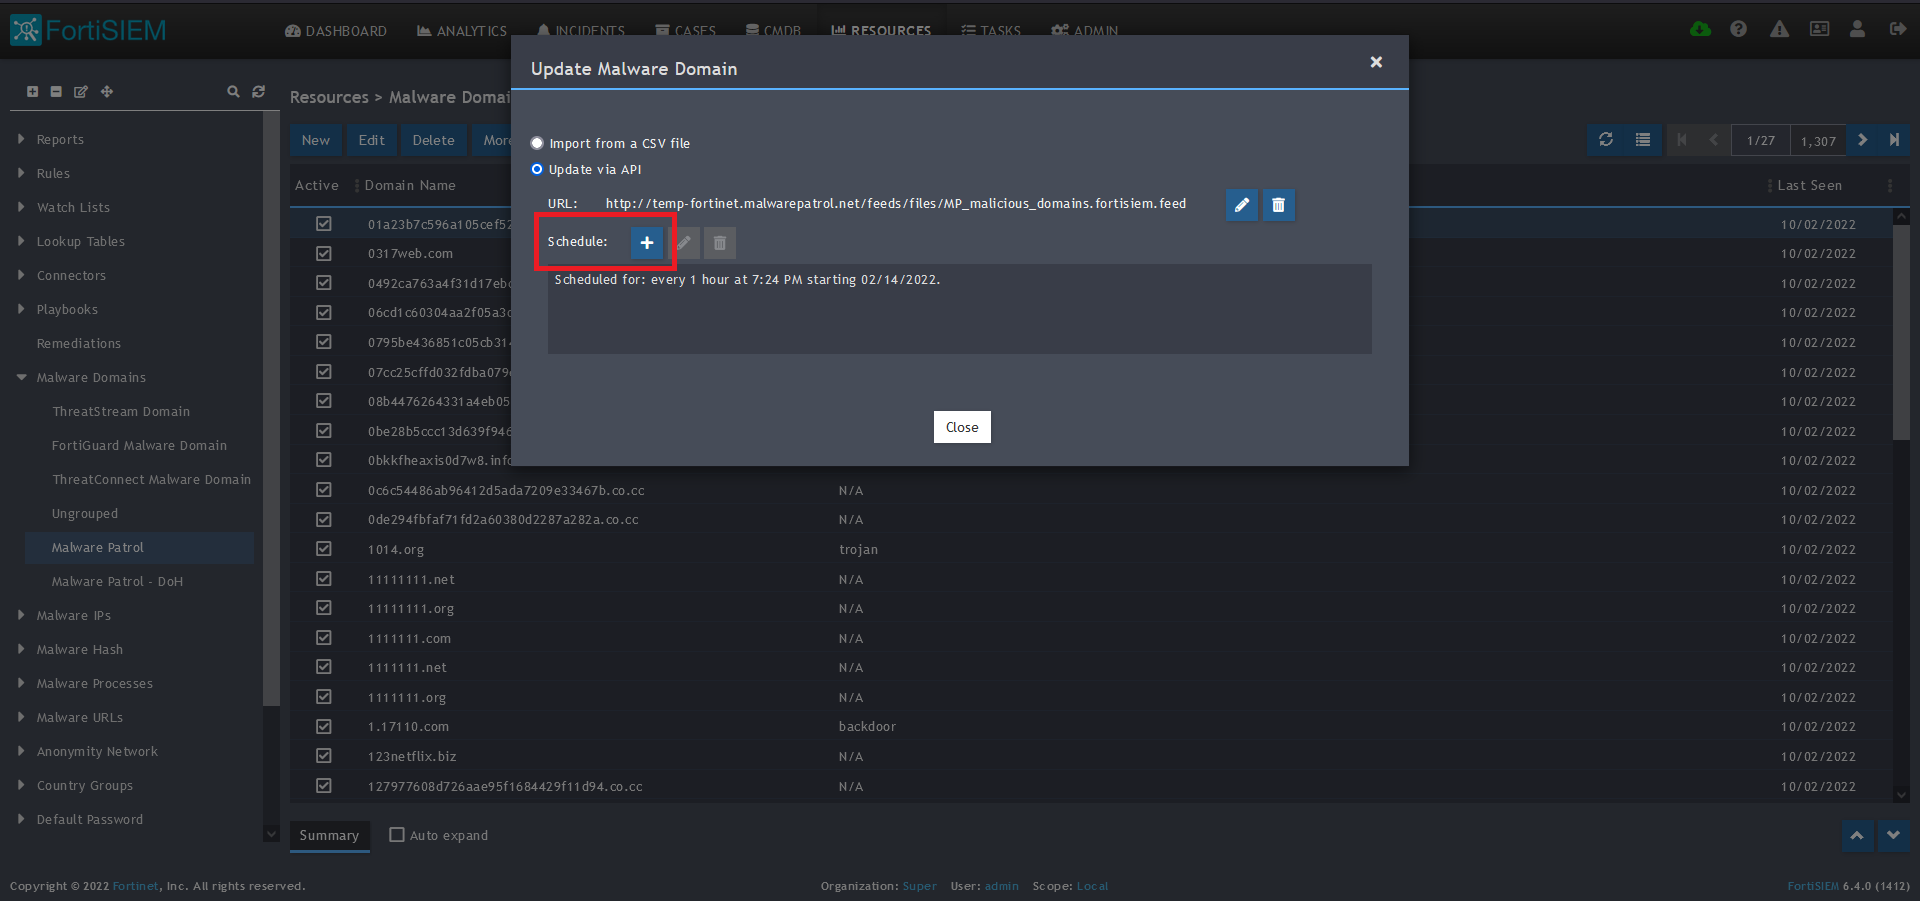 13) Click on the Schedule: + button
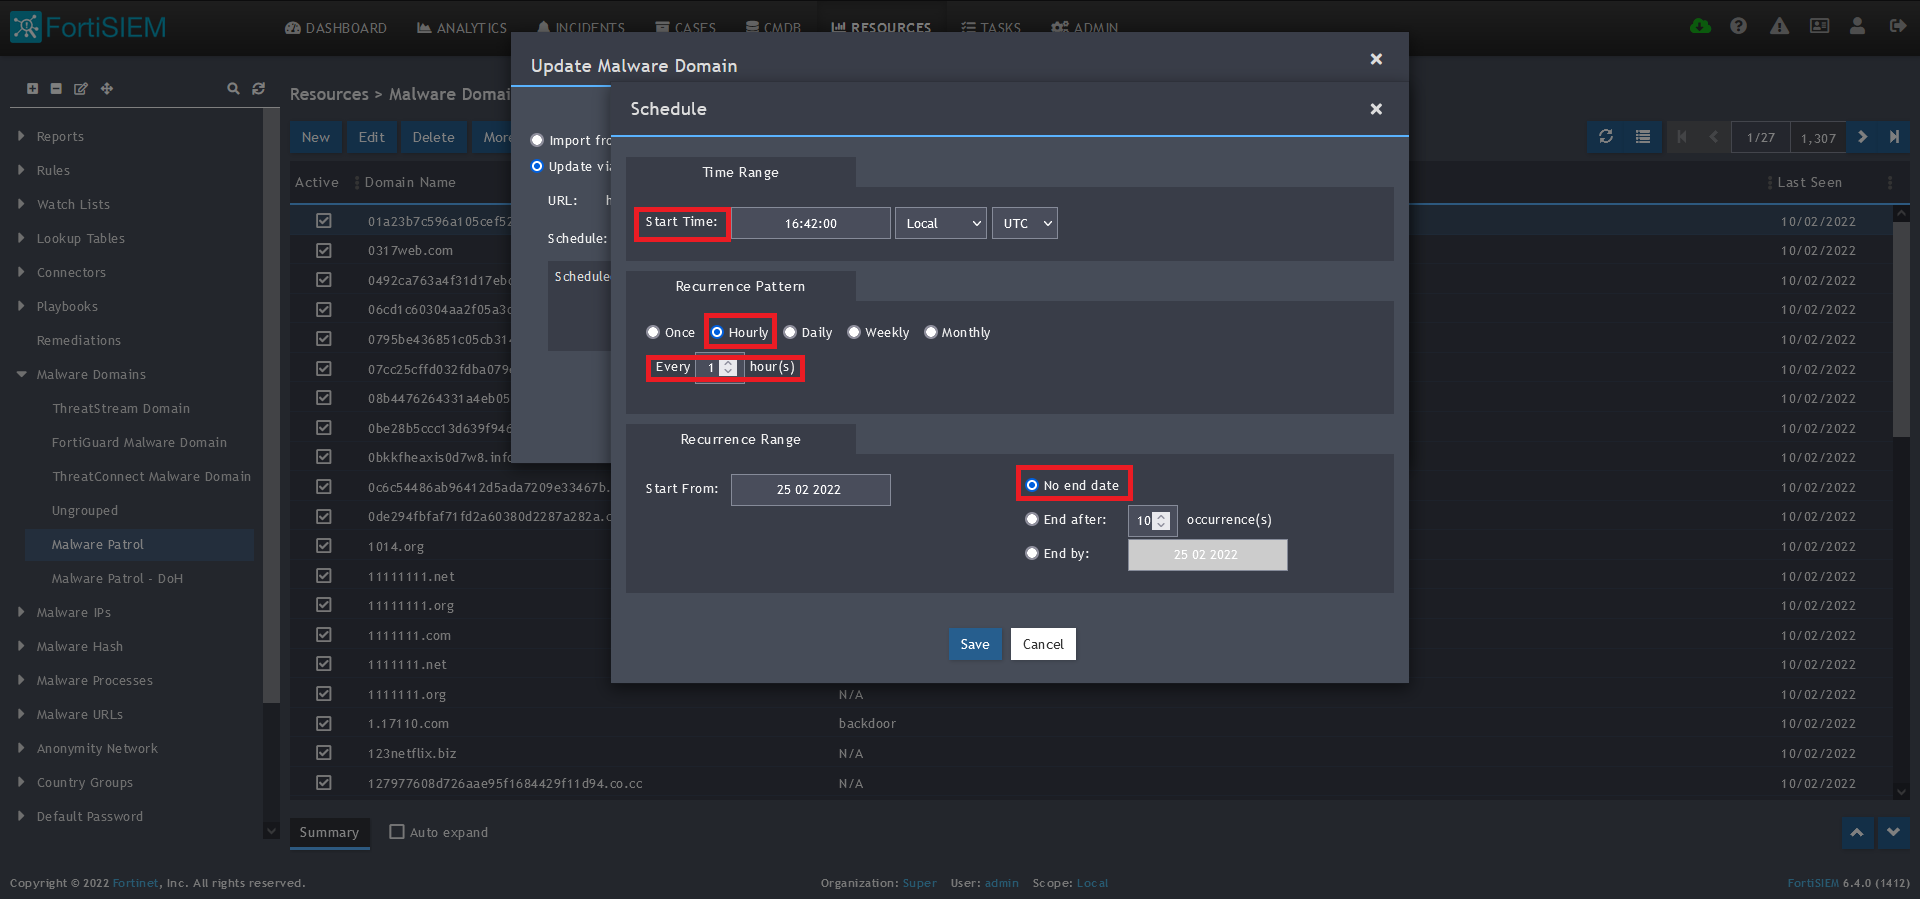
14) On the screen that pops up, enter:
- Start Time: Set a start time a few minutes from the current time. This will cause the data to be updated after your setup is complete
- Recurrence Pattern: Hourly, Every 1 Hour (Malware Patrol feeds are updated on an hourly basis)
- Recurrence:
- Start From: Today’s Date
- End Date: No End Date
- Click Save
 15) The data will populate at the start time set above. If it does not, click the Refresh button at the top of the data display area. Another option is to go back to the schedule settings to verify the time you set for the updates to begin. You can set another time a few minutes in the future.
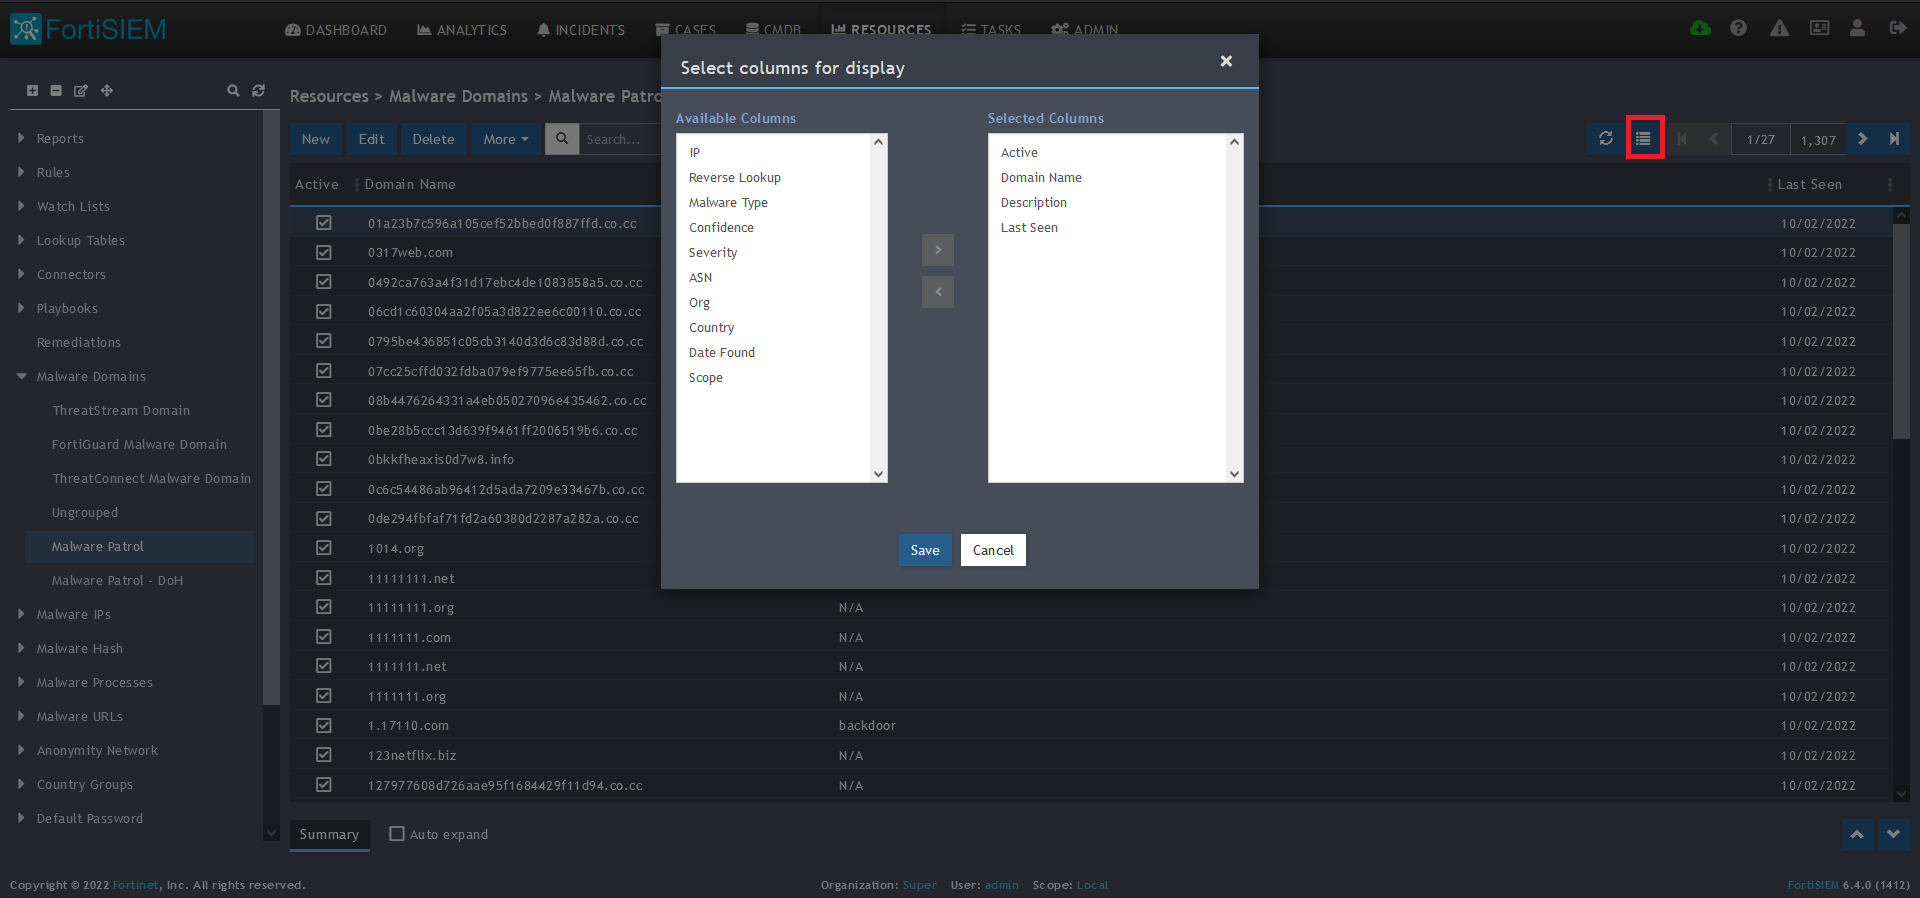
16) To change the columns displayed once the data populates, click on the Select Columns button located beside the refresh button. Use the data mapping information from the setup process for each feed to know which fields are available in the Malware Patrol feed.
Malicious IPs
Benefits of the Malware Patrol Malicious IPs Data Feed
This feed contains IP addresses known to actively host malicious files and C2 systems for malware and ransomware. Monitoring traffic destined to them is an effective network protection measure and provides valuable information for threat hunting purposes.
1) From the FortiSIEM dashboard, navigate to Resources in the top navigation menu. On the left side menu that appears, you will see the types of IoC feeds that can be integrated. 
2) Select Malware IPs from the menu on the left.
3) Click + button at the upper left-hand side of this side menu to add a new Malware IPs group.
4) Enter a group name. We will use Malware Patrol for this guide.
5) Click save. The Malware Patrol group will now appear under the Malware IPs section. 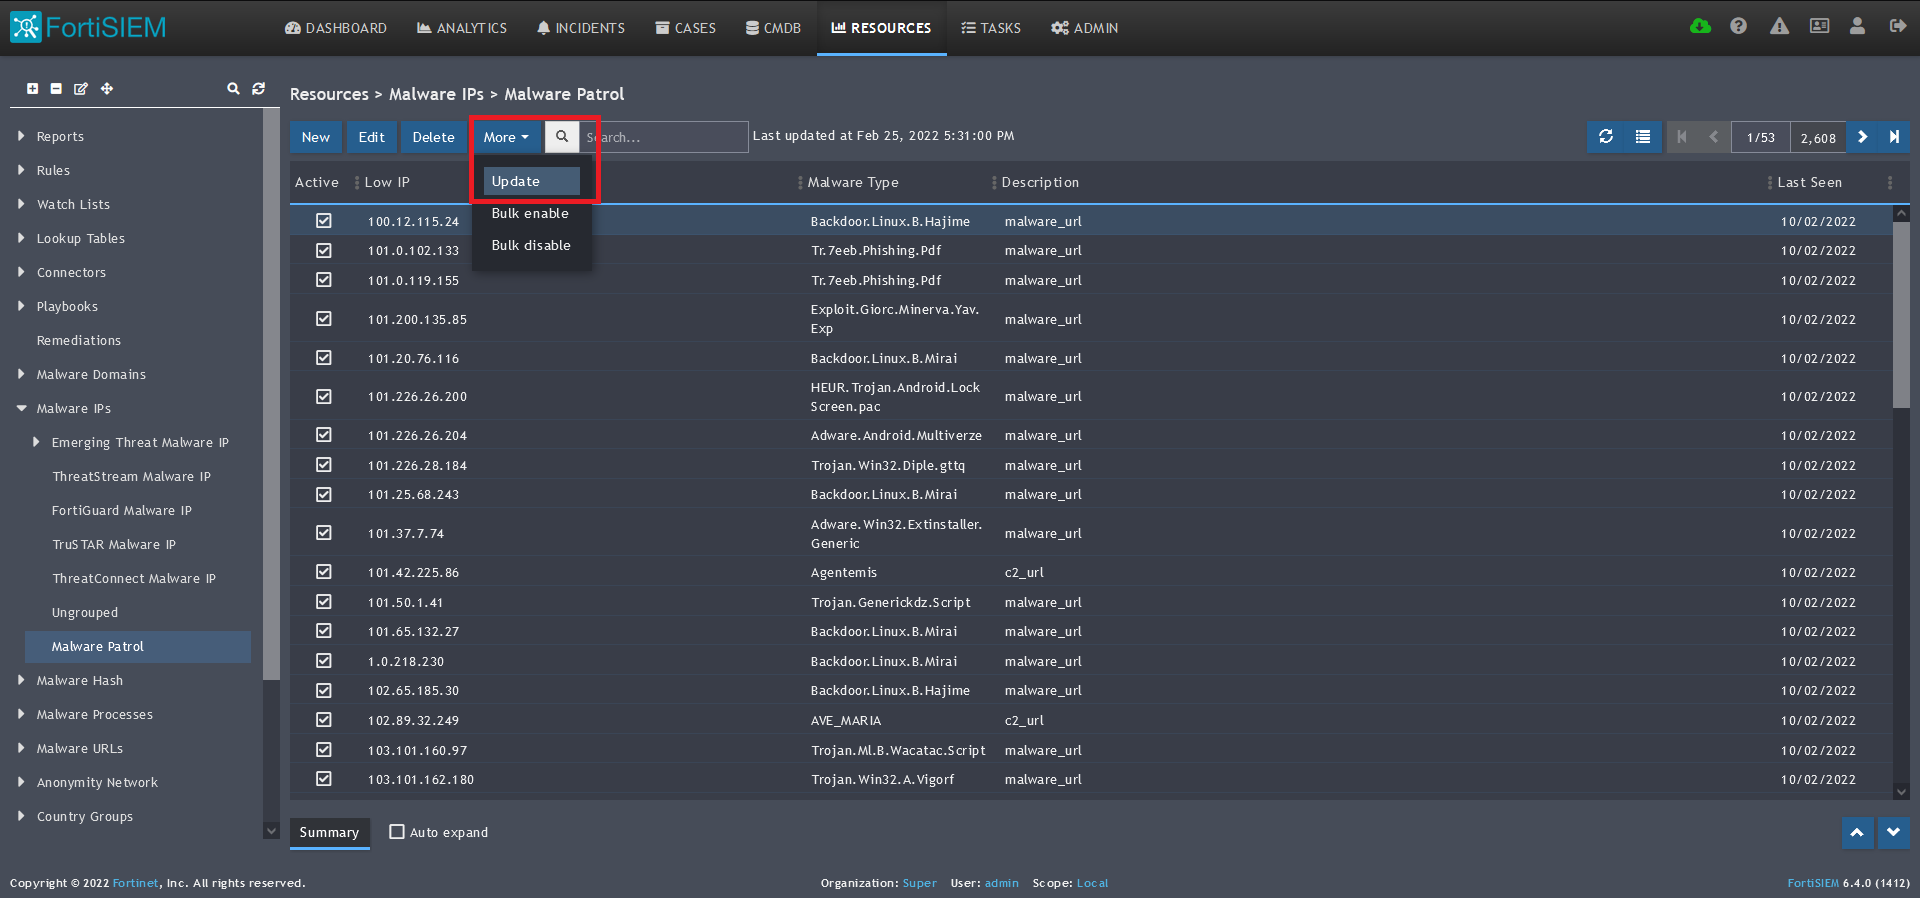
6) Select/highlight the Malware Patrol group and then More from the top menu.
7) Select Update from the drop-down menu. 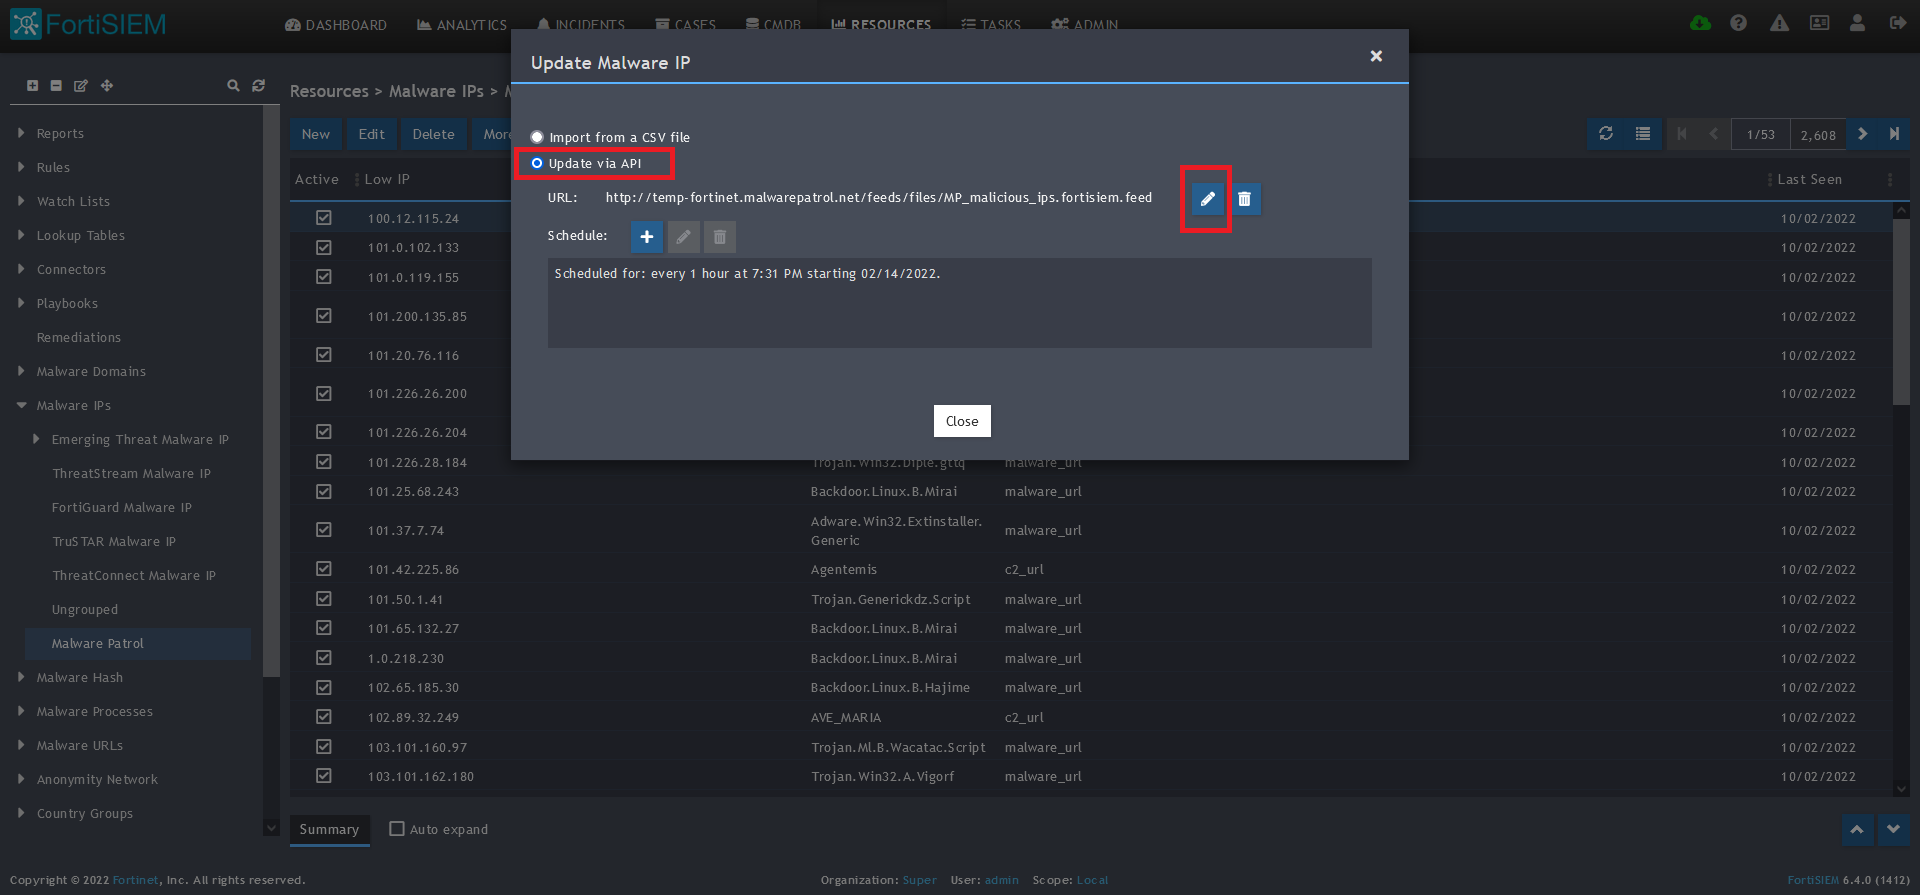
8) On the next screen, choose Update via API and click on the edit (pencil) button. 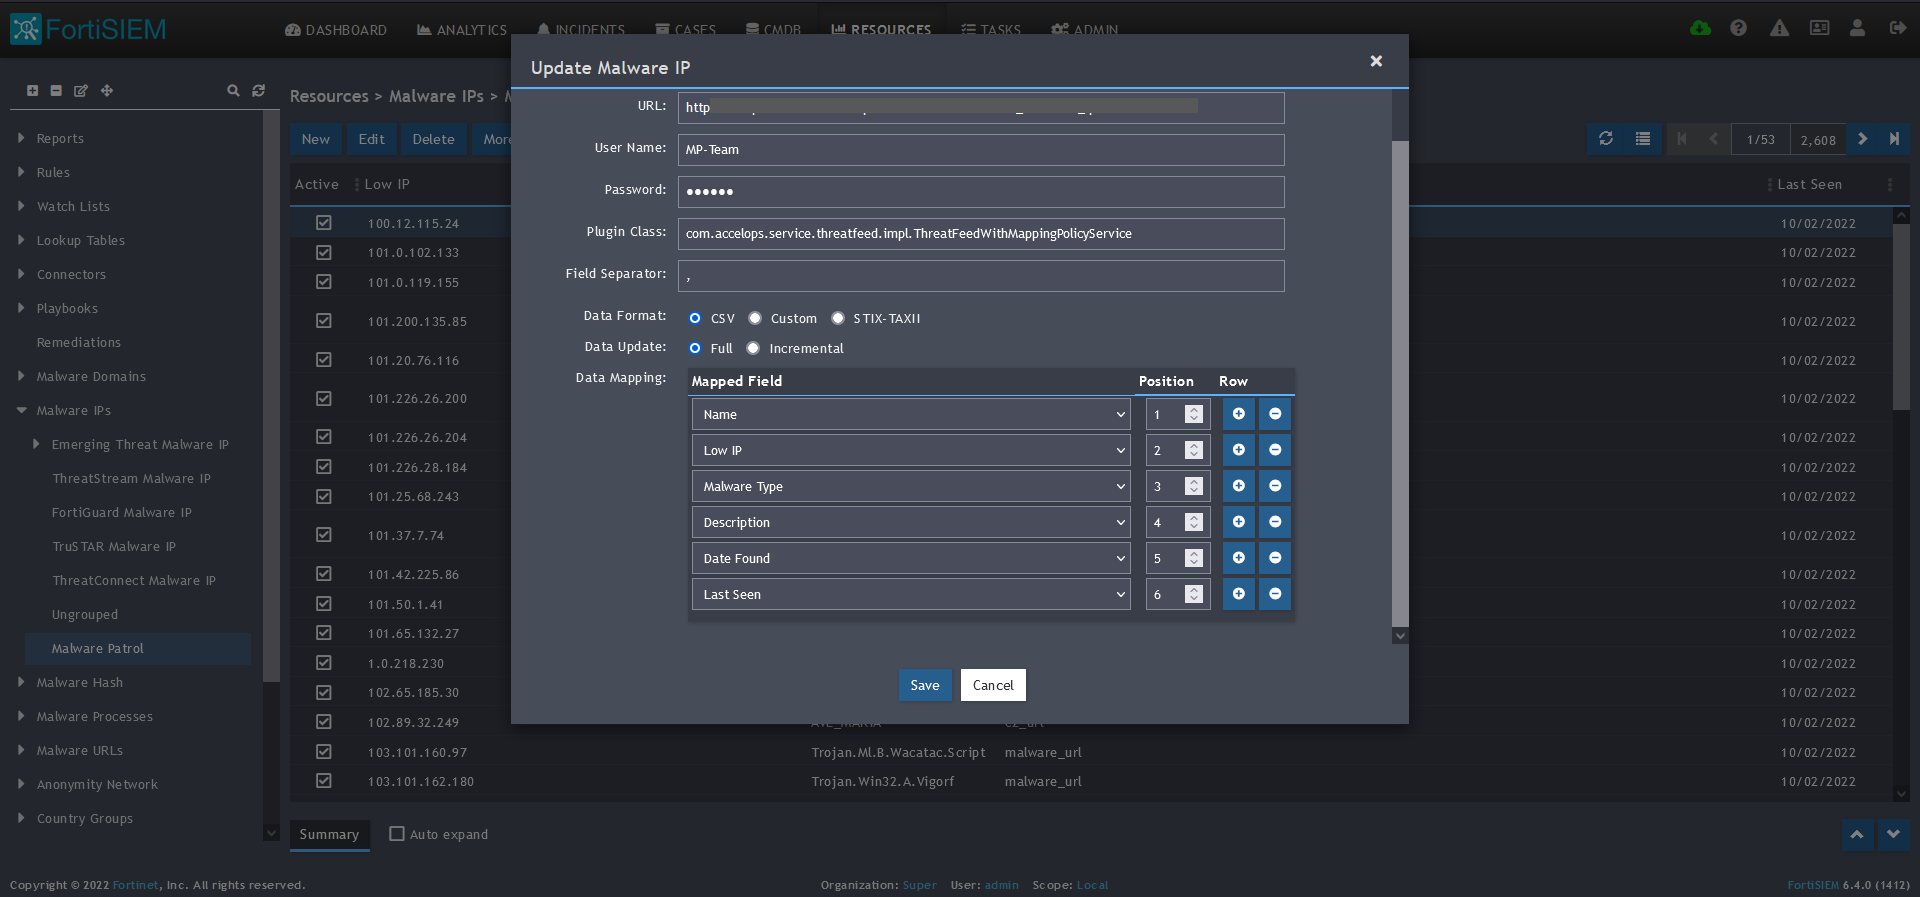
9) Enter the following to set up the feed update:
- URL of your Malware Patrol Malicious IPs feed or evaluation feed. This can be obtained by right clicking on the feed’s link in the Malware Patrol customer or evaluation portal.
- Your Malware Patrol portal username and password
- Plugin Class: no changes
- Field separator: ,
- Data format: CSV
- Data update: Full
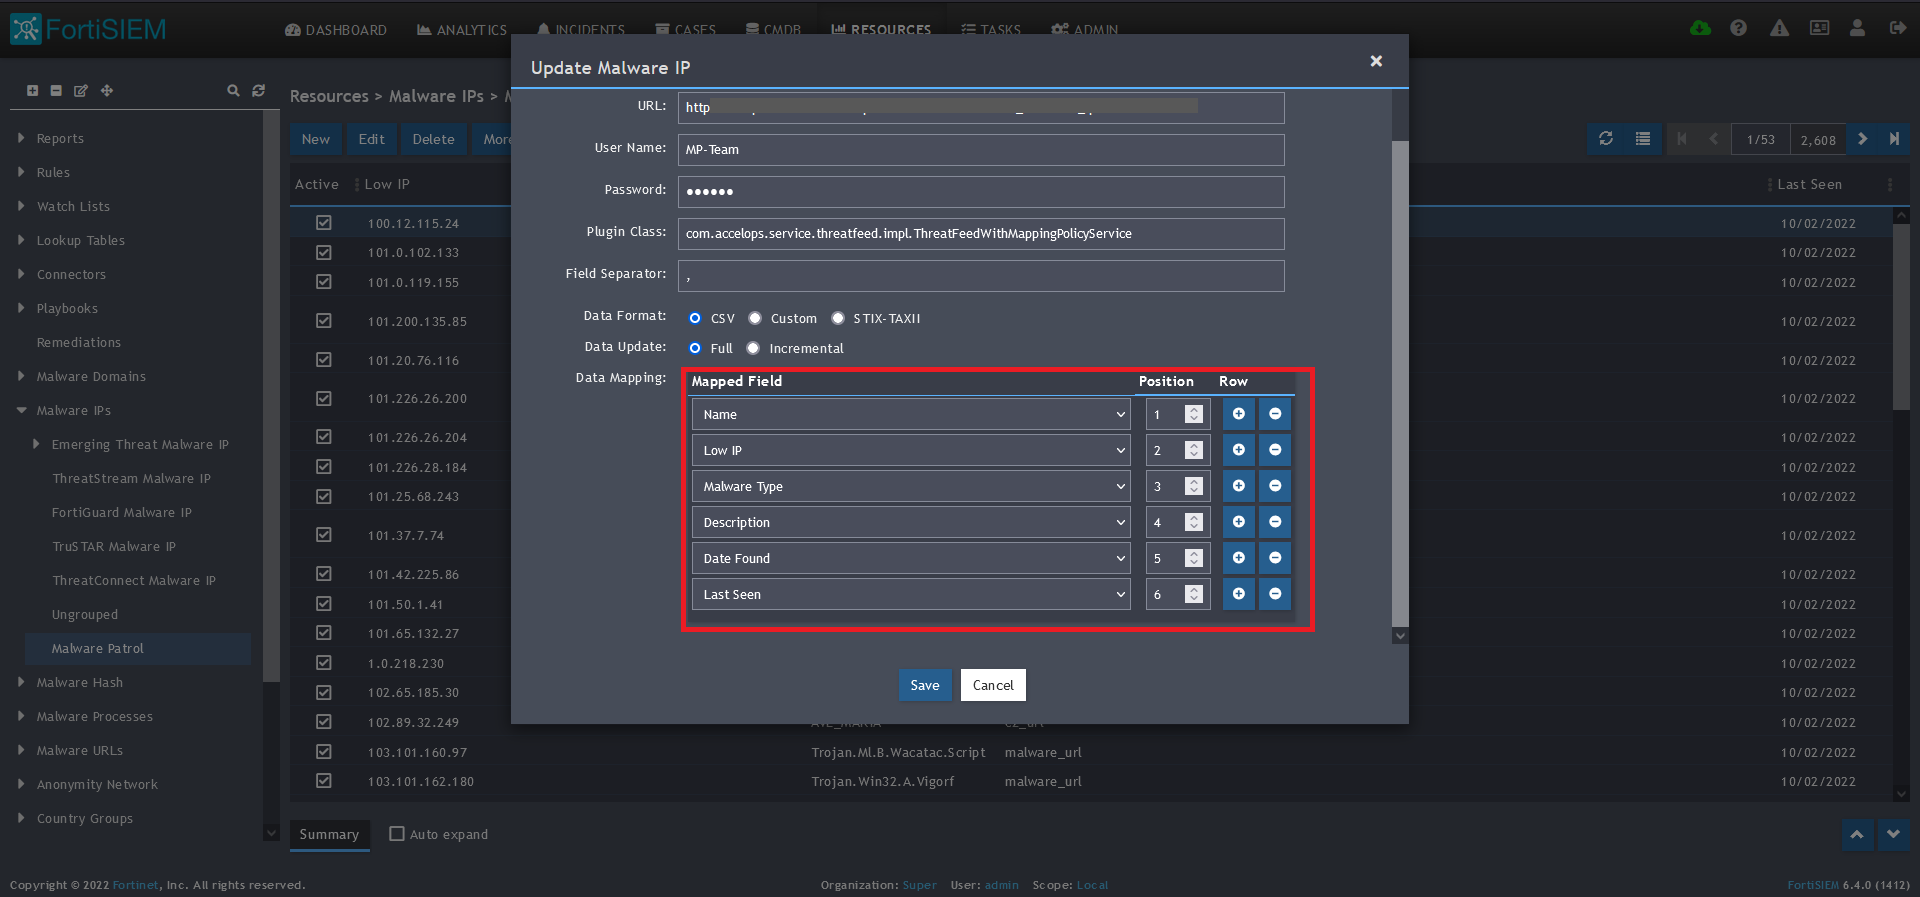
10) In the Data Mapping section, match the following:
- Name, Position 1
- Low IP, Position 2
- Malware Type, Position 3
- Description, Position 4
- Date Found, Position 5
- Last Seen, Position 6
11) Click Save
12) Click on the Schedule: + button 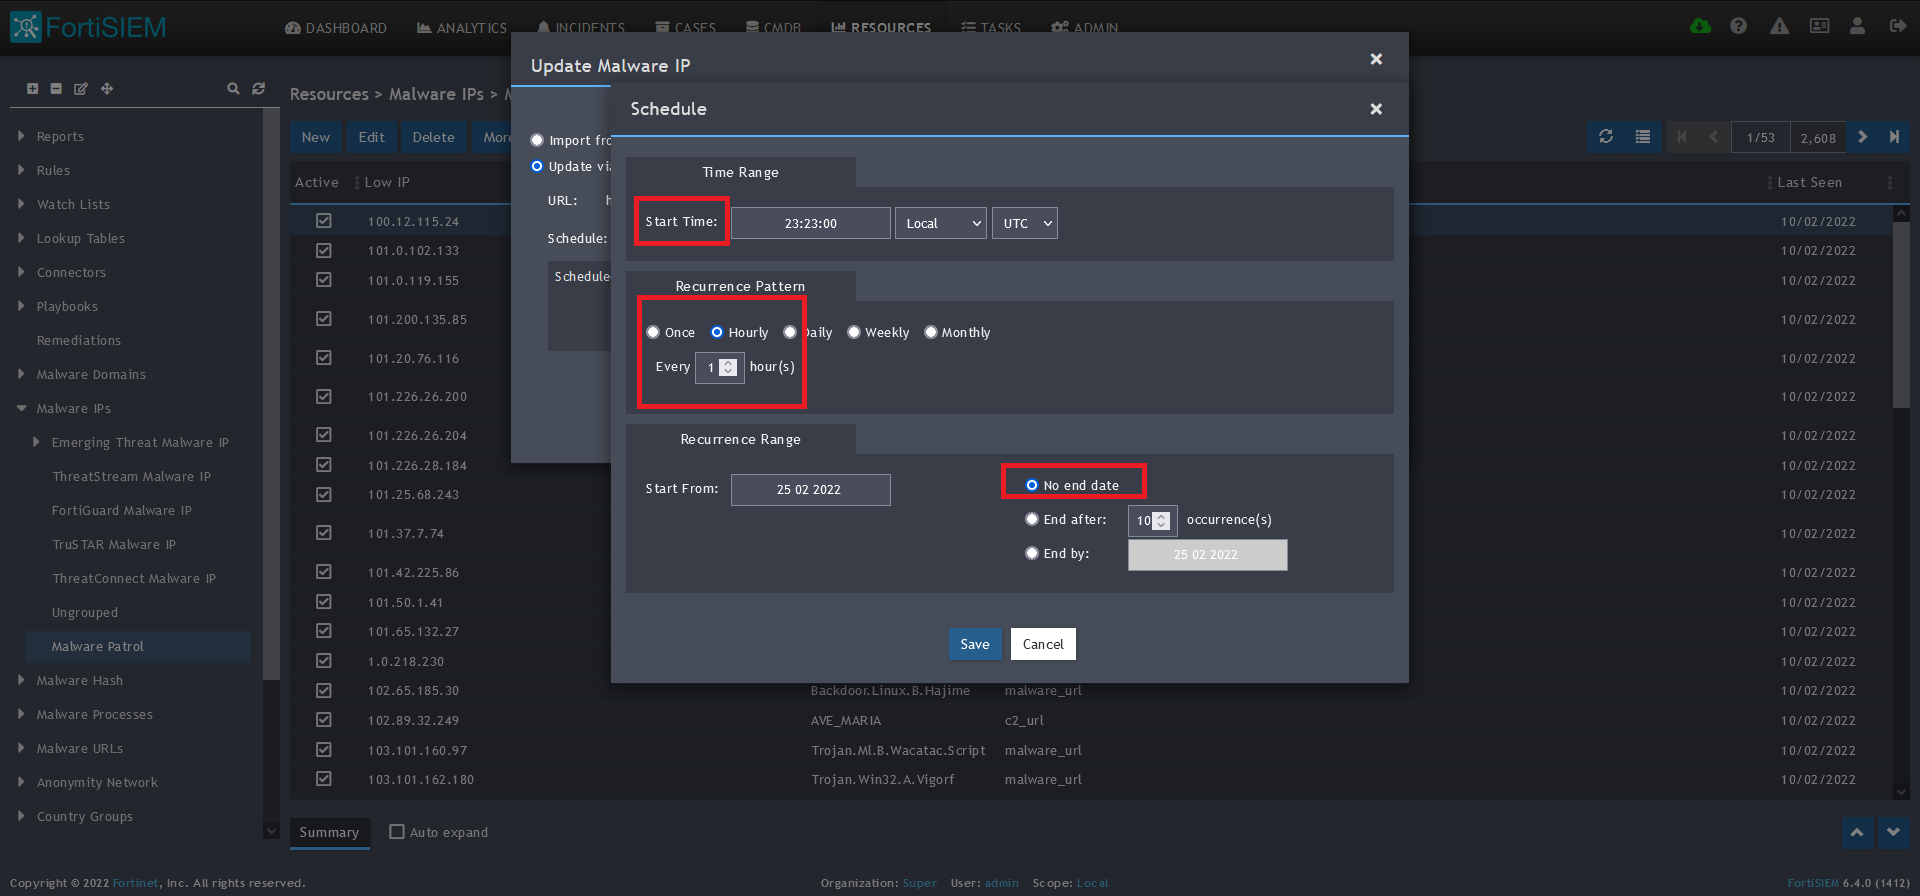
13) On the next screen, enter:
- Start Time: Set a start time a few minutes from the current time. This will cause the data to be updated after your setup is complete
- Recurrence Pattern: Hourly, Every 1 Hour (Malware Patrol feeds are updated on an hourly basis)
- Recurrence:
- Start From: Today’s Date
- End Date: No End Date
- Click Save
 14) The data will populate at the start time set above. If it does not, click the Refresh button at the top of the data display area. Another option is to go back to the schedule settings to verify the time you set for the updates to begin. You can set another time a few minutes in the future.
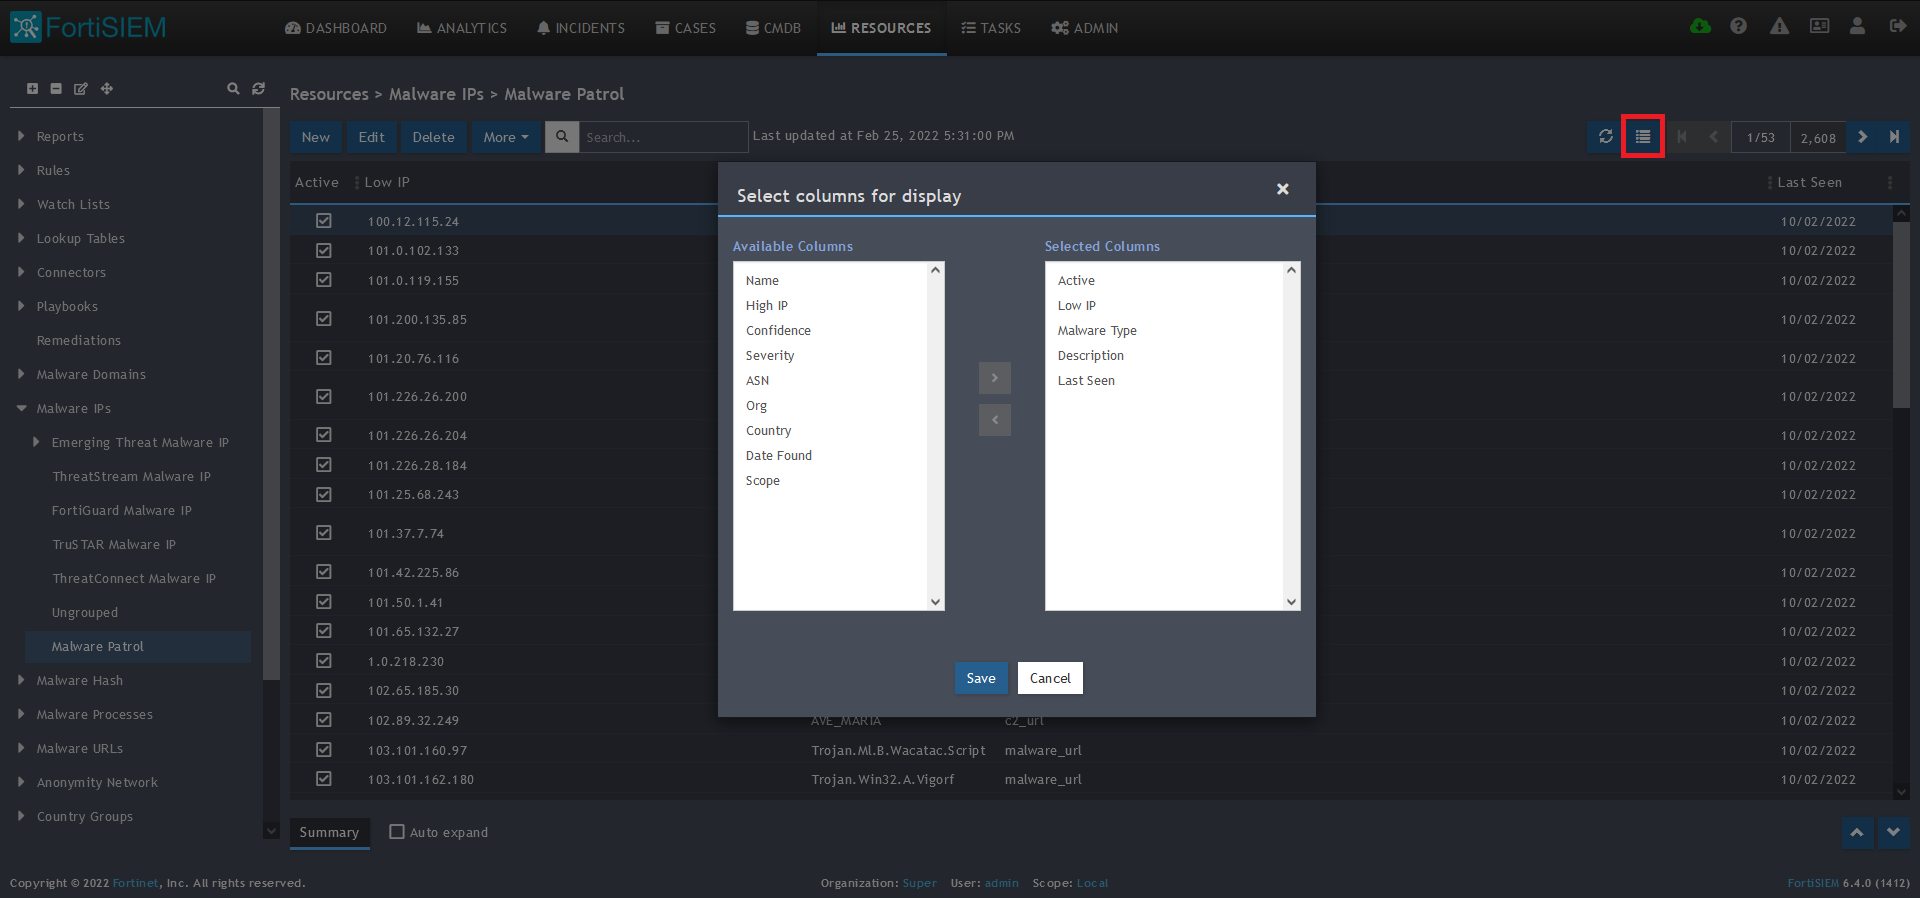
15) To change the columns displayed once the data populates, click on the Select Columns button located beside the refresh button. Use the data mapping information from the setup process for each feed to know which fields are available in the Malware Patrol feed.
Malware Hashes
Benefits of the Malware Patrol Malware Hashes Data Feed
This feed contains the SHA-1 hashes of malware and ransomware samples currently available on the internet. Encountering these signatures in your environment is a sign of malicious activity.
1) From the FortiSIEM dashboard, navigate to Resources in the top navigation menu. On the left side menu that appears, you will see the types of IoC feeds that can be integrated. 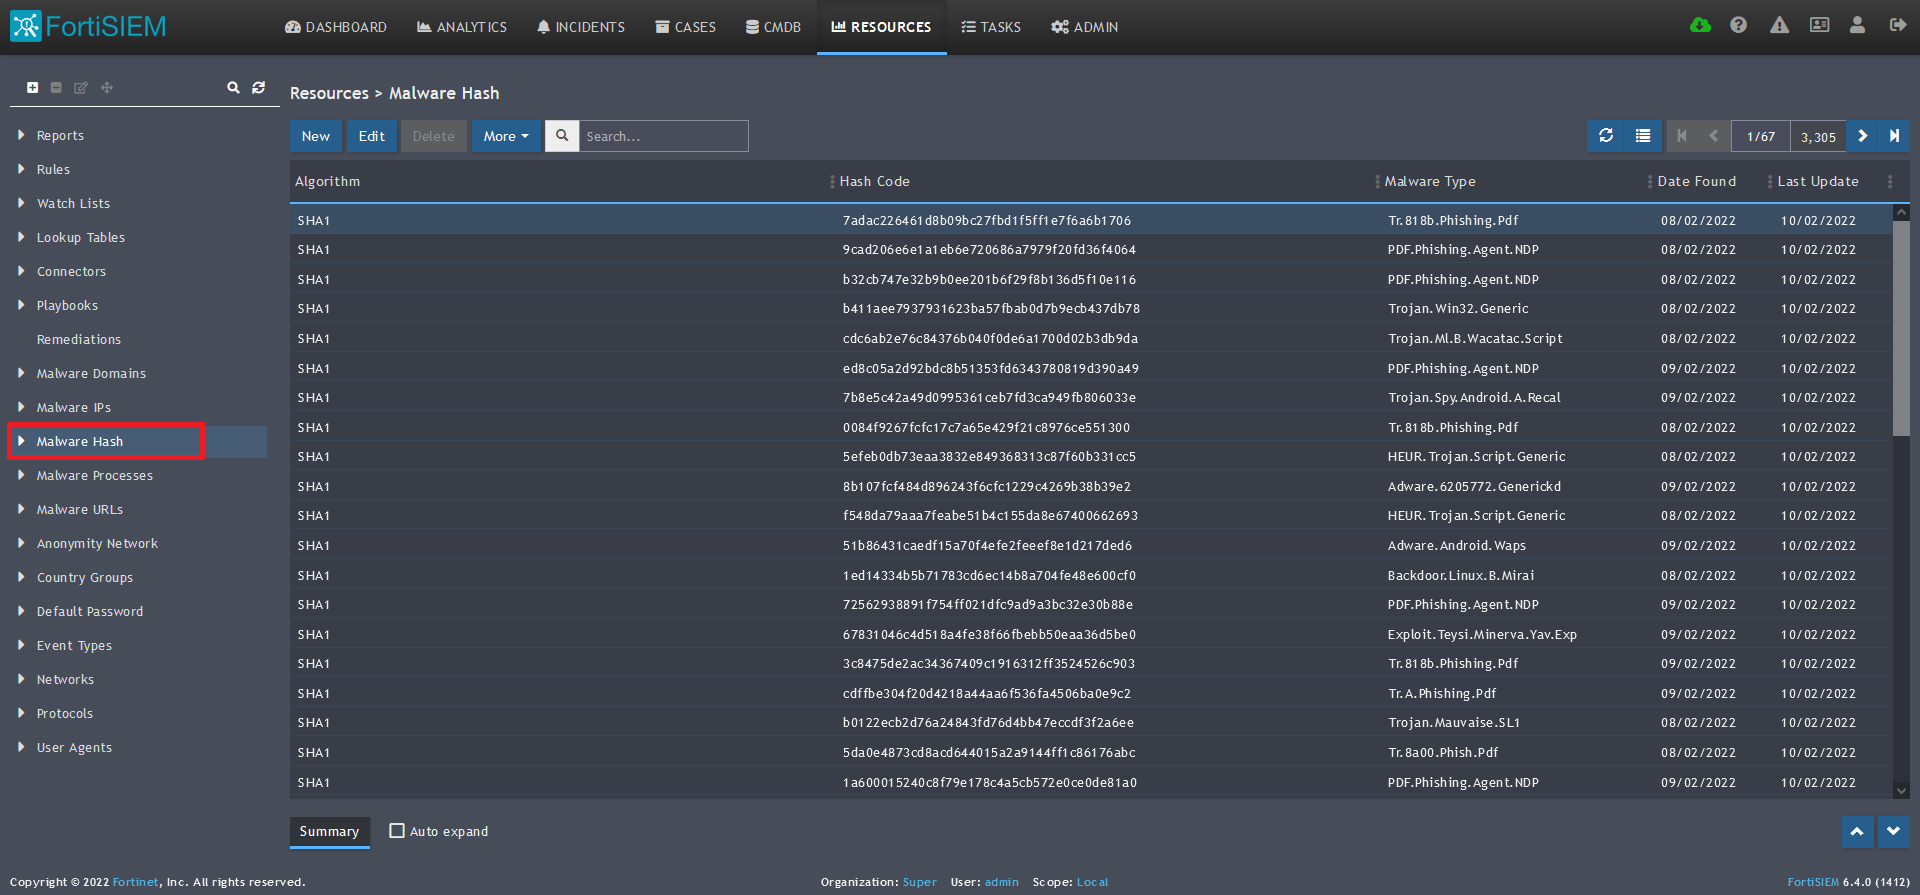
2) Select Malware Hash from the menu on the left.
3) Click + button at the upper left-hand side of this side menu to add a new Malware Hash group. 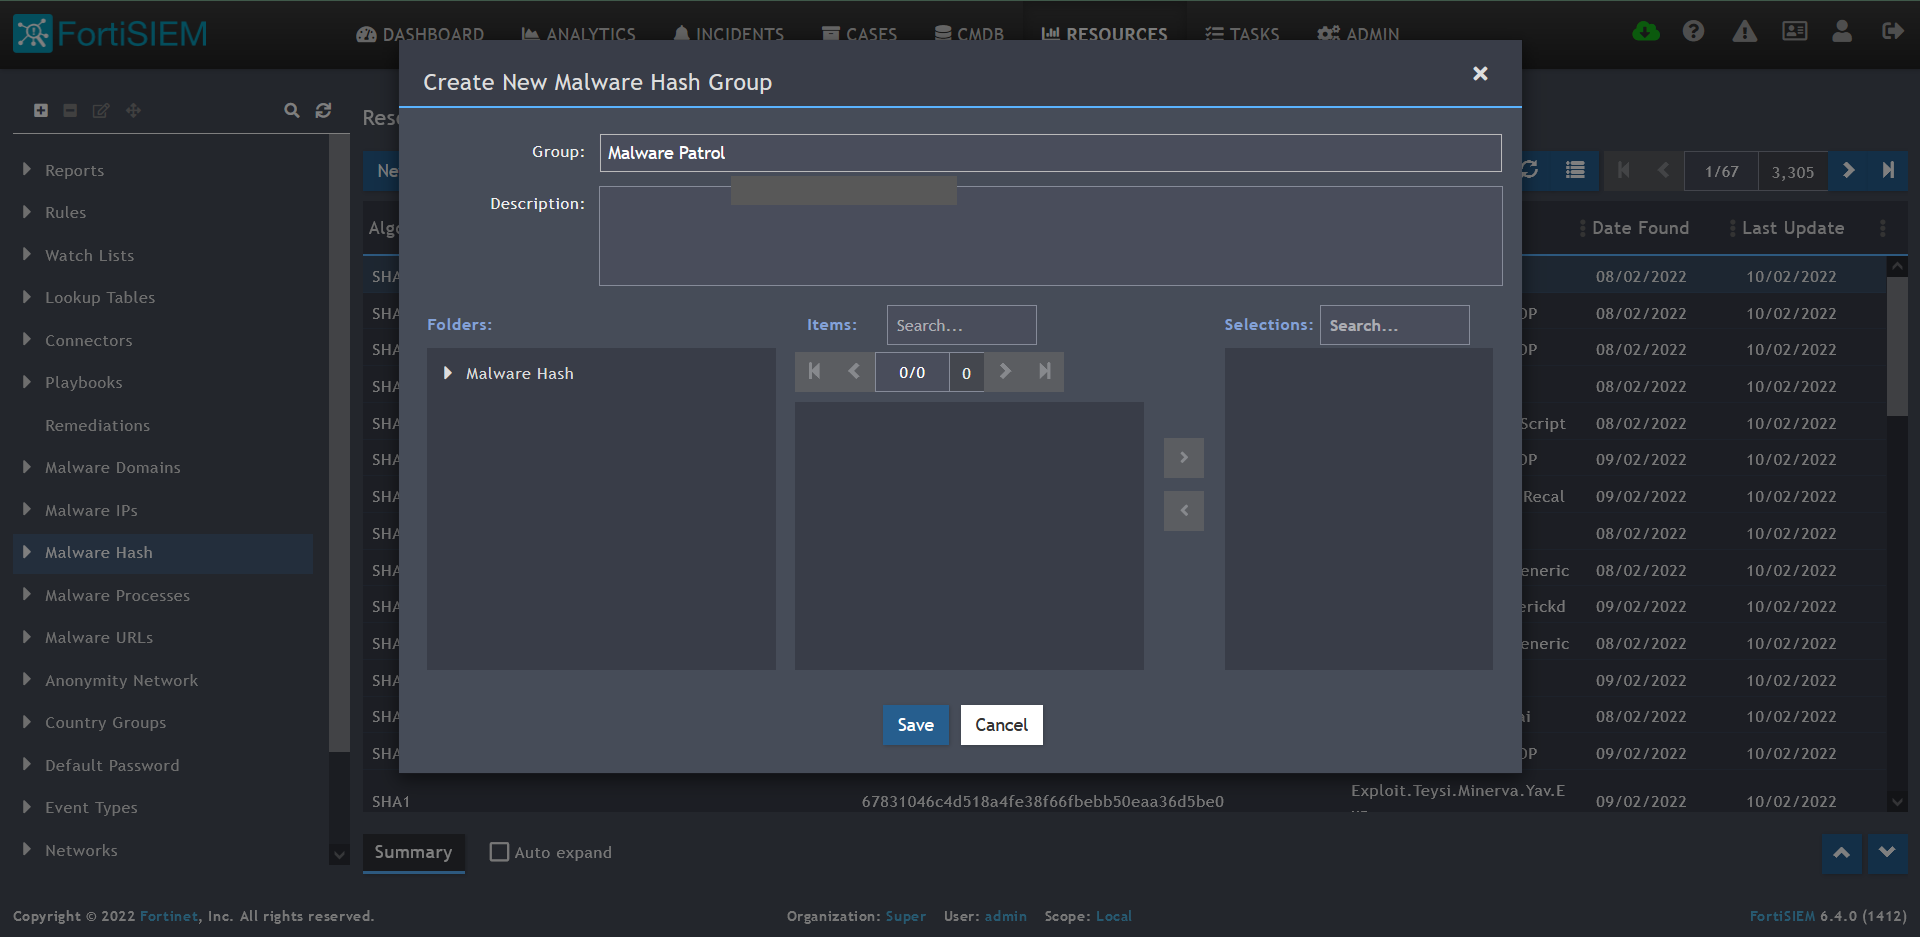
4) Enter a group name. We will use Malware Patrol for this guide.
5) Click save. The Malware Patrol group will now appear under the Malware Hash section.
 6) Select/highlight the Malware Patrol group and then More from the top menu.
7) Select Update from the drop-down menu. 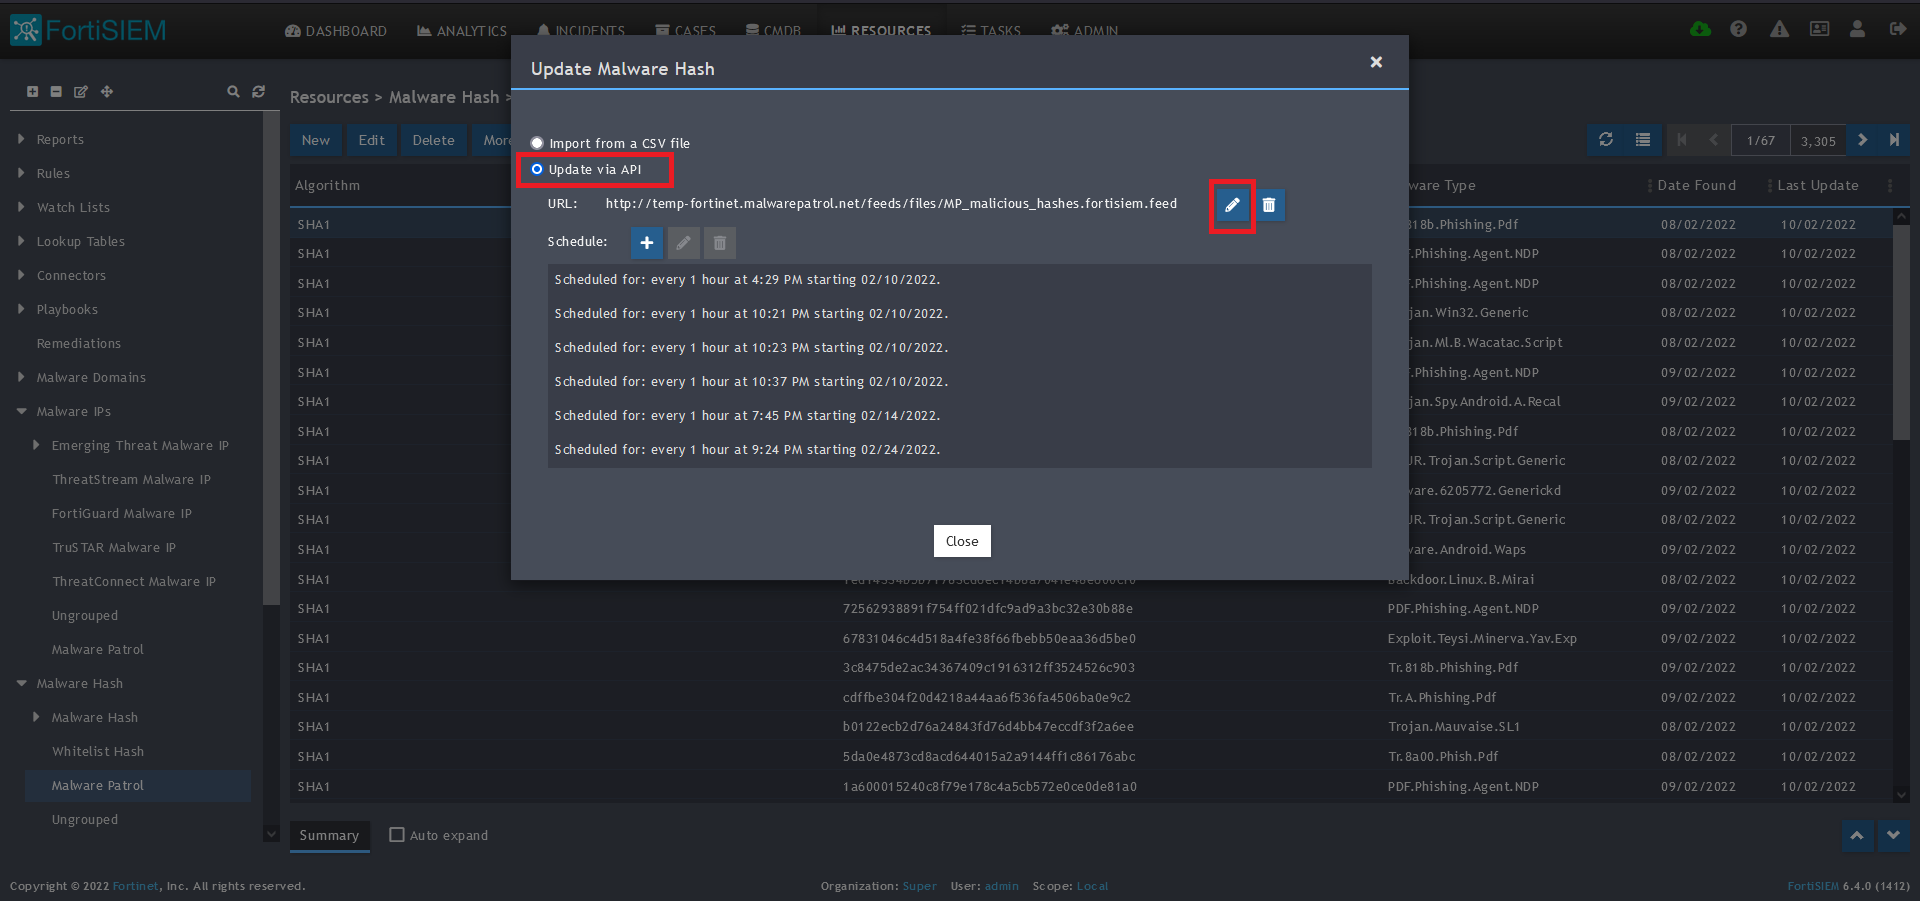
8) On the next screen, choose Update via API and click on the edit (pencil) button..
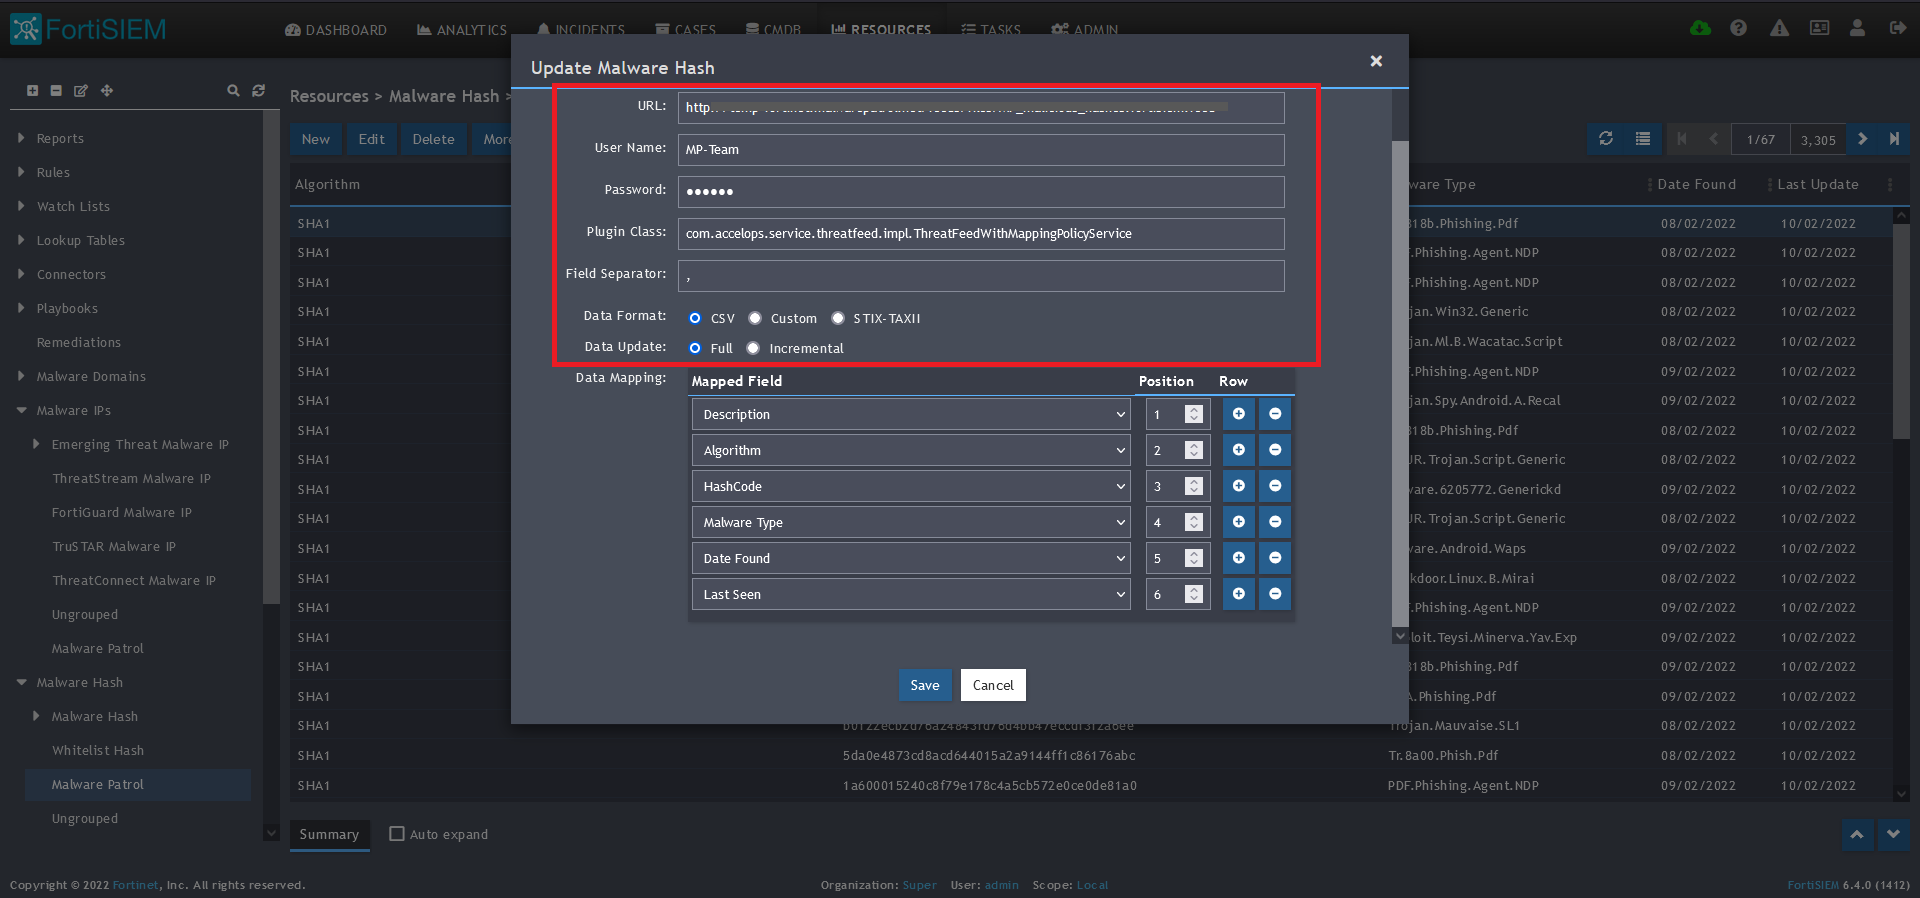 9) Enter the following to set up the feed update:
- URL of your Malware Patrol Malware Hashes feed or evaluation feed. This can be obtained by right clicking on the feed’s link in the Malware Patrol customer or evaluation portal.
- Your Malware Patrol portal username and password
- Plugin Class: no changes
- Field separator: ,
- Data format: CSV
- Data update: Full
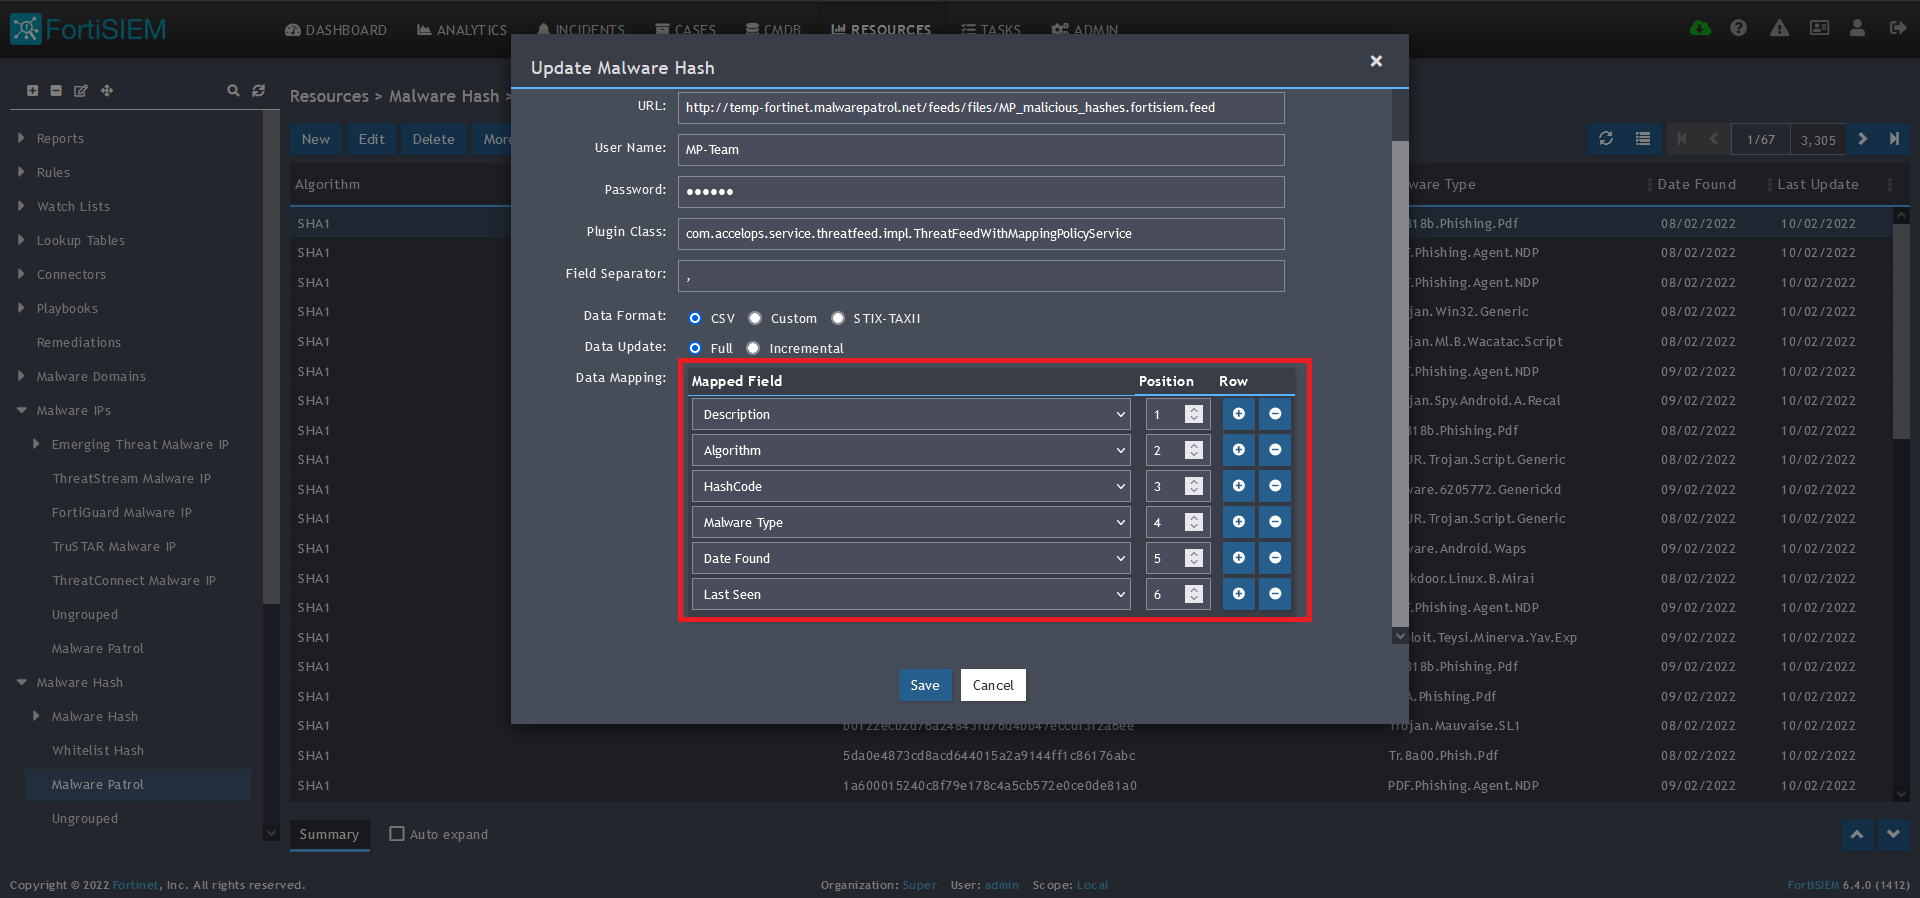 10) In the Data Mapping section, match the following:
- Description, Position 1
- Algorithm, Position 2
- HashCode, Position 3
- Malware Type, Position 4
- Date Found, Position 5
- Last Seen, Position 6
11) Click Save 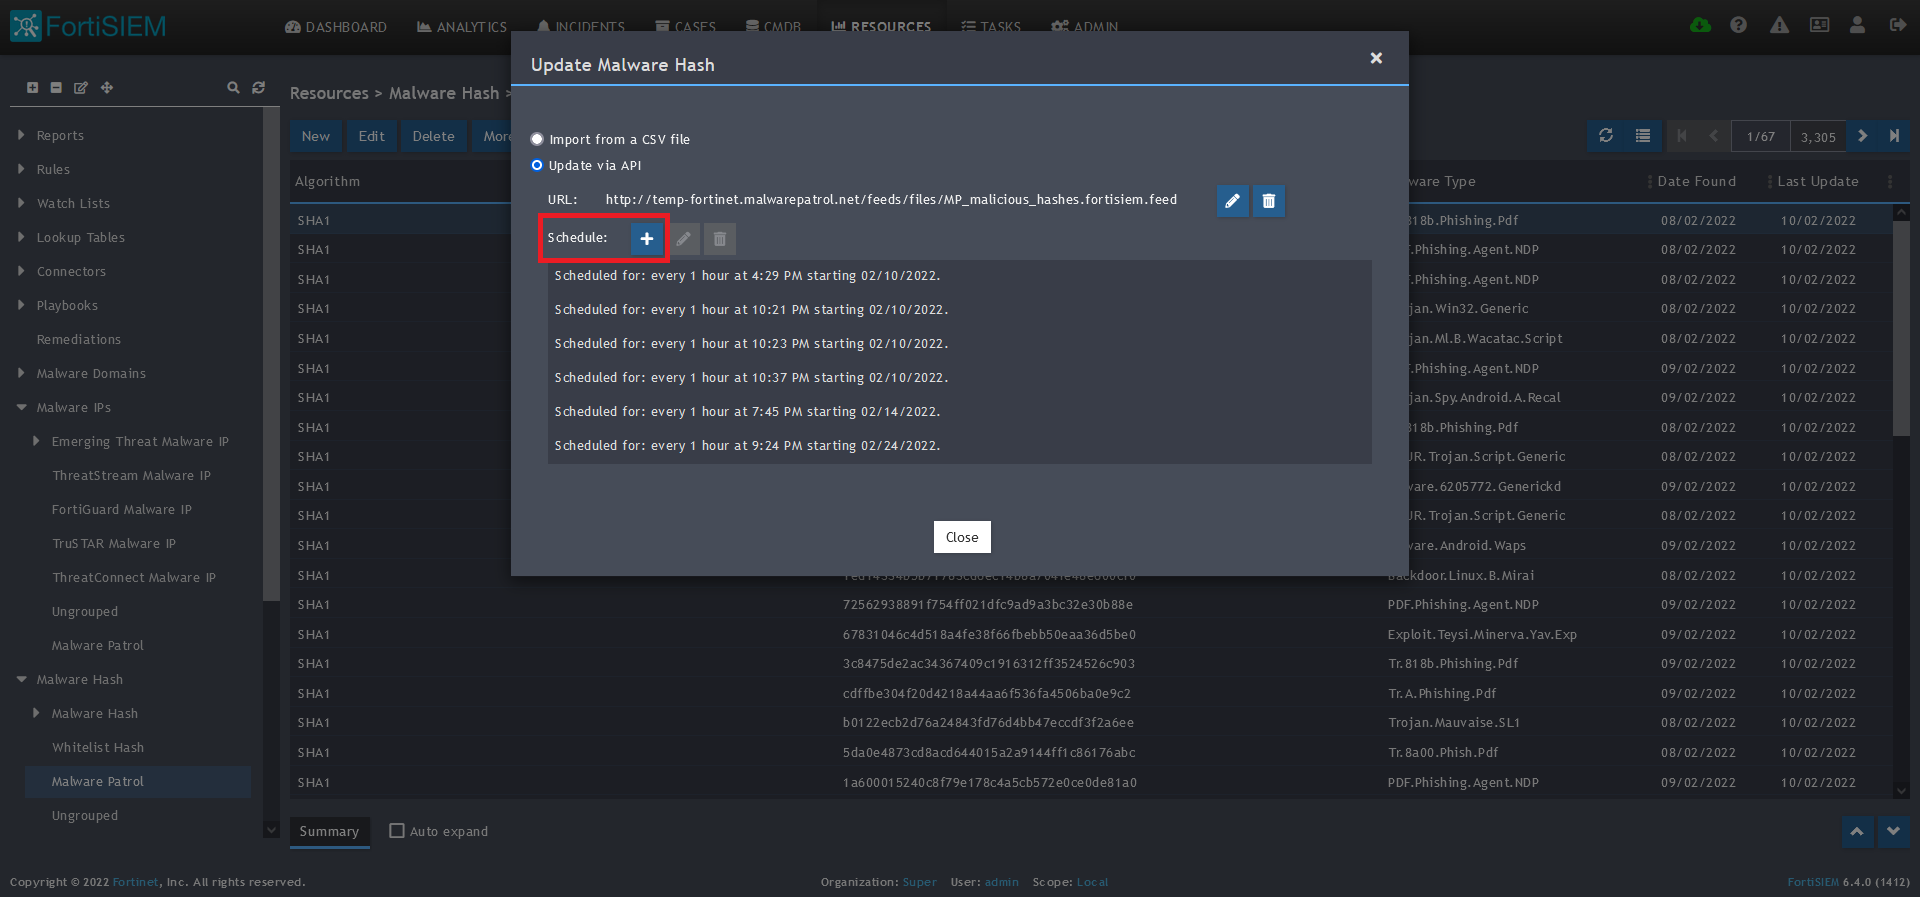
12) Click on the Schedule: + button 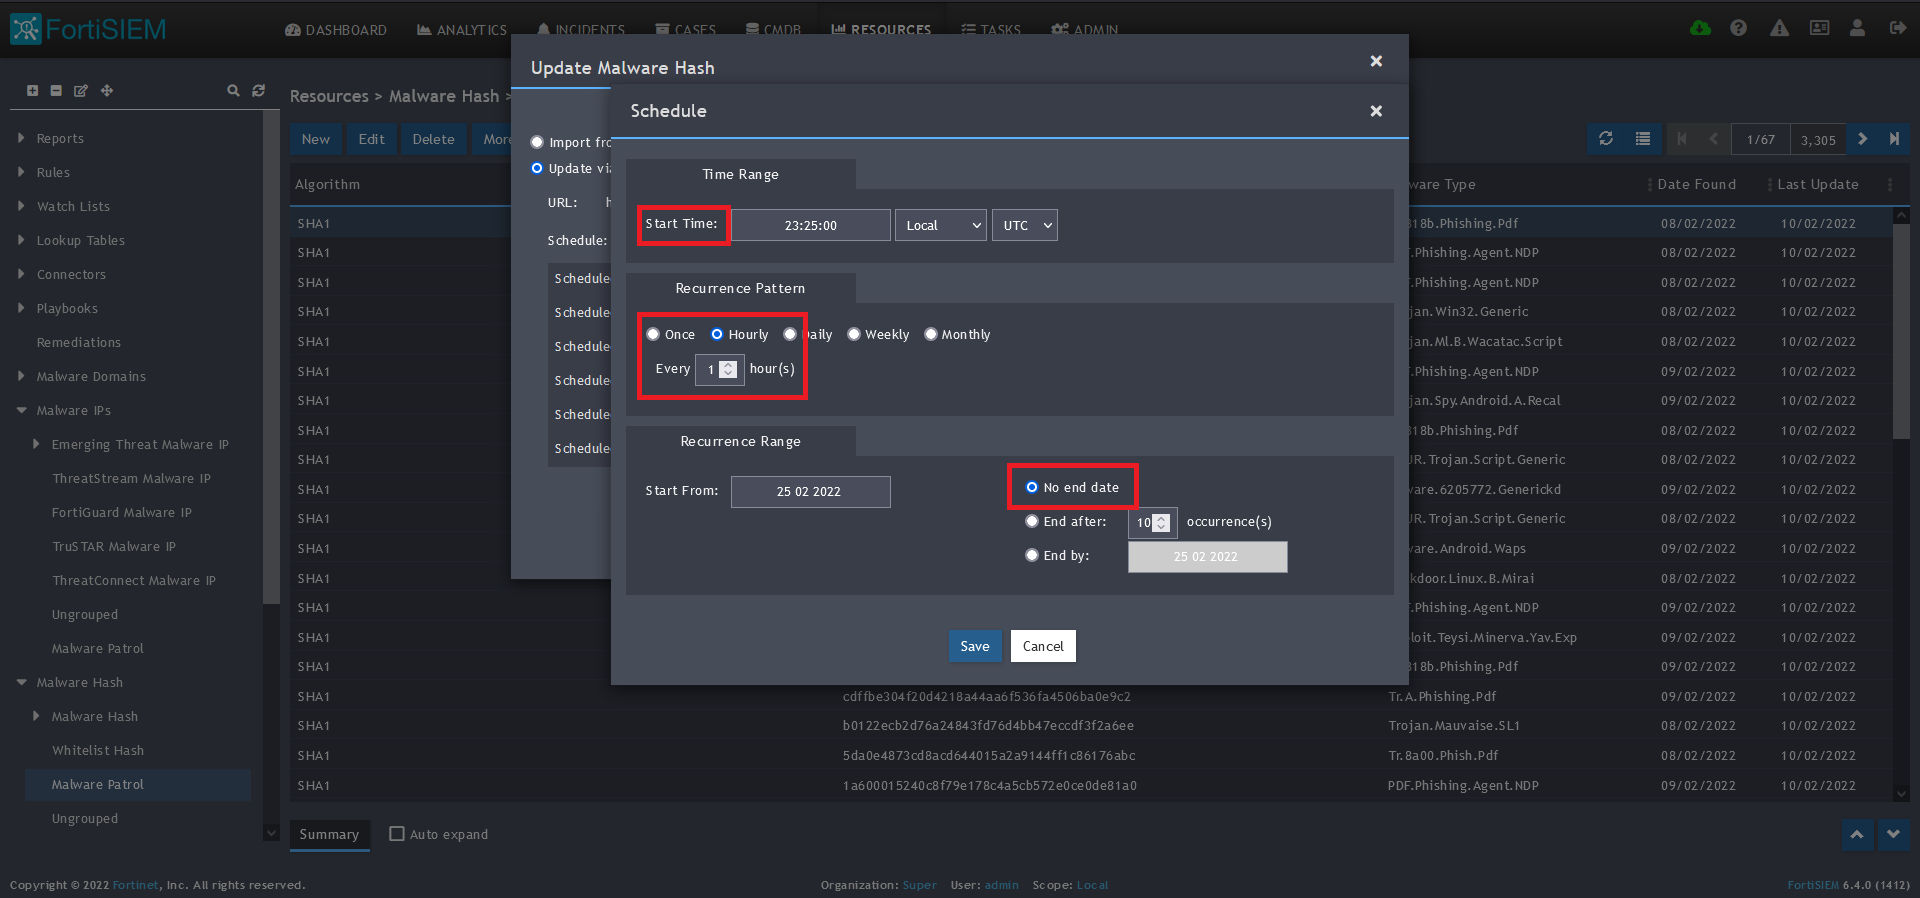
13) On the next screen, enter:
- Start Time: Set a start time a few minutes from the current time. This will cause the data to be updated after your setup is complete
- Recurrence Pattern: Hourly, Every 1 Hour (Malware Patrol feeds are updated on an hourly basis)
- Recurrence:
- Start From: Today’s Date
- End Date: No End Date
- Click Save
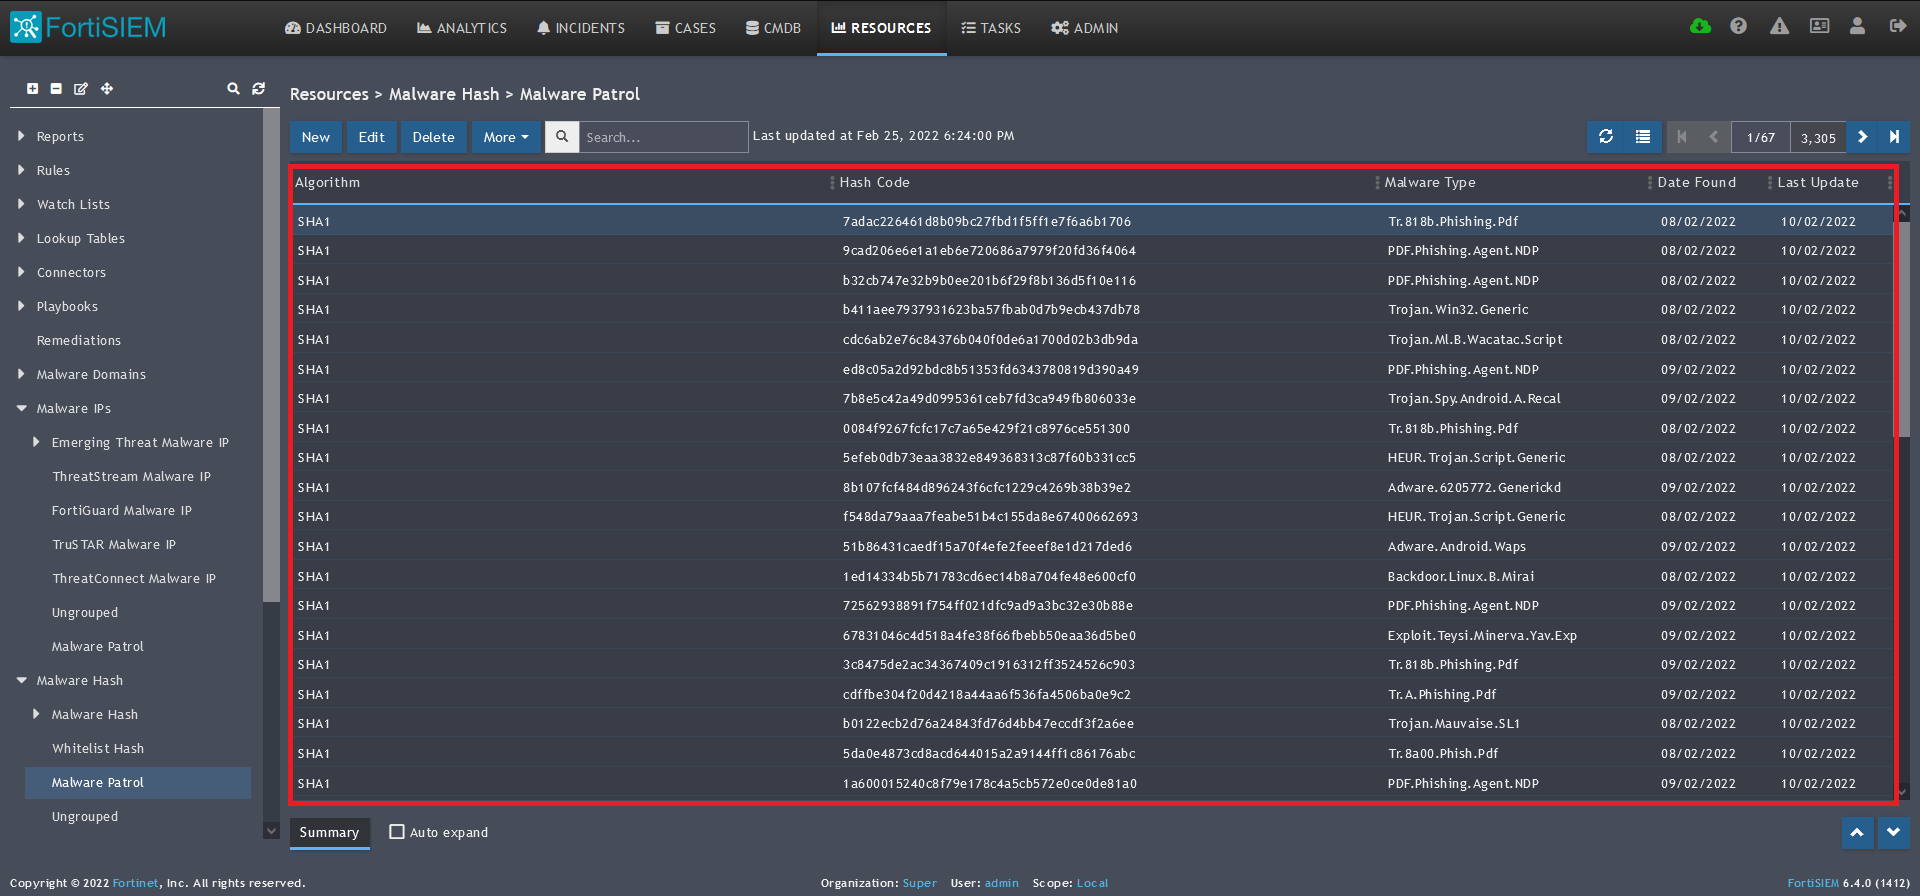 14) The data will populate at the start time set above. If it does not, click the Refresh button at the top of the data display area. Another option is to go back to the schedule settings to verify the time you set for the updates to begin. You can set another time a few minutes in the future.
15) To change the columns displayed once the data populates, click on the Select Columns button located beside the refresh button. Use the data mapping information from the setup process for each feed to know which fields are available in the Malware Patrol feed.
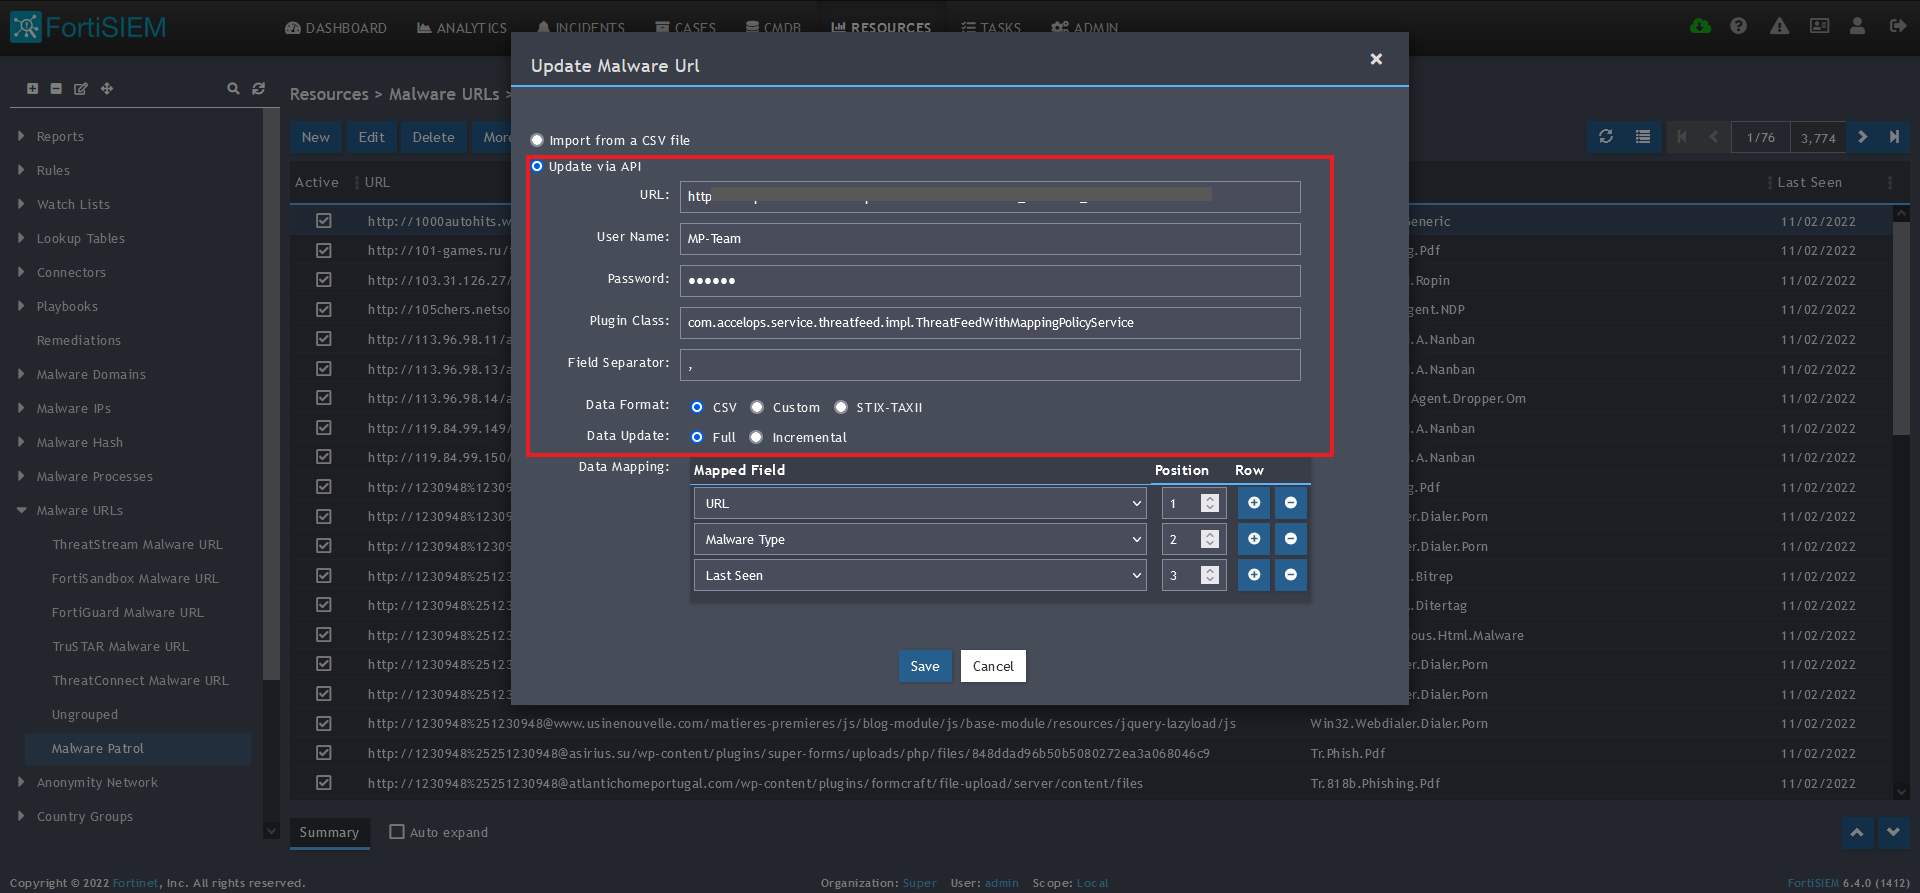
Malware URLs
Benefits of the Malware/Ransomware URLs Data Feed
This feed contains URLs known to be hosting malware binaries. It is updated hourly to remove inactive URLs and add newly detected ones. Correlating this feed with network traffic can pinpoint a potential malware infection.
1) From the FortiSIEM dashboard, navigate to Resources in the top navigation menu. On the left side menu that appears, you will see the types of IoC feeds that can be integrated.
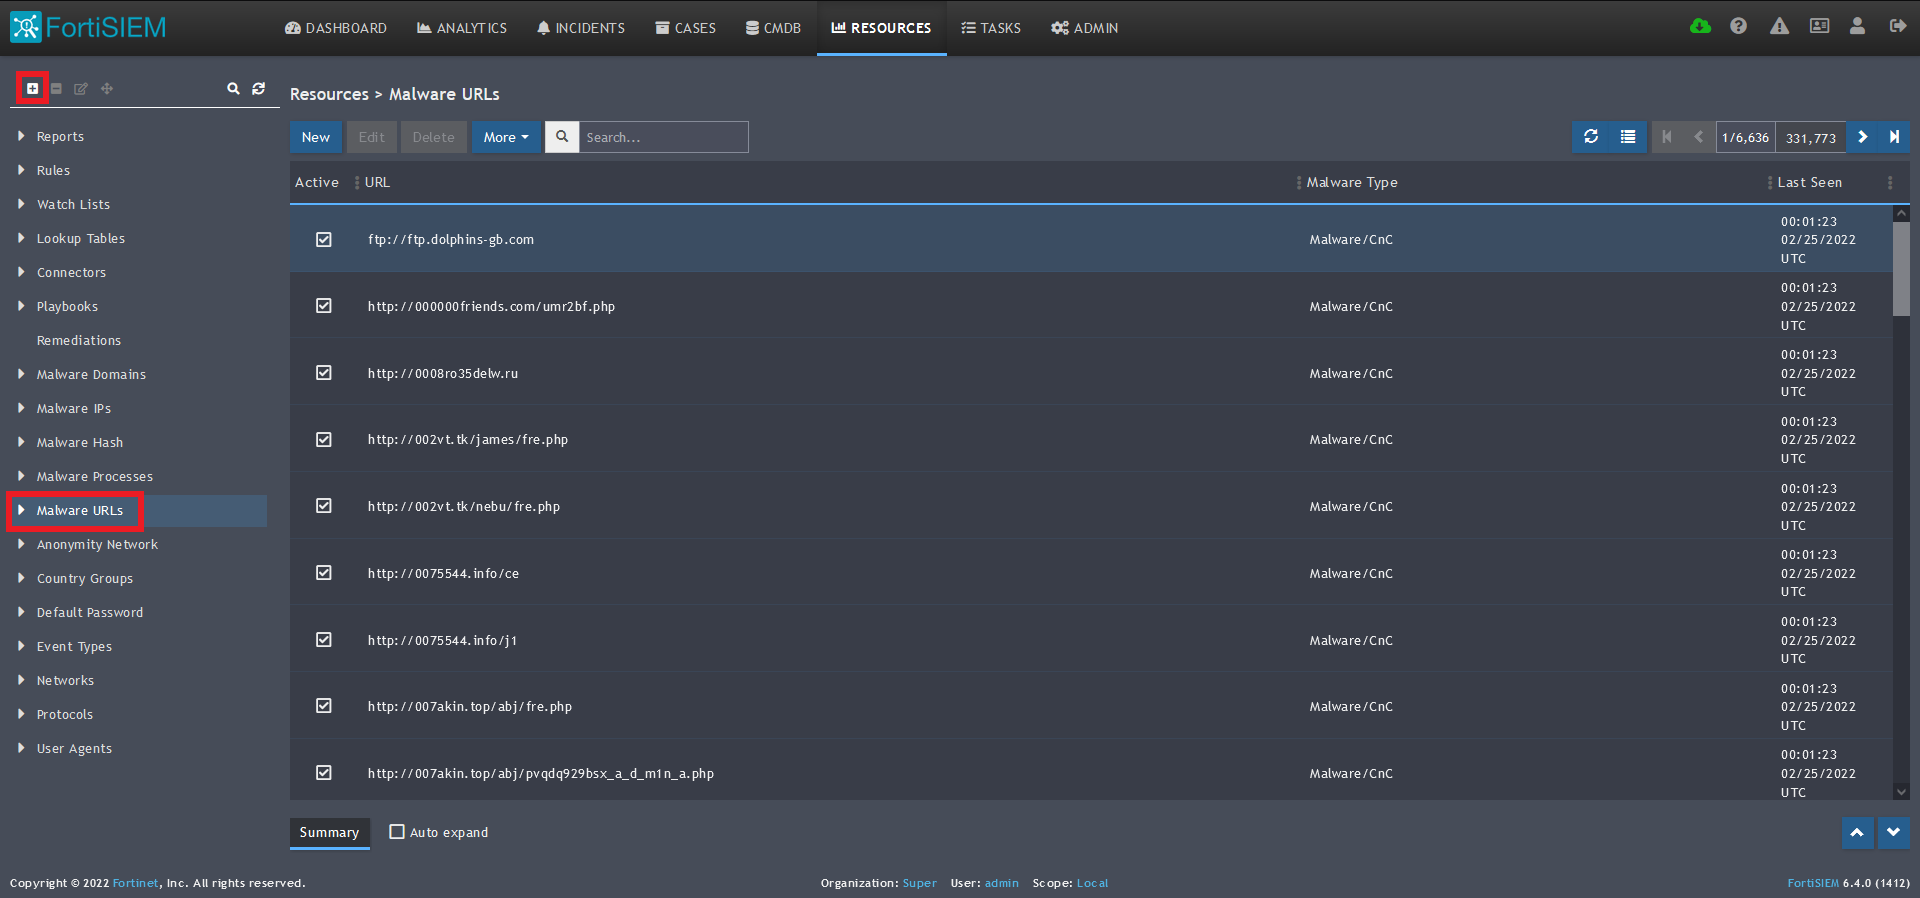 2) Select Malware URLs from the menu on the left.
3) Click + button at the upper left-hand side of this menu to add a new Malware URLs group.
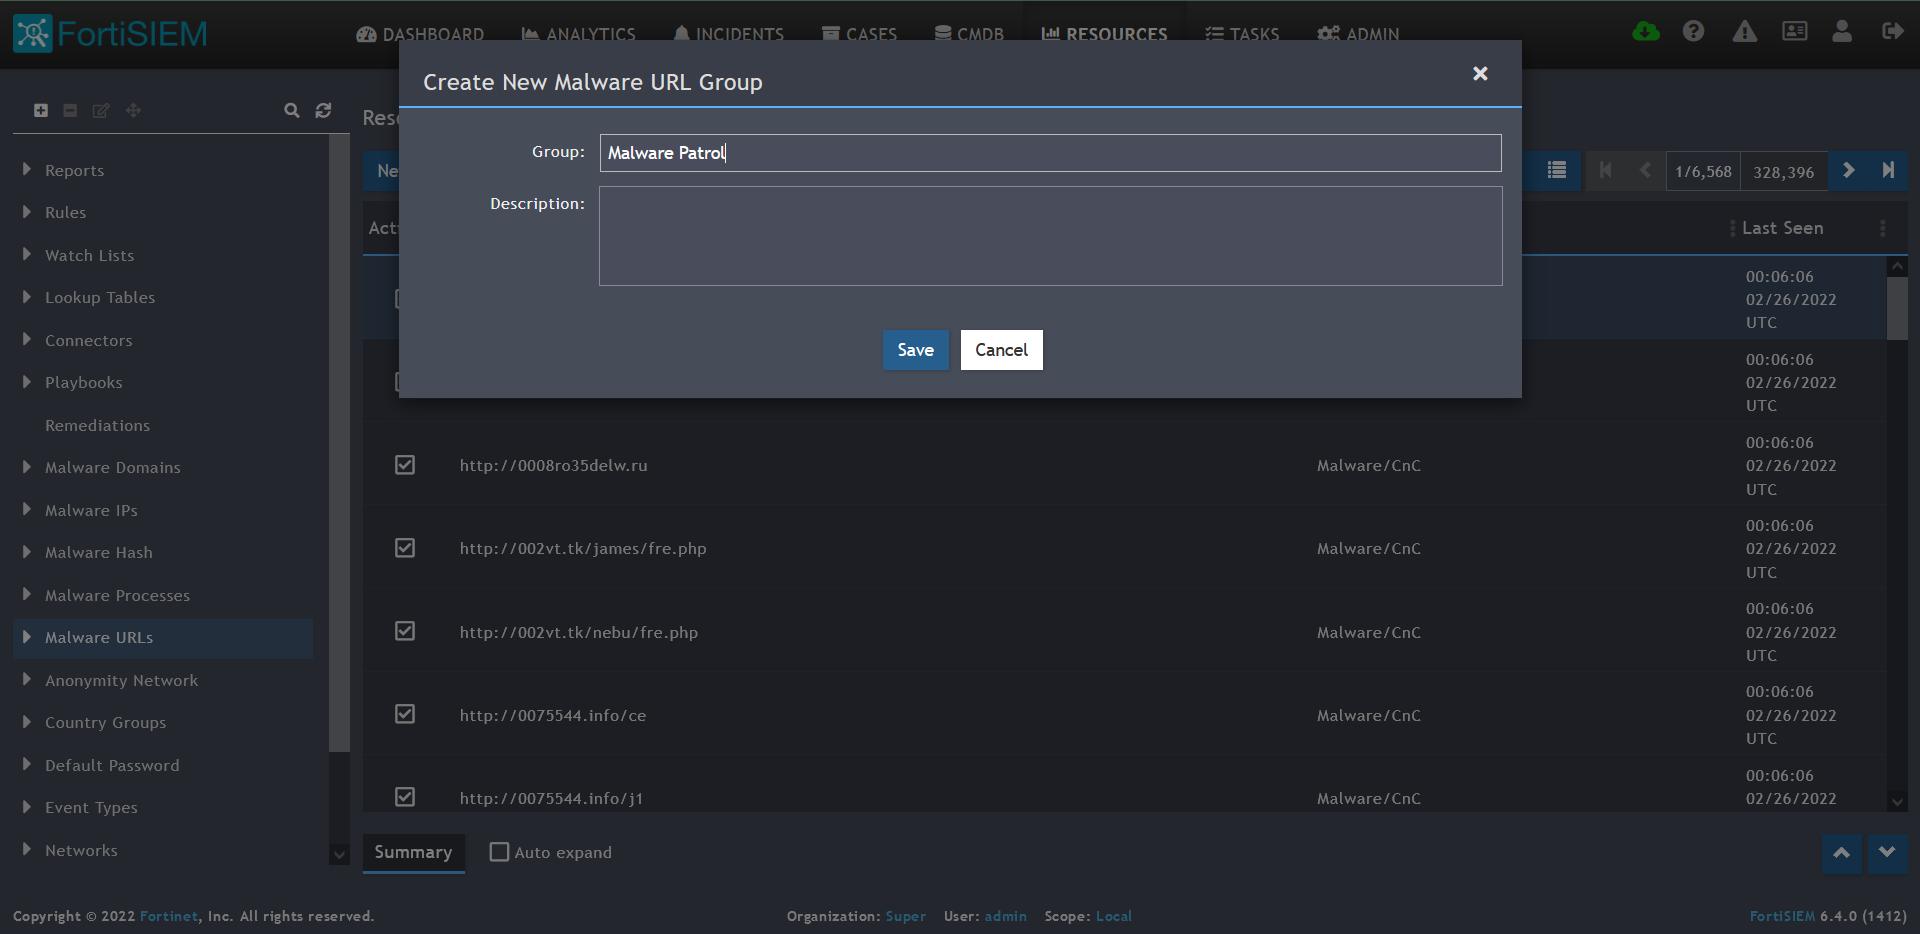 4) Enter a group name. We will use Malware Patrol for this guide.
5) Click save. The Malware Patrol group will now appear under the Malware URLs section.
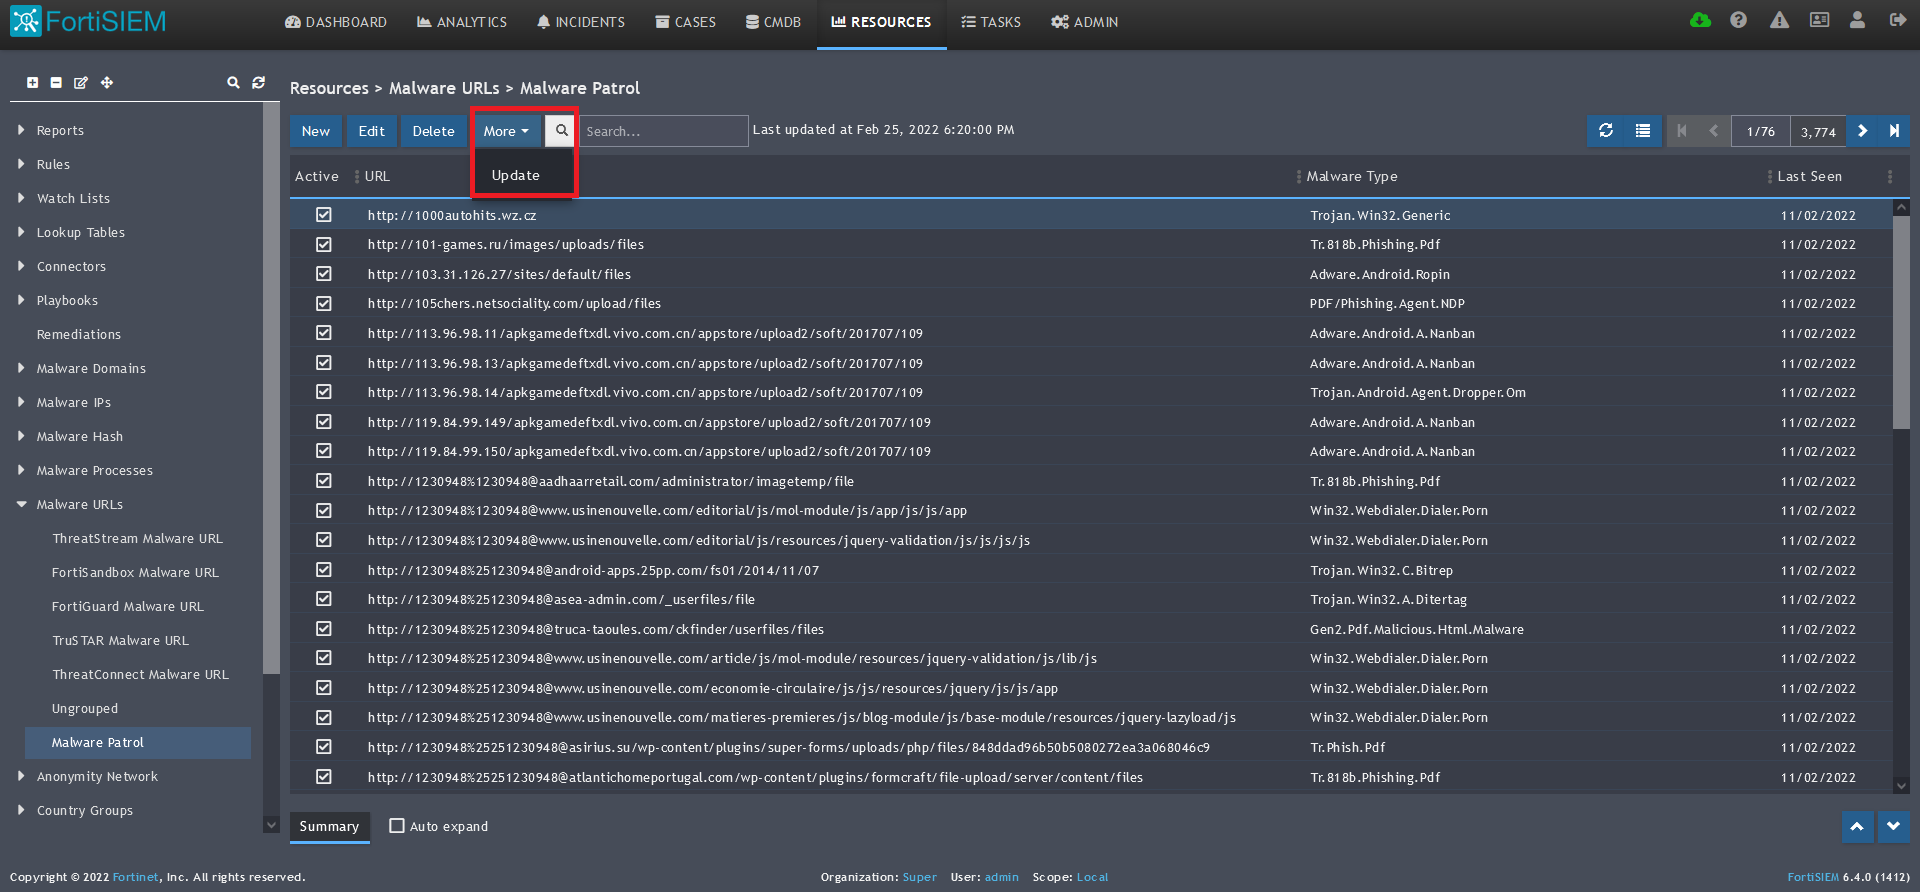 6) Select/highlight the Malware Patrol group and then More from the top menu.
7) Select Update from the drop-down menu. 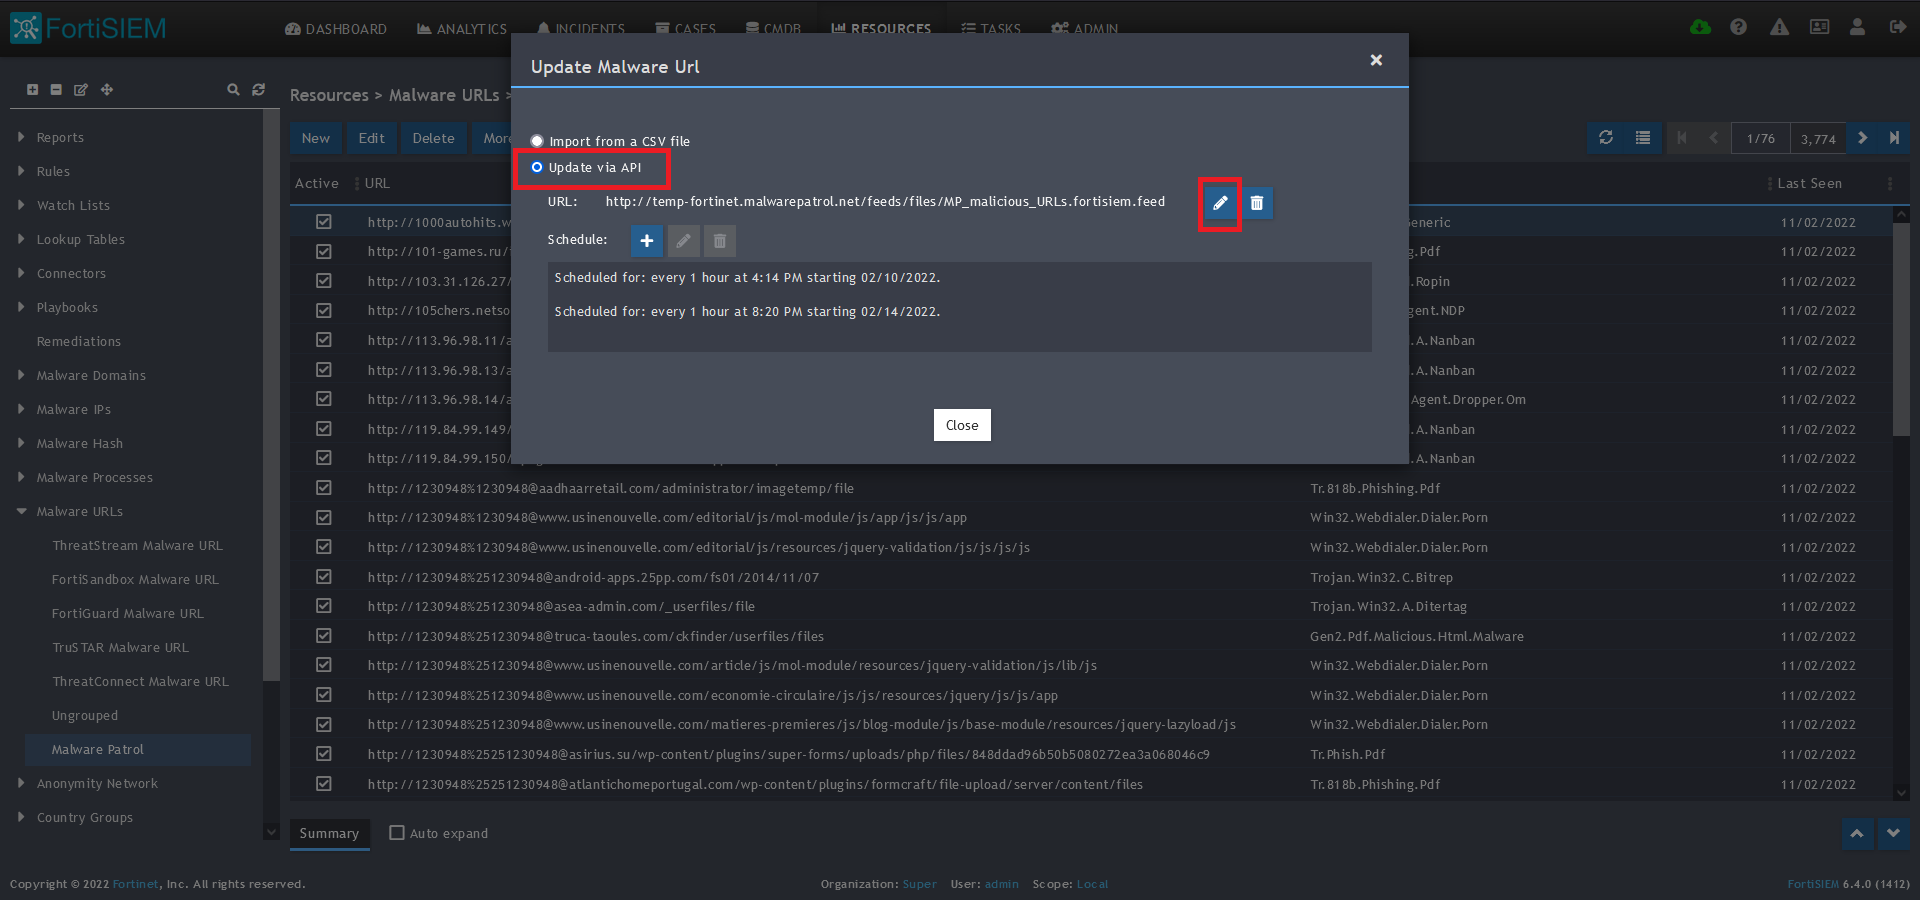
8) On the next screen, choose Update via API and click on the edit (pencil) button.
 9) Enter the following to set up the feed update:
- URL of your Malware Patrol Malware URLs feed or evaluation feed. This can be obtained by right clicking on the feed’s link in the Malware Patrol customer or evaluation portal.
- Your Malware Patrol portal username and password
- Plugin Class: no changes
- Field separator: ,
- Data format: CSV
- Data update: Full
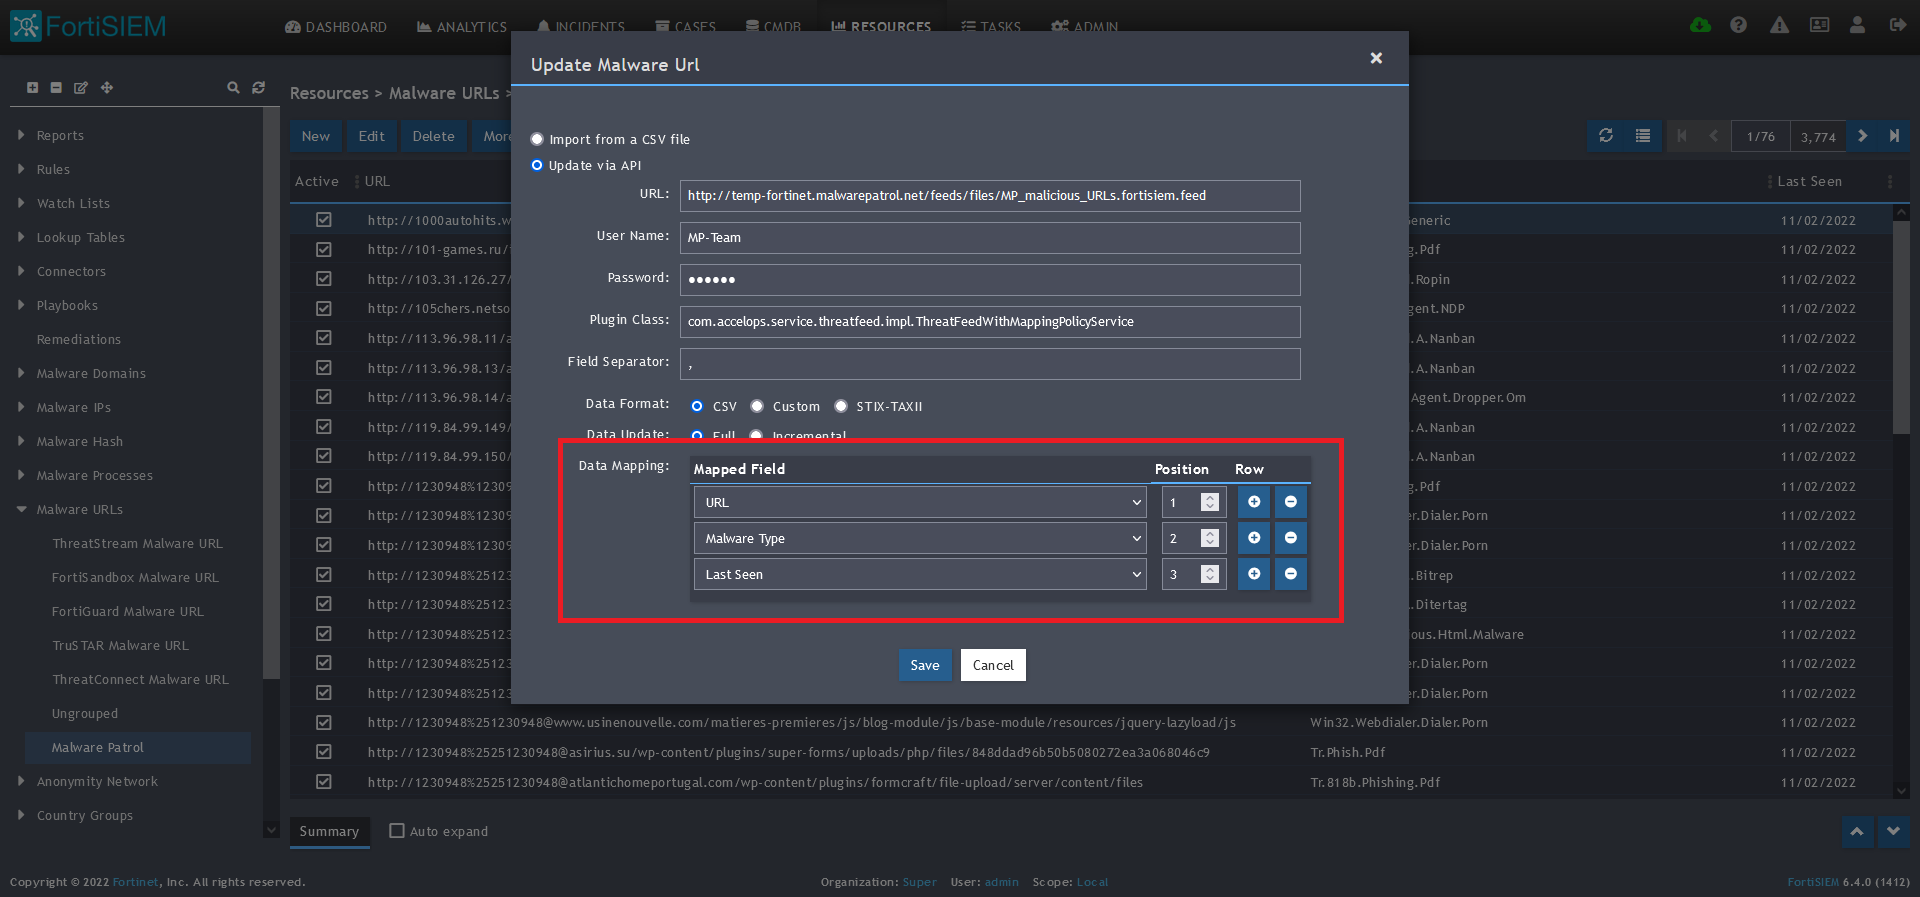 10) In the Data Mapping section, match the following:
- URL, Position 1
- Malware Type, Position 2
- Last Seen, Position 3
11) Click Save 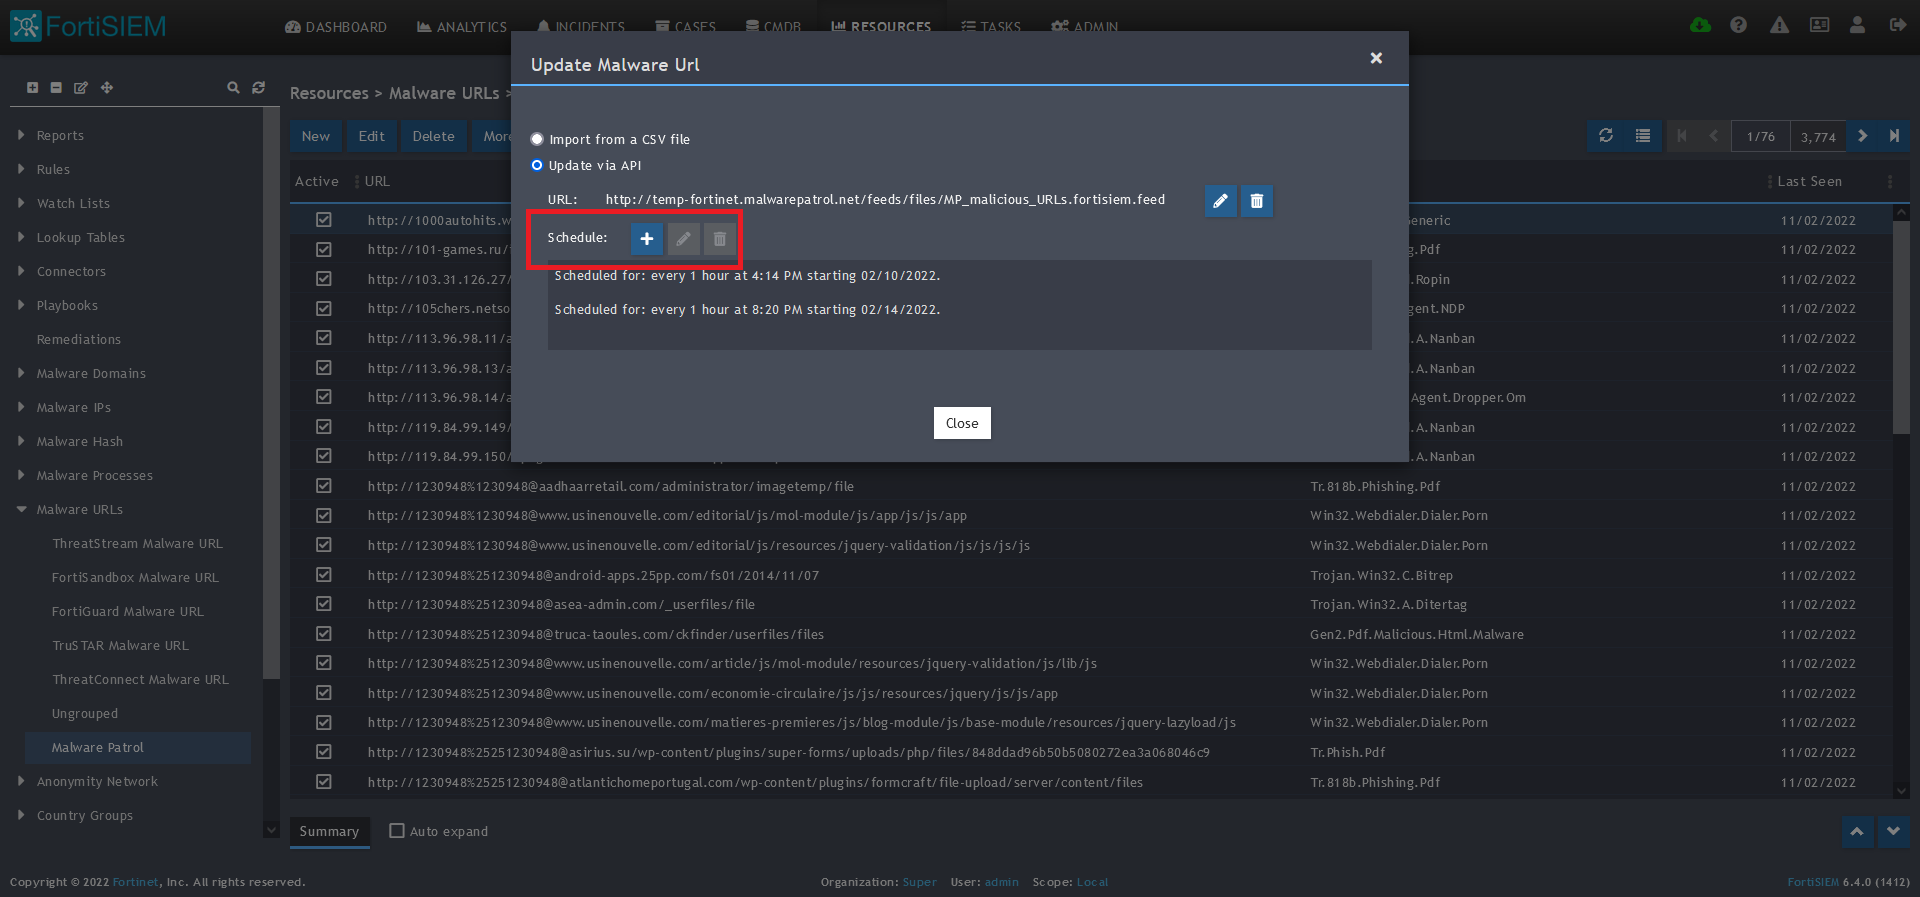
12) Click on the Schedule: + button 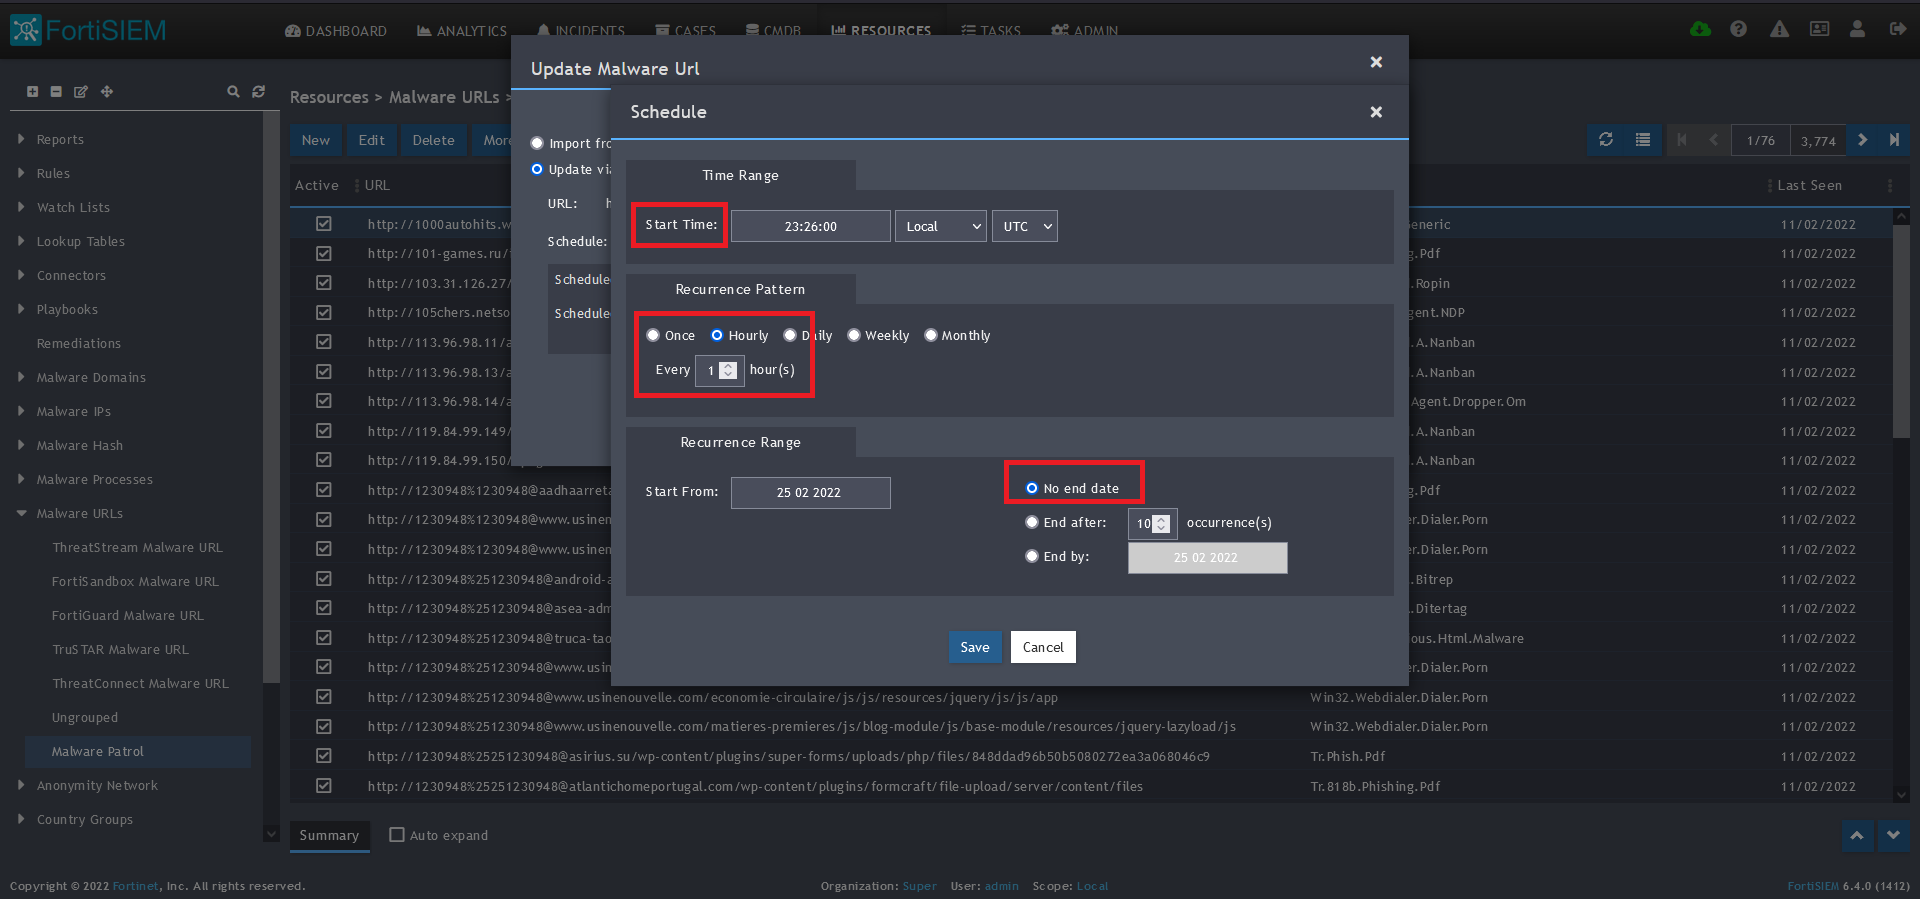
13) On the next screen, enter:
- Start Time: Set a start time a few minutes from the current time. This will cause the data to be updated after your setup is complete
- Recurrence Pattern: Hourly, Every 1 Hour (Malware Patrol feeds are updated on an hourly basis)
- Recurrence:
- Start From: Today’s Date
- End Date: No End Date
- Click Save
 14) The data will populate at the start time set above. If it does not, click the Refresh button at the top of the data display area. Another option is to go back to the schedule settings to verify the time you set for the updates to begin. You can set another time a few minutes in the future.
15) To change the columns displayed once the data populates, click on the Select Columns button located beside the refresh button. Use the data mapping information from the setup process for each feed to know which fields are available in the Malware Patrol feed.
If you need any assistance with your FortiSIEM integration, please email support (@) malwarepatrol.net or contact your Account Manager.
Mikrotik (Enterprise Customers)
Malware Patrol provides a version of our Enterprise Malicious IPs and Malicious Domains data feeds compatible with Mikrotik.
“MikroTik is a Latvian company founded in 1996 to develop routers and wireless ISP systems. MikroTik now provides hardware and software for Internet connectivity in most of the countries around the world. Our experience in using industry standard PC hardware and complete routing systems allowed us in 1997 to create the RouterOS software system that provides extensive stability, controls, and flexibility for all kinds of data interfaces and routing.”
You can follow these simple steps to configure your Mikrotik to filter malicious IPs and/or domains to protect your network, computers, and users from getting infected by malware and ransomware. This includes IPs and domains derived from C2s, DGAs and URLs hosting malware and ransomware binaries.
1) You will need the username and password provided to you by Malware Patrol. If you are evaluating, this will be your evaluation portal credentials. If you are a customer, you will use your account login details and portal URL.
2) Execute the following commands in Mikrotik’s CLI:
Malicious Domains
/system script add name=MP_UpdateMaliciousDomains owner=admin policy=ftp,read,write dont-require-permissions=no source={
/tool fetch url=_URL_FROM_EVAL_OR_CUSTOMER_PORTAL_ mode=https dst-path=MP_malicious_domains.mikrotik.rsc
/ip firewall address-list remove [find where comment=MP_Malicious_domain]
/import file-name=MP_malicious_domains.mikrotik.rsc ;
}
/ip firewall filter add chain=forward action=drop protocol=tcp dst-address-list=MP_MaliciousDomains log=yes log-prefix=Blocked_by_MP_MaliciousDomains
/system scheduler add name=MP_UpdateMaliciousIPsFeed interval=1h on-event=MP_UpdateMaliciousIPs owner=admin policy=ftp,read,write
Malicious IPs
/system script add name=MP_UpdateMaliciousIPs owner=admin policy=ftp,read,write dont-require-permissions=no source={
/tool fetch url=_URL_FROM_EVAL_OR_CUSTOMER_PORTAL_ mode=https dst-path=MP_malicious_ips.mikrotik.rsc
/ip firewall address-list remove [find where list=MP_MaliciousIPs]
/import file-name=MP_malicious_ips.mikrotik.rsc;
}
/ip firewall filter add chain=forward action=drop protocol=tcp dst-address-list=MP_MaliciousIPs log=yes log-prefix=Blocked_by_MP_MaliciousIPs
/system scheduler add name=MP_UpdateMaliciousDomainsFeed interval=1h on-event=MP_UpdateMaliciousDomains owner=admin policy=ftp,read,write
The code above will create a script that downloads and updates the Malicious IPs and/or Malicious Domains list. The system scheduler portion will schedule the download and update processes to happen on an hourly basis. We advise this frequency because our lists are updated every hour.
If you encounter any difficulties during the configuration process, feel free to contact our tech support at support (@) malwarepatrol.net
Configuration guides for other systems can be found on our Tech Support page.
MineMeld (Enterprise Customers)
Palo Alto MineMeld is an extensible Threat Intelligence processing framework and the multi-tool of threat indicator feeds. Based on an extremely flexible engine, MineMeld can be used to collect, aggregate and filter indicators from a variety of sources and make them available for consumption to peers or to the Palo Alto Networks security platforms.
This versatile tool can be used to grab data feeds of IPs, URLs and domains and aggregate, deduplicate, process it and output the final result in formats suitable to in Palo Alto Networks products. MineMeld can also be configured to send data to Splunk.
Malware Patrol has determined the steps required to allow our customers to utilize our data feeds on MineMeld. The following steps are required to create a miner, a processor and finally an output. The entire process follows the logic of creating and configuring prototypes based on existing entities and later cloning them. Keep this in mind and the logic will be clearer as we move forward through each step.
We have created a specific Enterprise data feed for MineMeld consumption. You can find its URL in the evaluation or customer portal. If you are a current customer, please contact your Sales Manager to have the feed added to your portal. This configuration guide shows how to extract URLs from that feed. The same logic can be applied to create new a miner, processor and output for other indicators contained in the feed.
1) If you don’t have MineMeld installed and configured yet, you can download a preconfigured a virtual machine or the software’s source code from Github. Please visit the following URLs for more details:
a. https://www.paloaltonetworks.com/products/secure-the-network/subscriptions/minemeld
b. https://live.paloaltonetworks.com/t5/MineMeld-Articles/Manually-install-MineMeld-on-Ubuntu-Server-16-04/ta-p/253336
2) Once you successfully log in to MineMeld, click on Config to view the current list of miners, processors and output.
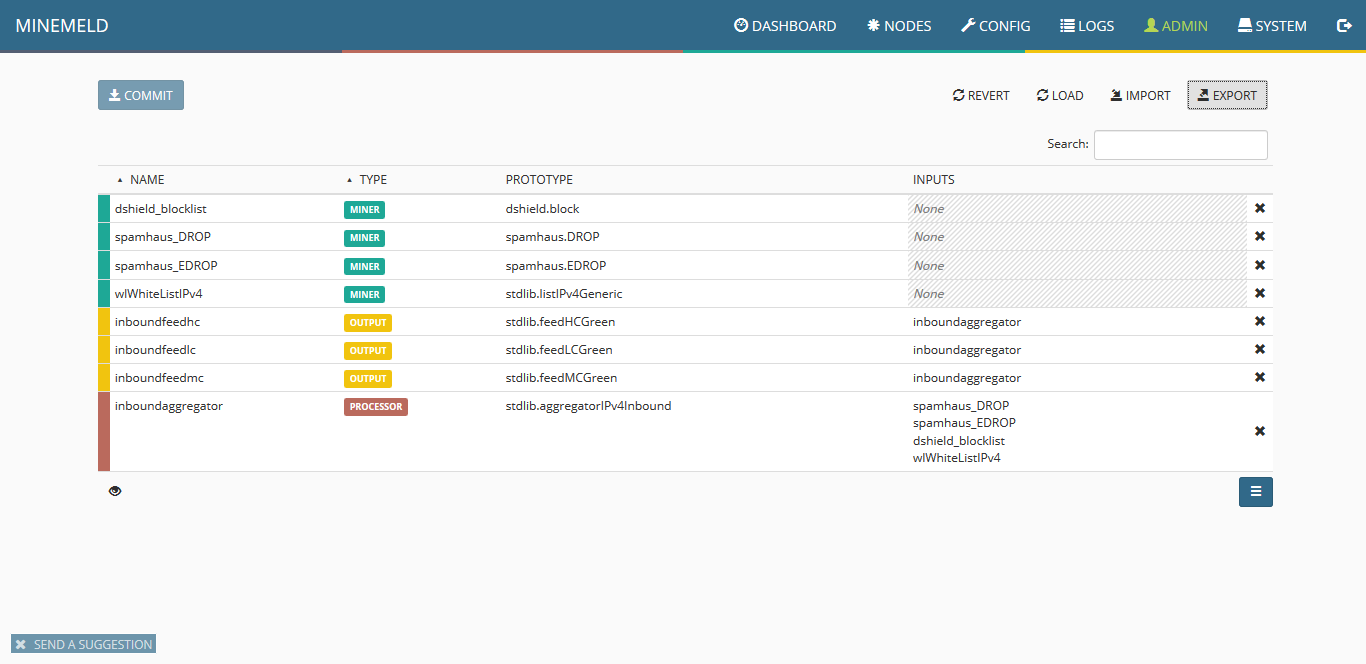
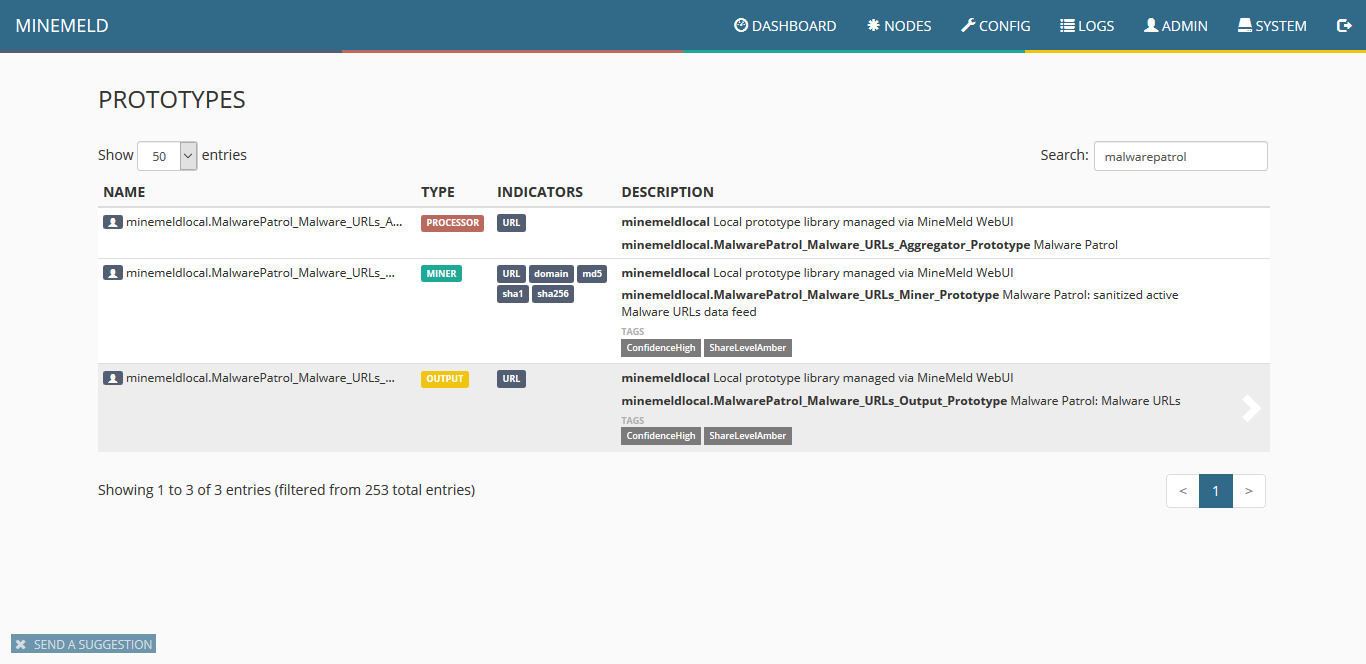
3) To configure a new miner prototype we will use an existing miner. Click the blue icon on the lower right corner of the screen named browse prototypes. In the search field, type ssla and once the list is updated, select sslabusech.ipblacklist.

4) Once the miner configuration is displayed, click on new.
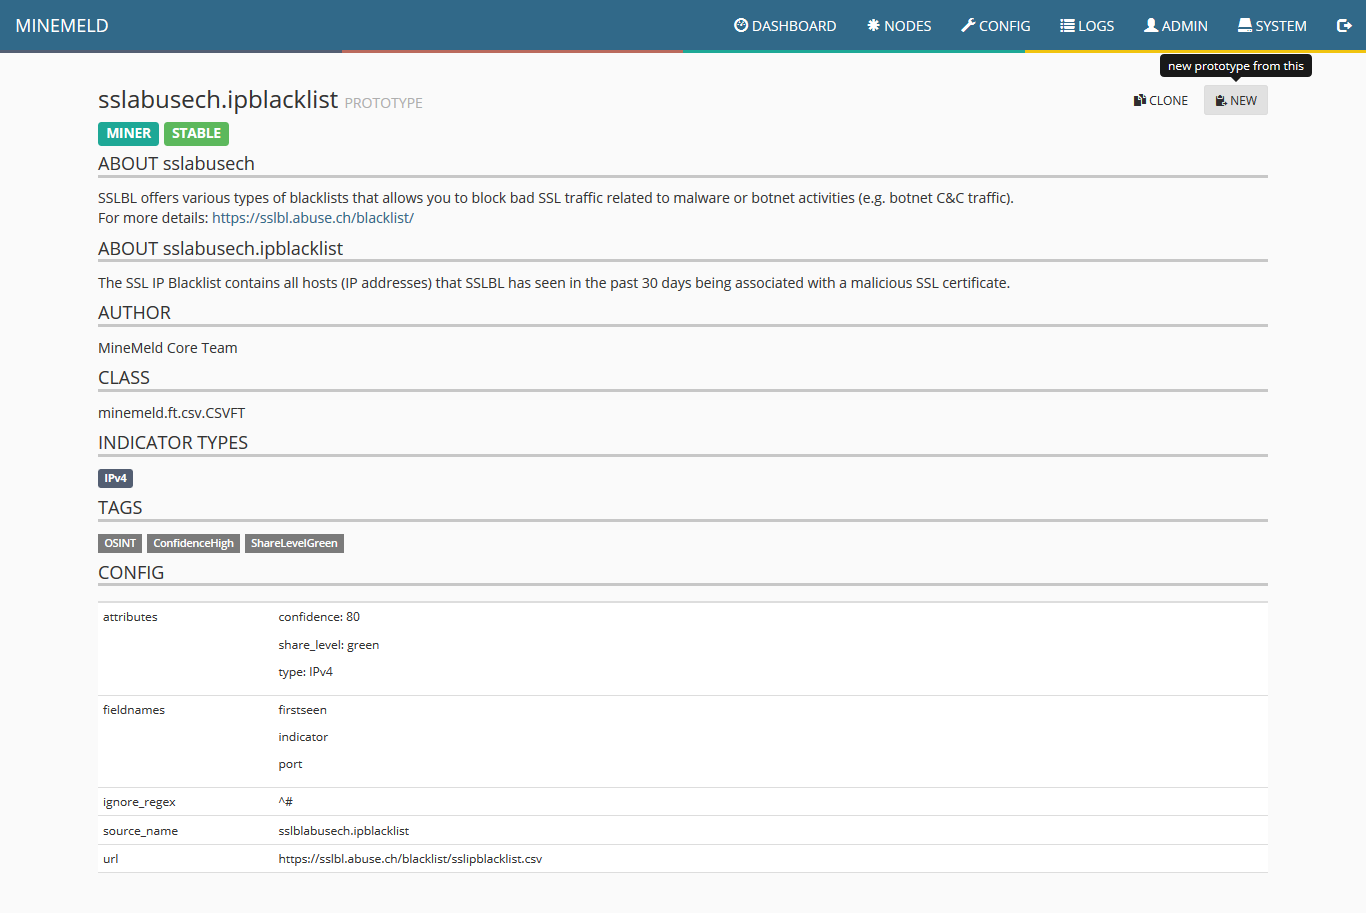
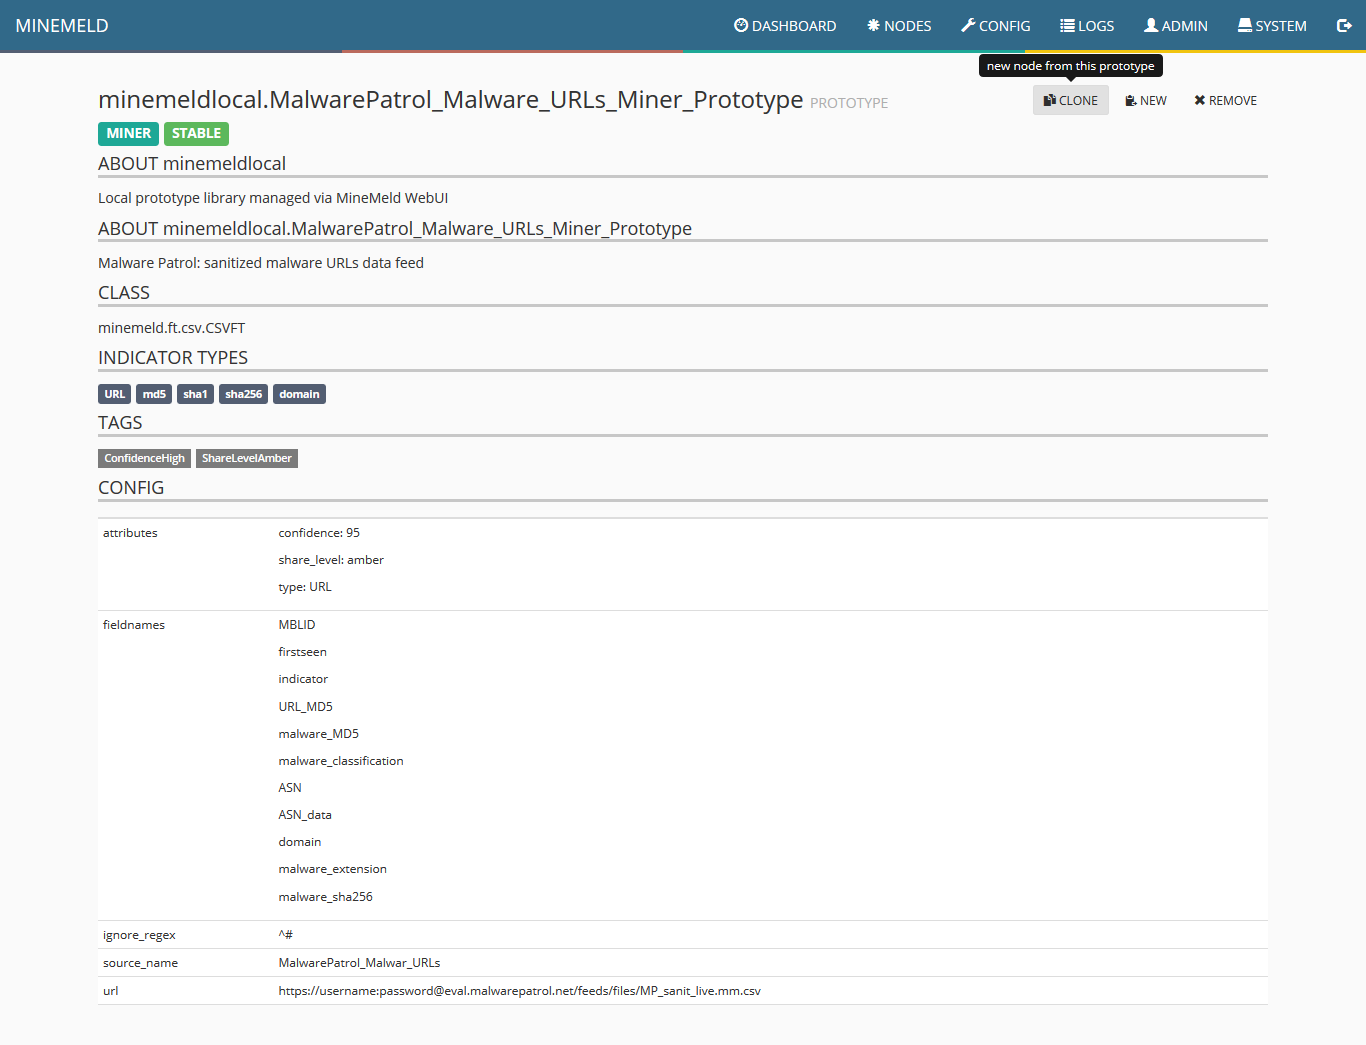
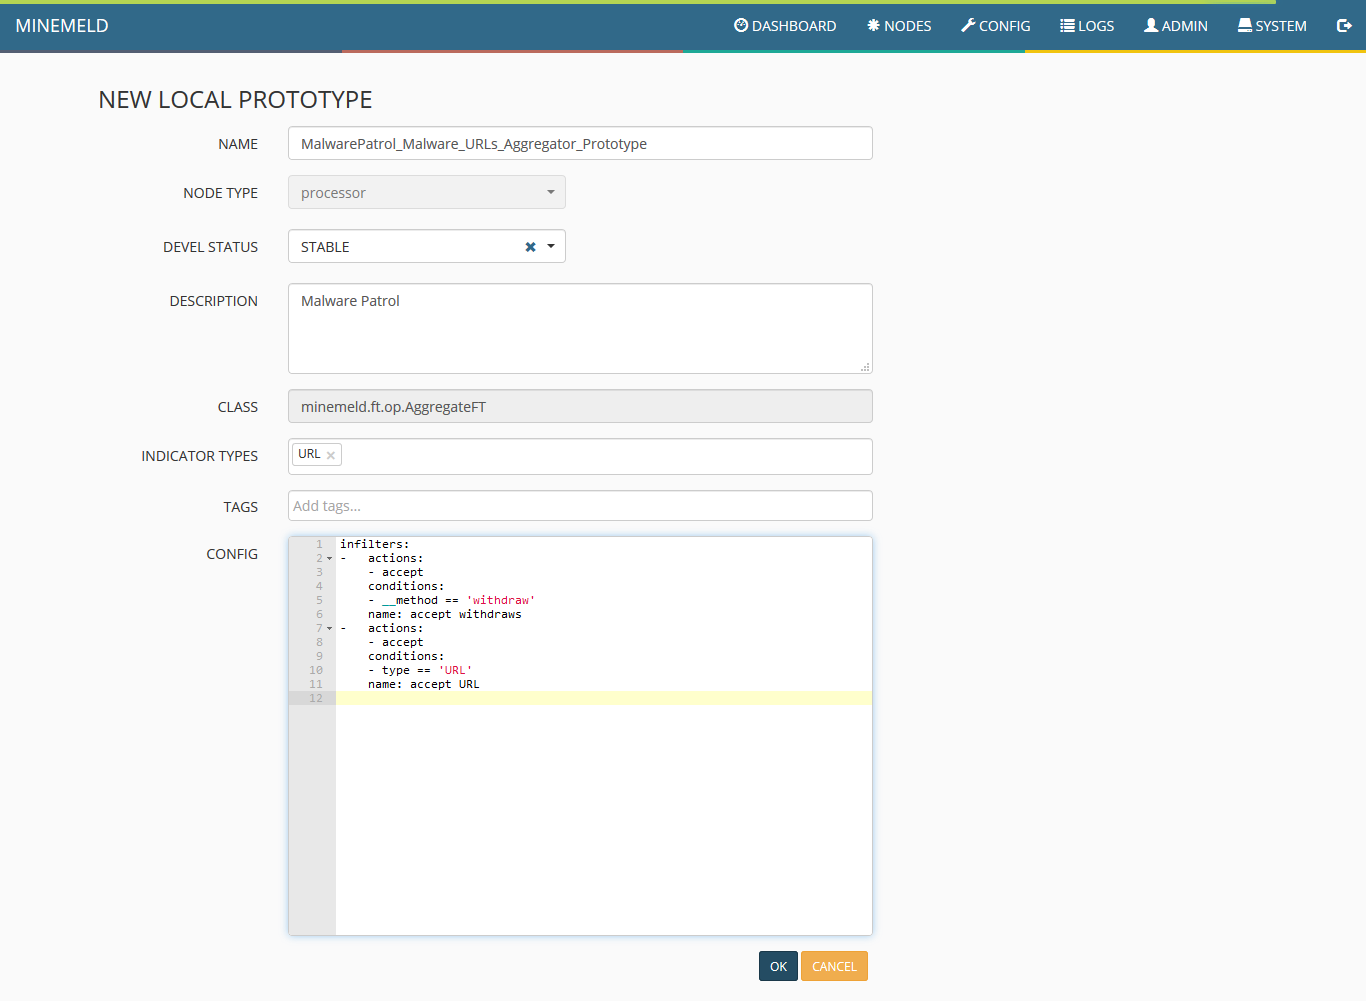
5) Make the necessary changes to each field according to the following image. Special attention must be taken to the field CONFIG and the line url. This must be filled with the URL of Malware Patrol’s data feed for MineMeld data feed. As explained previously the address can be found in your evaluation or customer portal. After properly populating the fields, click ok.
6) You will see the new miner prototype created, click on it.
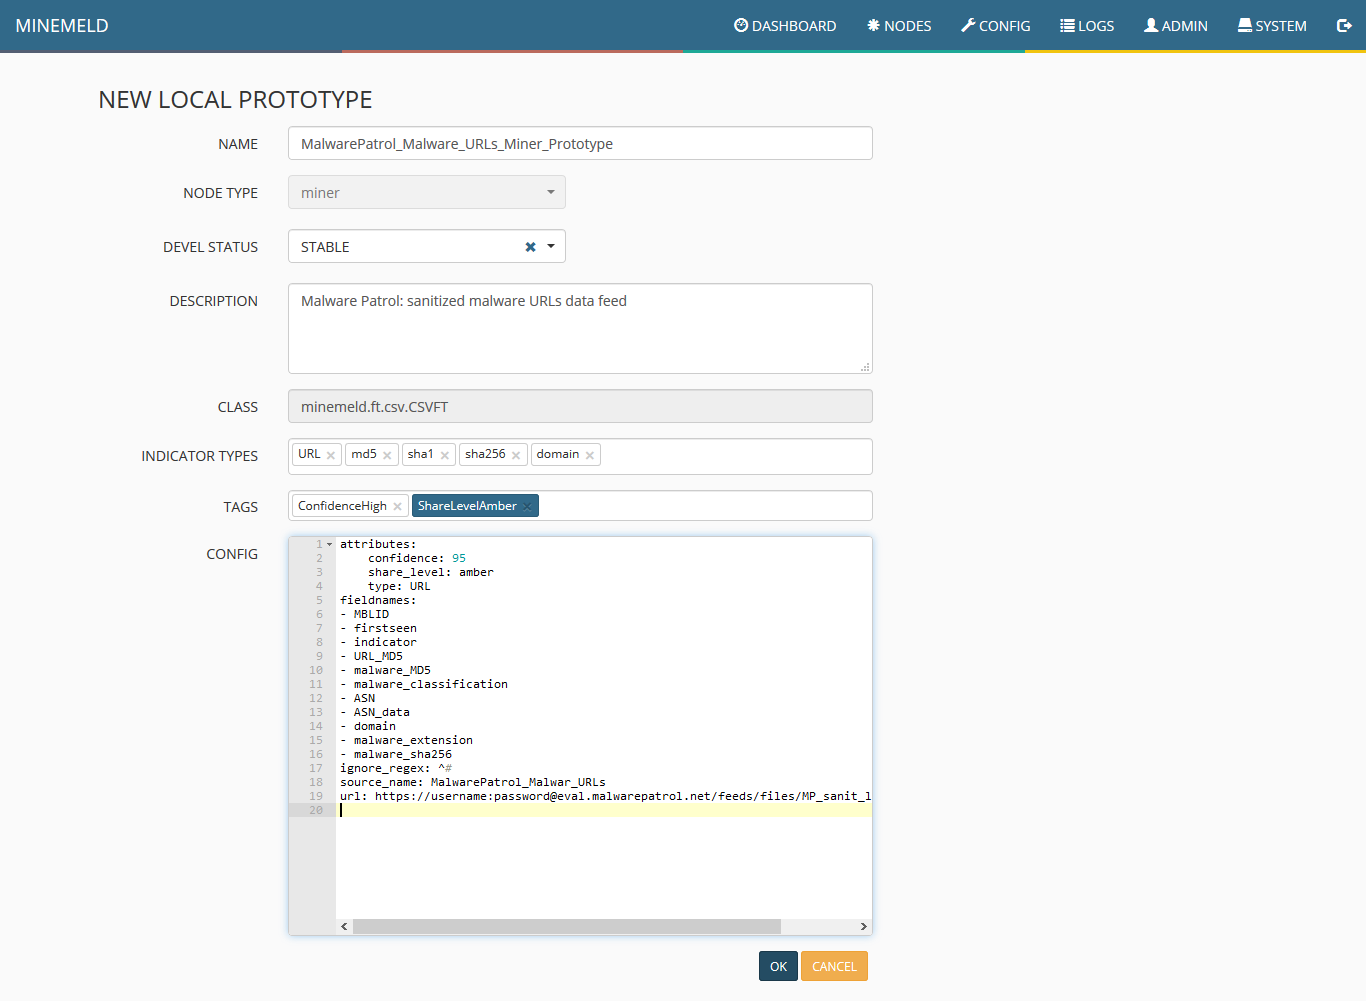
7) When the miner loads, click on clone.
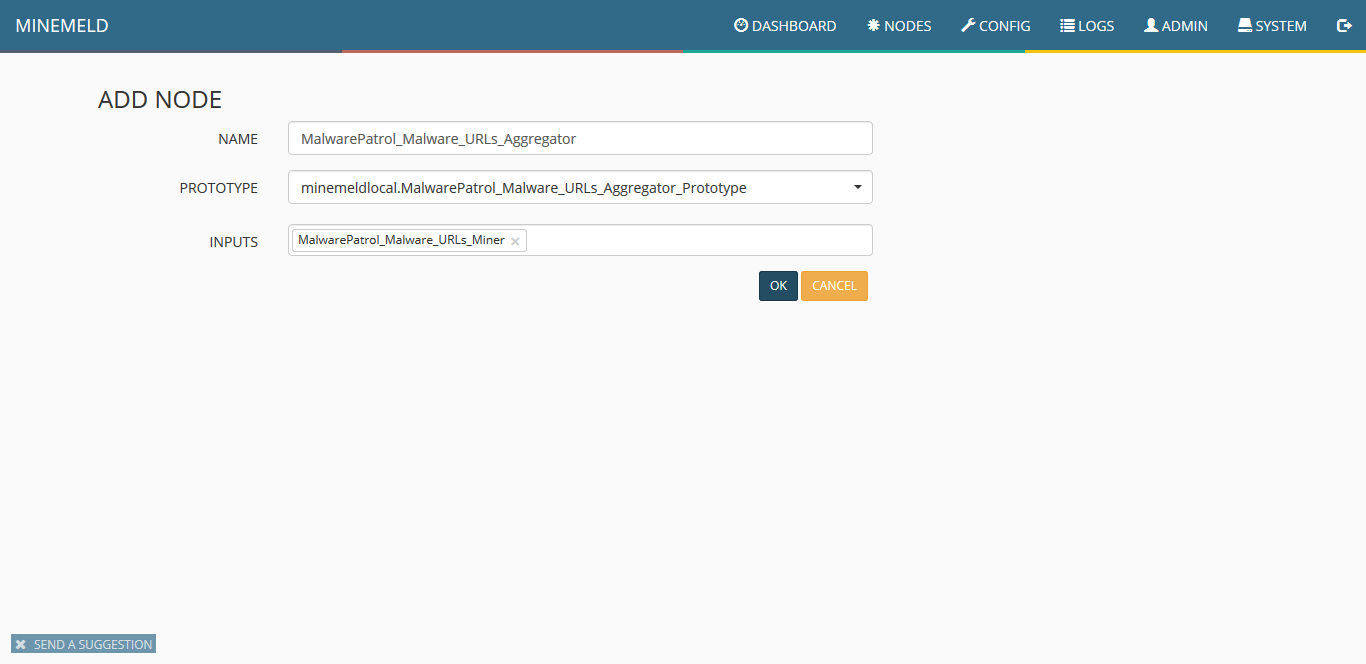
8) Fill the two fields as shown in the following screenshot and click ok.

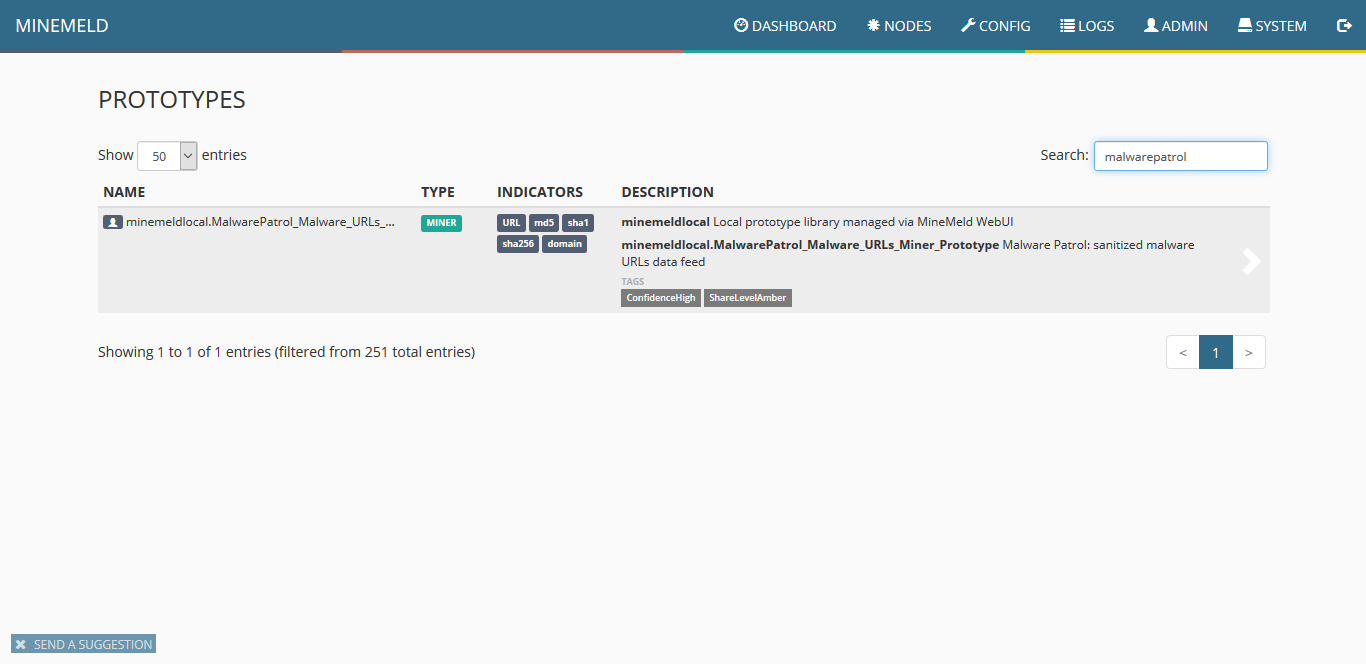
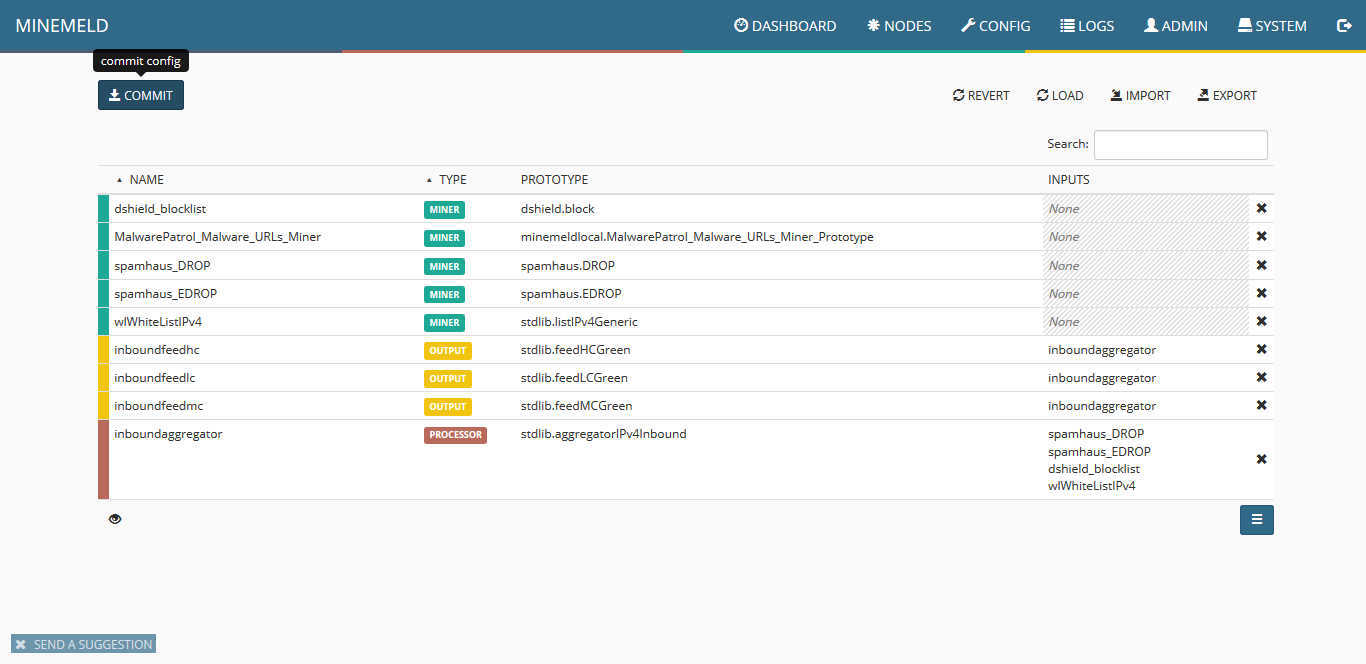
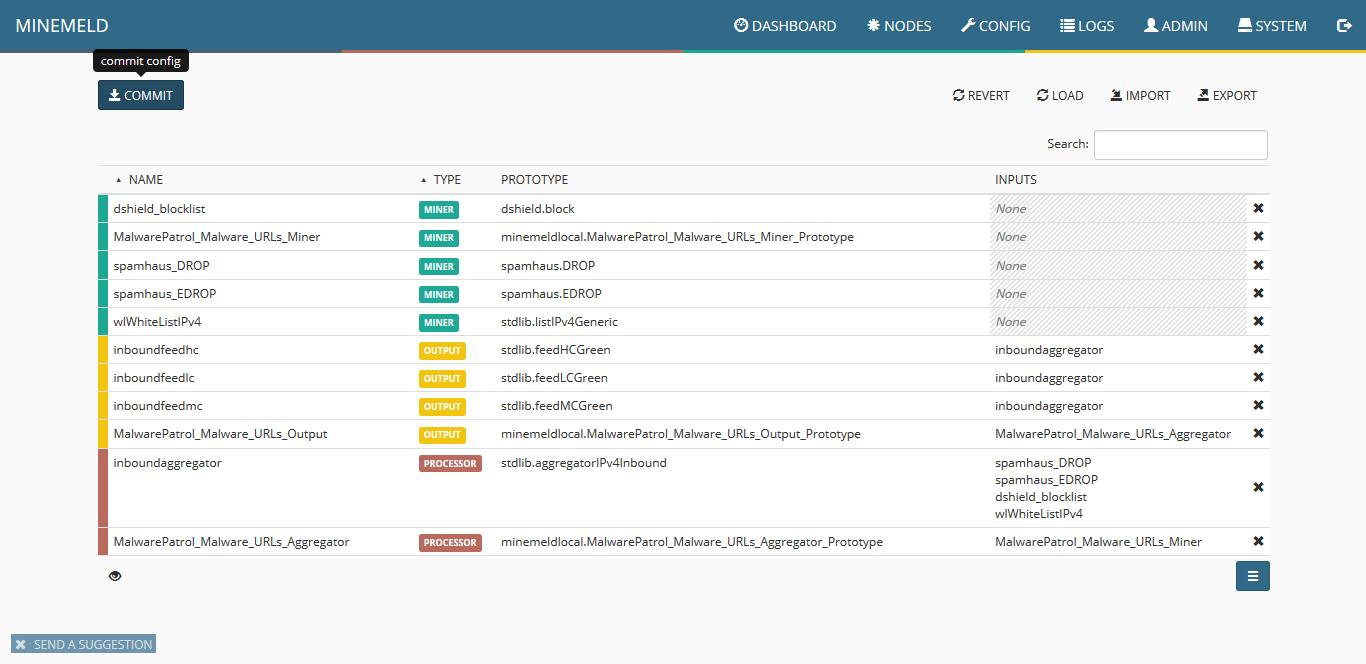
9) The screen will show all the available items, including the new miner. Click on commit to push the changes. Wait a few seconds as some components of MineMeld will be restarted.
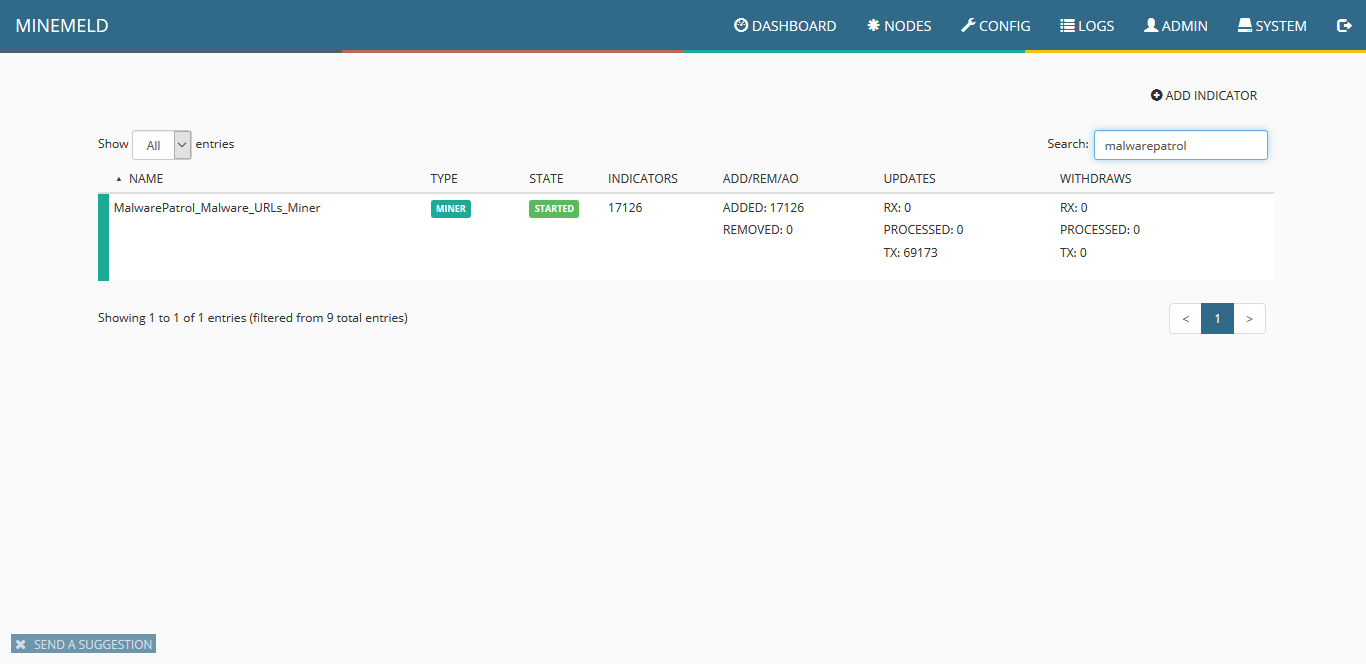
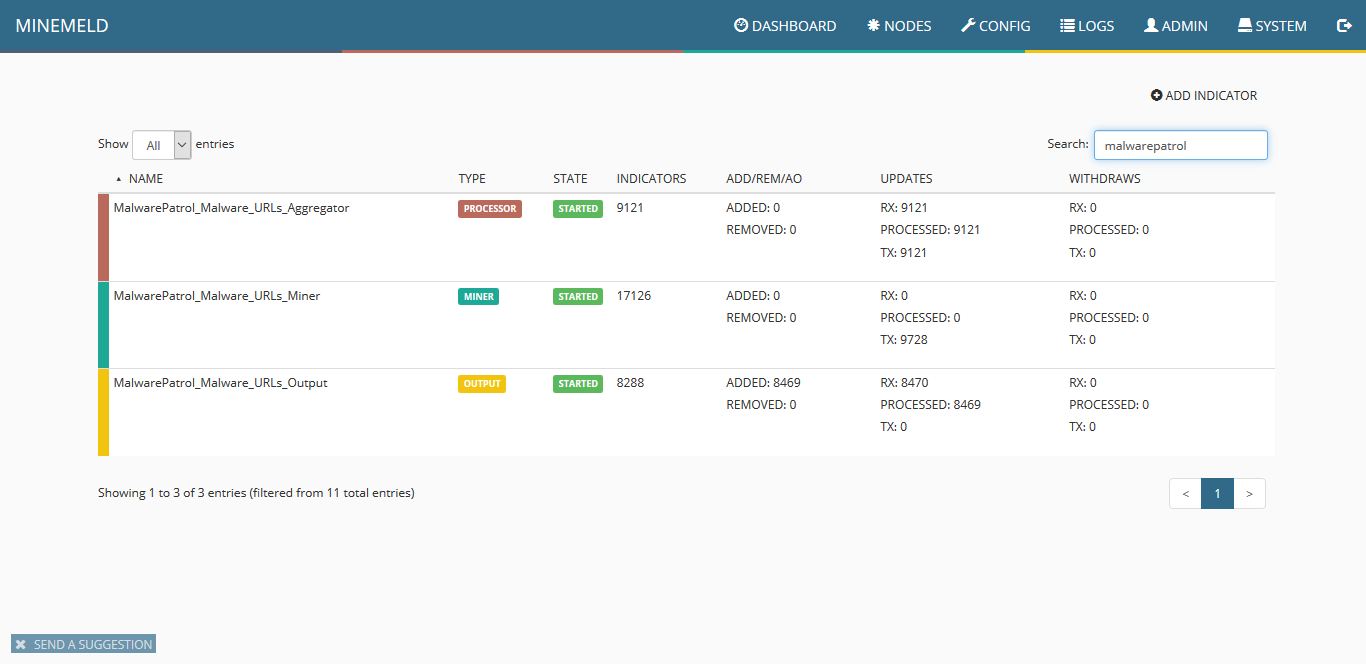
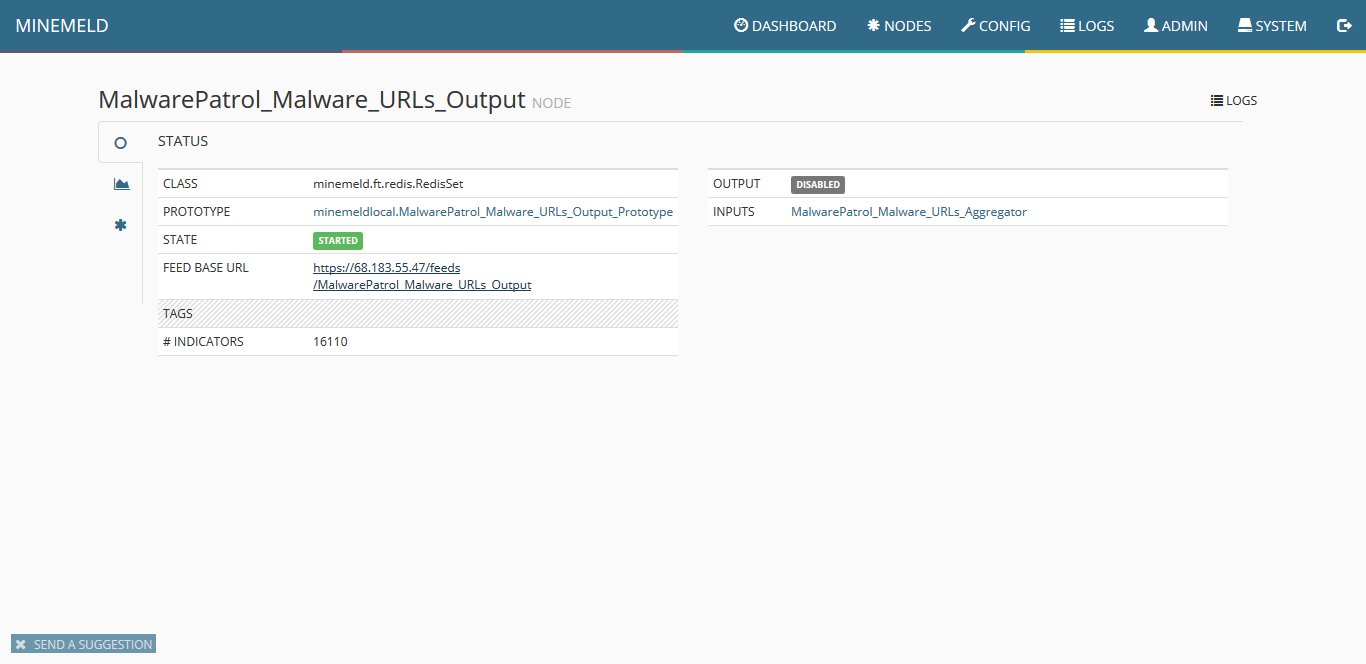
10) Click on nodes and use the search field to look for malwarepatrol. You should see the new miner. Pay close attention to indicators that should show an increasing amount of items pulled from our data feed.
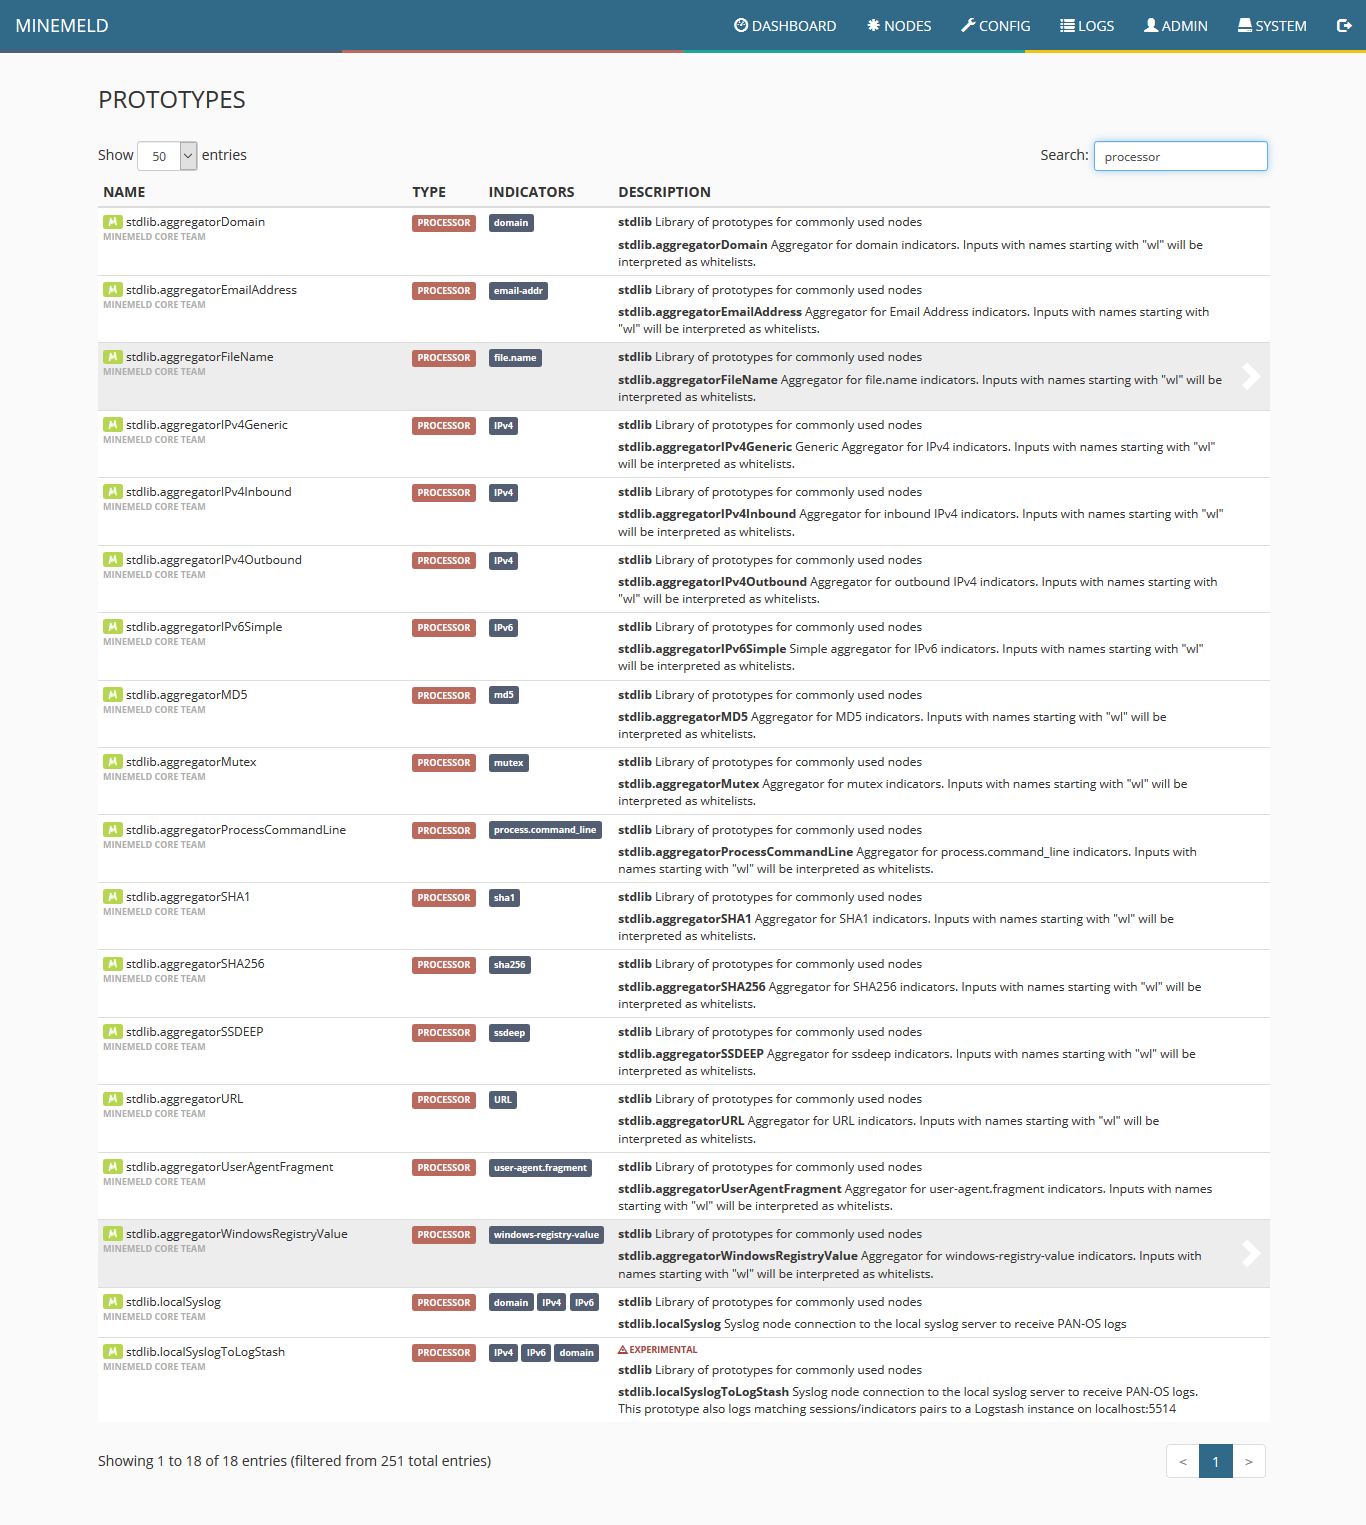
11) To create the processor prototype, click on config and then the blue icon on the lower right corner of the screen named browse prototypes. Search for processor. In the list displayed, click on stdlib.aggregatorFileName
12) Click new and fill the form fields according to the following screenshot and click ok.
13) Once the list of prototypes is shown, click on the newly created one and choose clone. Fill the form according to the next screenshot.
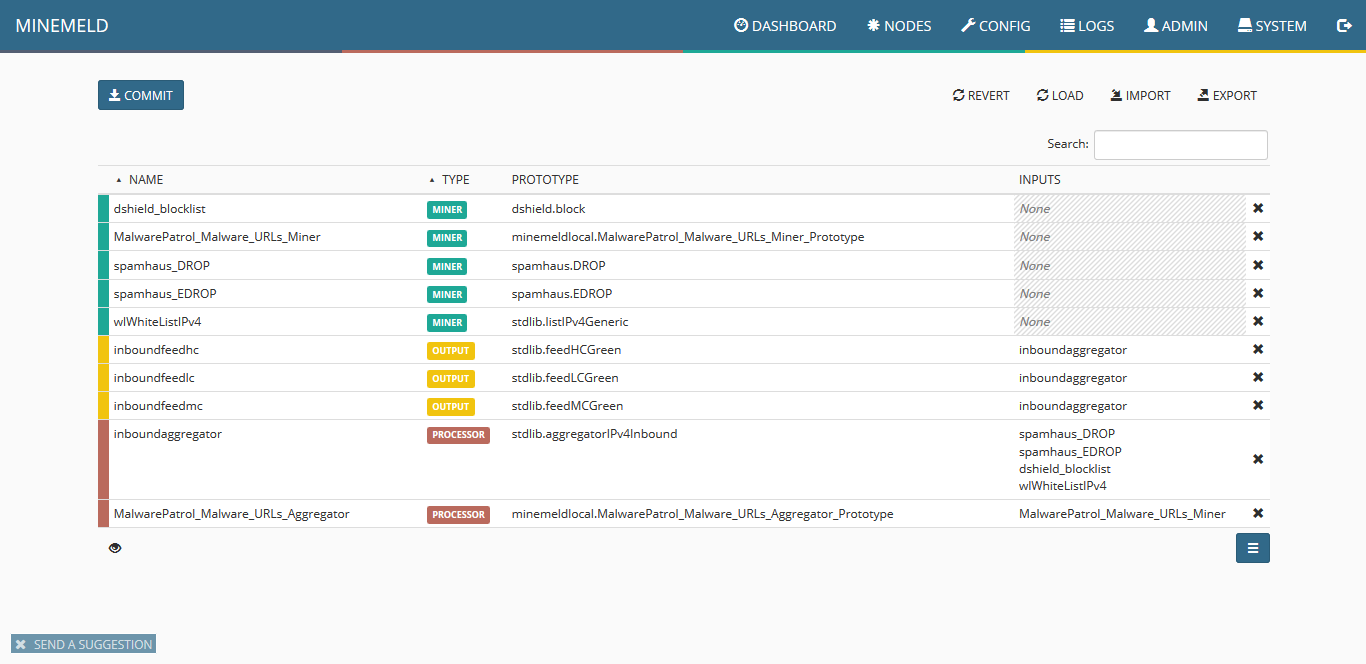
14) Clicking on config you should see a screen similar to the following:
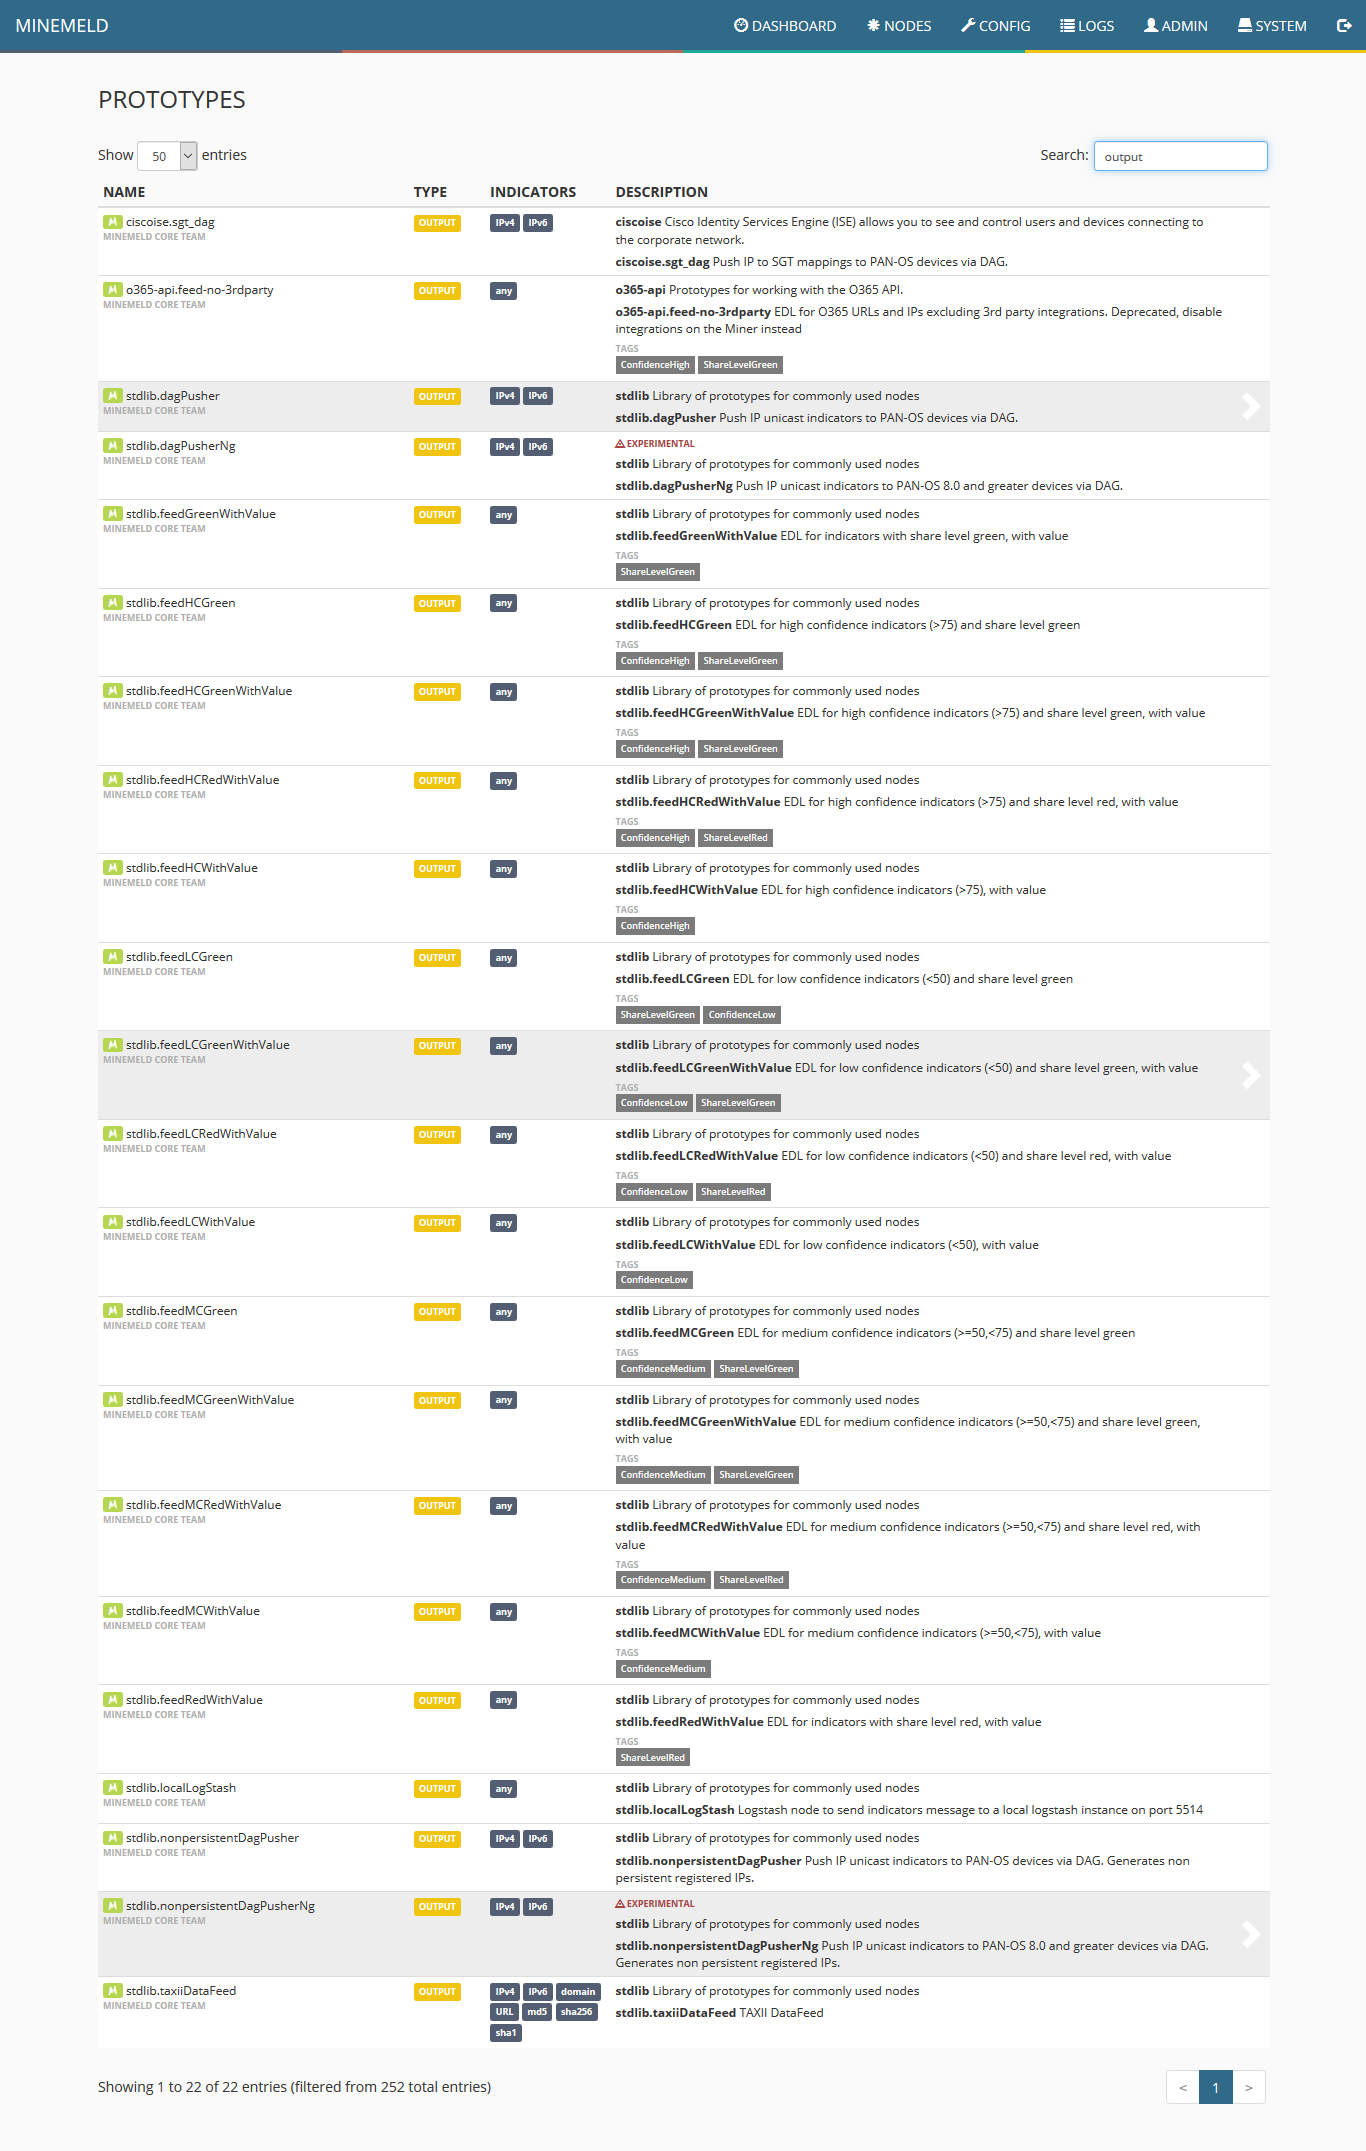
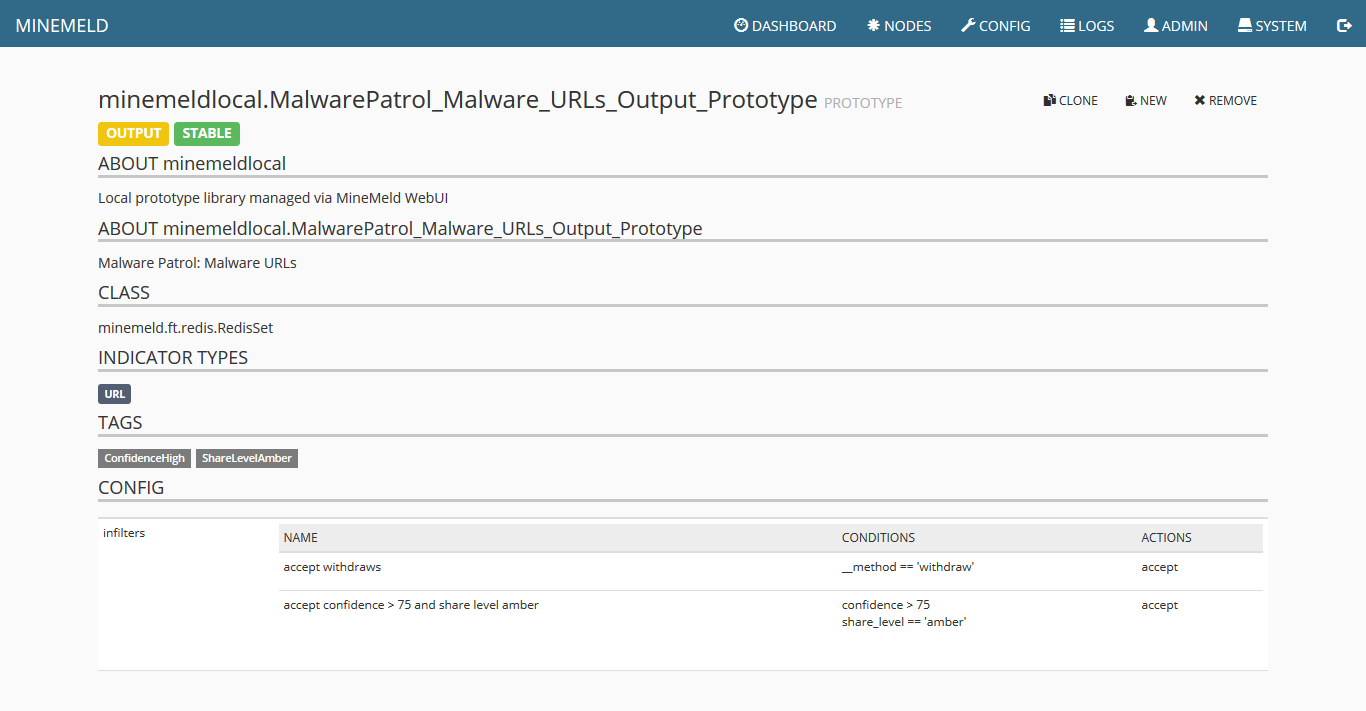
15) Now to create an output prototype, click the blue icon on the lower right corner of the screen named browse prototypes. Search for output and in the list that will be displayed, click stdlib.dagPusher.
16) Fill the form fields as in the following screenshot and click ok.

17) In the list that will be displayed, click the newly created prototype.
18) Click clone.
19) At this point, the list displayed should contain one new item for a miner, processor and output. Click on commit to make the changes effective. Wait a few seconds as some components of MineMeld will be restarted.
20) Click on nodes and search for malwarepatrol. You should see the three newly created items and the count of indicators increasing. That shows that data is flowing from our data feed into the miner, processor and finally made ready by the output.
21) Clicking on output you can see details including the URL of the finalized feed that can be consumed by Palo Alto Networks systems.
22) For information on MineMeld and how to connect it with other Palo Alto Networks products and Splunk, please visit the following URLs.
- Create Dynamic Firewall Rules Based on MineMeld Threat Feeds: https://www.virtualizationhowto.com/2018/12/create-dynamic-firewall-rules-based-on-minemeld-threat-feeds/
- Create a MineMeld input in Splunk: https://splunk.paloaltonetworks.com/autofocus-and-minemeld.html
- Quick tour of MineMeld default config: https://live.paloaltonetworks.com/t5/MineMeld-Articles/Quick-tour-of-MineMeld-default-config/ta-p/72042
- Using MineMeld to Create a Custom Miner: https://live.paloaltonetworks.com/t5/MineMeld-Articles/Using-MineMeld-to-Create-a-Custom-Miner/ta-p/227694
- Developer’s Guide: https://github.com/PaloAltoNetworks/minemeld/wiki/Developer’s-Guide
If you encounter any difficulties during the configuration process, feel free to contact our tech support at [email protected]. Configuration guides for other systems can be found on our Tech Support page.
MISP (Enterprise Customers)
MISP is a threat intelligence platform for gathering, sharing, storing and correlating indicators of compromise of targeted attacks, threat intelligence, financial fraud information and vulnerability information.
It can be configured to ingest MISP-formatted data feeds. To ingest the data provided by Malware Patrol following these steps:
1) In the customer portal or evaluation portal, search for the feed of interest. Once you find it, look for the “MISP compatible data feed” link. Right click on it and choose “Copy link location”.
2) Open your MISP instance and click on “Sync Actions / List Feeds”.
3) On the left menu, click “Add Feed”.
4) Fill the field “Name” as “Malware Patrol – _data_feed_name_” (for example: Malware Patrol – C2s). On “Provider” put “Malware Patrol”. Choose “Network” on “Input Source”.
5) The field “URL” should contain the link location you have copied from the customer portal or evaluation portal.
6) On “Source Format”, choose “MISP Feed”.
7) Click on “Add Basic Auth” and complete the fields with your “Username” and “Password” for the customer portal or evaluation portal. Then click on “Add Basic Auth Header”.
8) Adjust “Distribution”, “Default Tag” and “Filter rules” appropriately for your environment.
9) Click “Add”.
10) Back to the list of feeds, select the Malware Patrol data feed and click “Enable selected”.
11) Still in the list of feeds, for the Malware Patrol data feed, click in the last icon on the right named “Download”. Your MISP instance will download the current feed file, parse them and add to your instance.
Malware Patrol also provides data feeds via MISP server synchronization. Please contact your sales manager for details.
Palo Alto Networks NGFW Configuration Guide (Enterprise Customers)
Malware Patrol offers five Enterprise feeds formatted for use with Palo Alto Networks NGFW (PAN-OS). Customers choose the feed(s) that meet their needs:
1) DNS-over-HTTPS (DoH) Servers: This feed gives security teams control over the use of DoH in their environment. DoH wraps DNS queries in an HTTPS request, which can disguise malicious traffic. Several malware families take advantage of this to use DoH for their C2 communications.
2) Malicious Domains: Prevent access to domains hosting malware, ransomware, phishing, cryptominers, and command and control servers (C2s) for over a hundred malware and ransomware families. Blocking C2 communication disrupts the attacker’s ability to execute malicious commands and navigate laterally within the network, essentially breaking the cyber kill chain.
3) Malicious IPs: Provides a first line of defense against threats for which signature-based indicators may not yet be available. The broad coverage of IPs may also extend protection to attacks from adversaries utilizing the same infrastructure. The feed includes IPs actively hosting malicious malware and ransomware files, phishing sites, as well as C2 servers.
4) Malware URLs: This feed contains URLs known to be hosting malware and ransomware binaries. By leveraging malicious URL feeds, security tools can block access to harmful links while still allowing legitimate services hosted on the same domain. This level of precision prevents the unnecessary blocking of popular and legitimate platforms, such as Dropbox or Google Drive, where malicious content is frequently hosted.
5) Scam Domains: Unlike other cyber threats that may rely on known patterns or malicious code, scams often leverage social engineering and psychological manipulation to deceive victims. That makes them hard to detect with conventional automated systems. This feed fills in the gaps for threat intellligence’s “gray area” with ScamAdviser’s extensive database covering online shopping, investment and crypto, identity theft, advance fees, employment, romance, subscriptions and other types of scams.
Integrating external threat intelligence into your organization’s firewall is a crucial step in fortifying cybersecurity defenses. Organizations gain a more comprehensive and well-rounded view of emerging threats when they diversify their information sources. Different providers may have varying expertise and access to distinct threat data, offering a broader spectrum of insights. This multi-sourced approach enhances the firewall’s ability to detect and block a wider range of malicious activities, reducing the risk of missing critical threats. It’s a strategic move that ensures a more robust and adaptable security posture, minimizing the chances of falling victim to sophisticated cyberattacks.
Malware Patrol offers free evaluations of our Enterprise feeds, including those for Palo Alto Networks NGFW (PAN-OS). Request your evaluation here.
PAN-OS External Dynamic Lists
Additional threat intelligence sources are integrated into Palo Alto Networks NGFW’s PAN-OS as “External Dynamic Lists” or EDLs. According to the PAN-OS Administrator’s Guide:
“An External Dynamic List is a text file that is hosted on an external web server so that the firewall can import objects—IP addresses, URLs, domains—included in the list and enforce policy. To enforce policy on the entries included in the external dynamic list, you must reference the list in a supported policy rule or profile. When multiple lists are referenced, you can prioritize the order of evaluation to make sure the most important EDLs are committed before capacity limits are reached. As you modify the list, the firewall dynamically imports the list at the configured interval and enforces policy without the need to make a configuration change or a commit on the firewall.”
Users can add up to 30 EDLs. There are per-firewall model restrictions on the number of entries allowed for each of the following object types: 1) IP address and 2) URL & Domain. Check the above referenced administrator’s guide for more details.
Pre-Integration – External Source Certificate Profiles
When EDL sources, such as Malware Patrol, are secured with SSL, you will need a certificate profile in order to authenticate the server hosting your data feed(s). Both the root CA (certificate authority) and intermediate CA certificates are required. Per the Administrator’s Guide (link above), you should “use the same certificate profile to authenticate external dynamic lists from the same source URL. If you assign different certificate profiles to external dynamic lists from the same source URL, the firewall counts each list as a unique external dynamic list.”
To get the certificates for Malware Patrol:
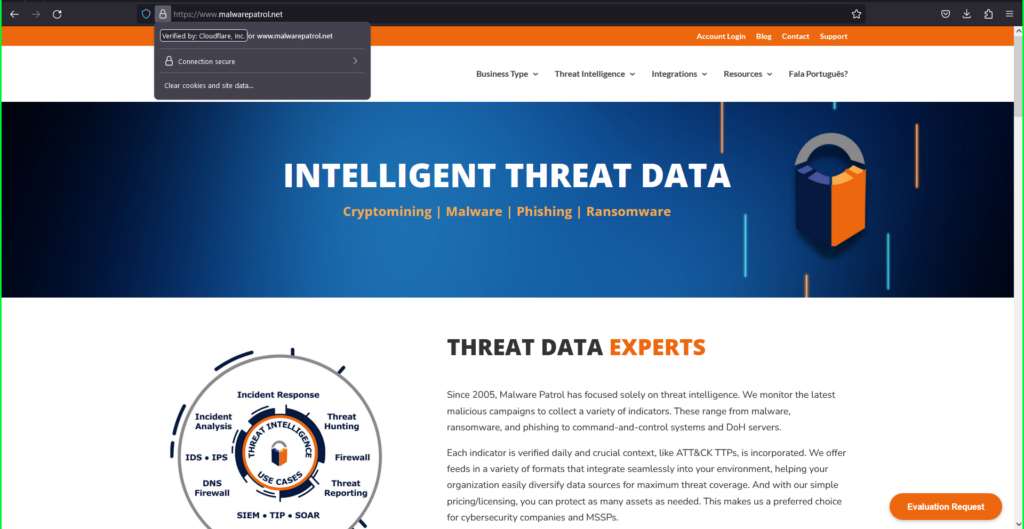
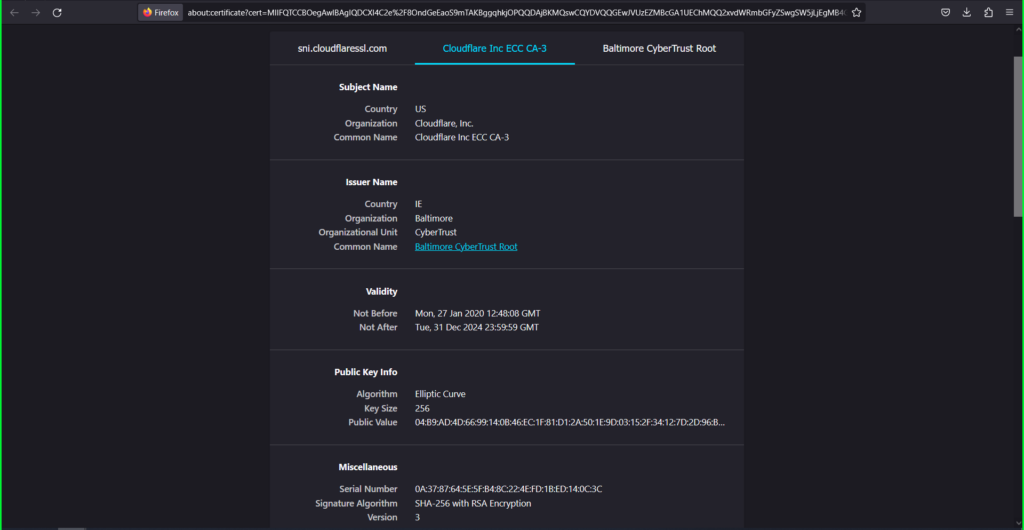
1) Navigate to https://malwarepatrol.net (We used the Firefox browser – instructions will vary for others.)
2) (Left) Click on the site security padlock icon
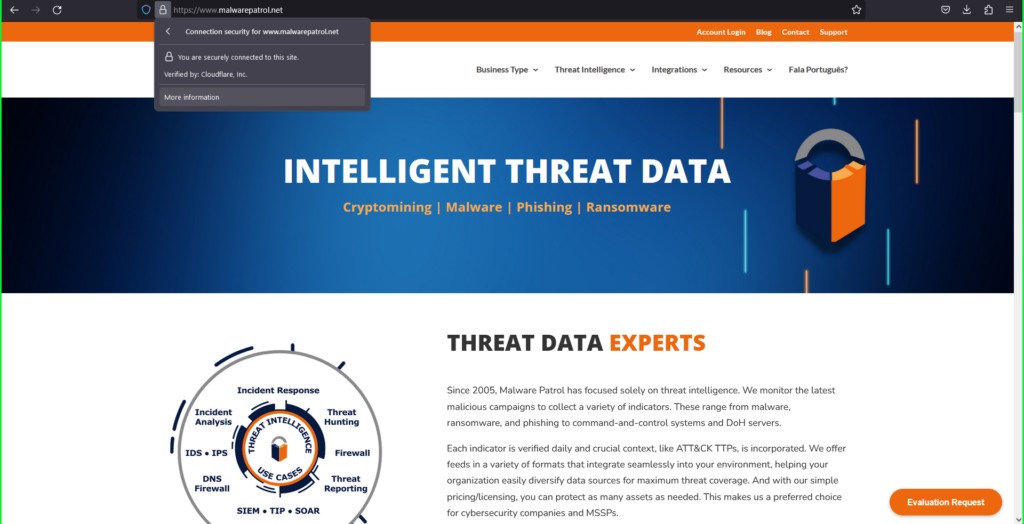
3) Select Connection Secure –> More Information.
4) Click View Certificate.
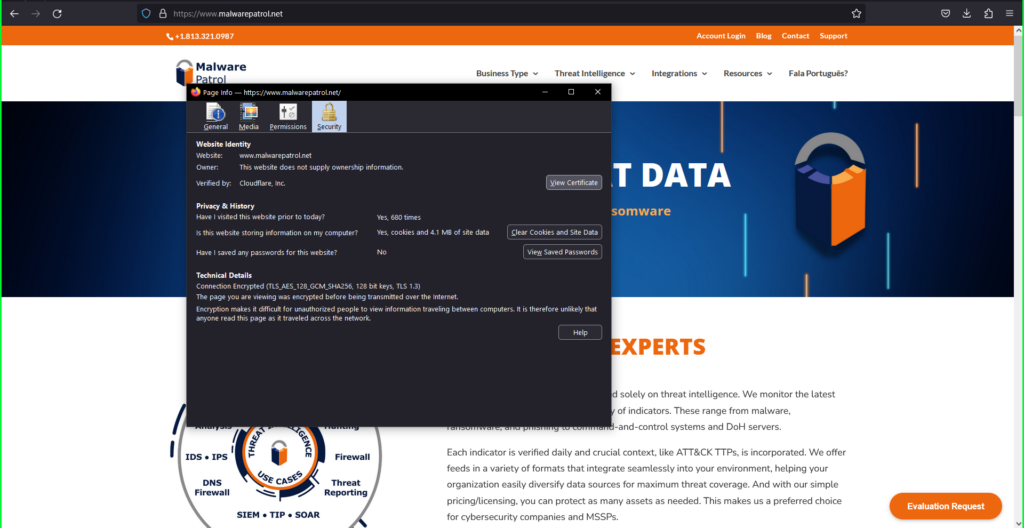
5) In the certificate information dialog box that appears:
- Click on the Cloudflare Inc ECC CA-3 tab
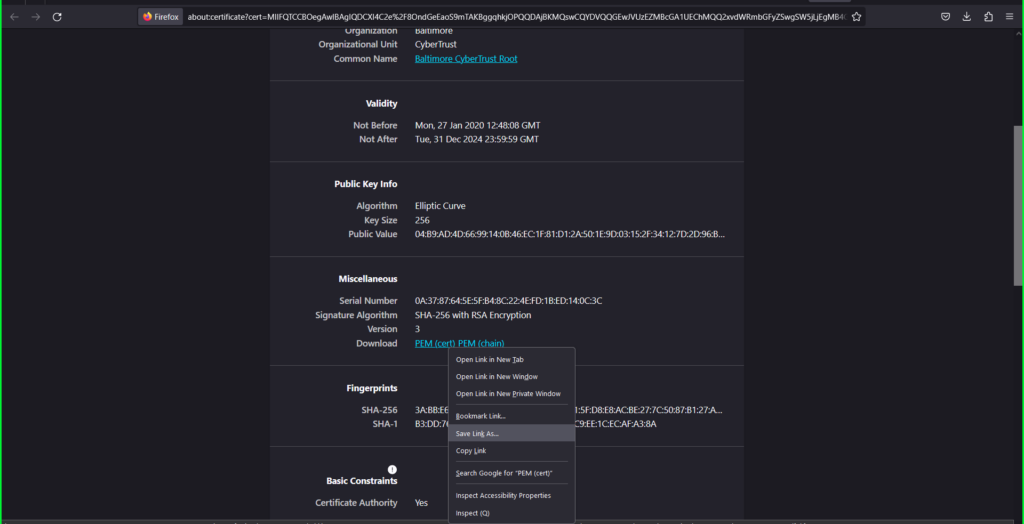
- Right click the PEM (cert) link
- Select Save Link As and save as ‘root.pem’ to your computer
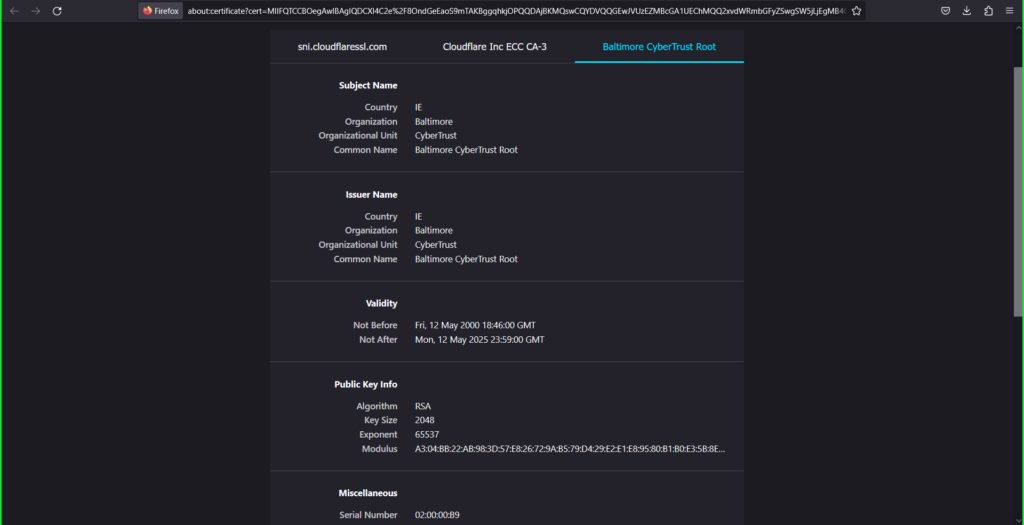
- Click on the Baltimore CyberTrust Root tab
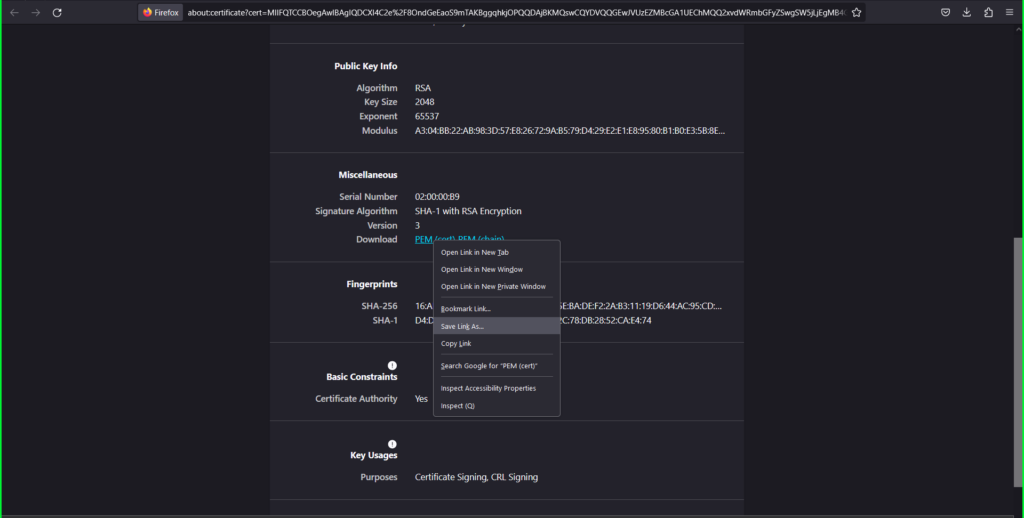
- Right click the PEM (cert) link
- Select Save Link As and save as ‘intermediate.pem’ to your computer.
Add Certificate Profiles to PAN-OS
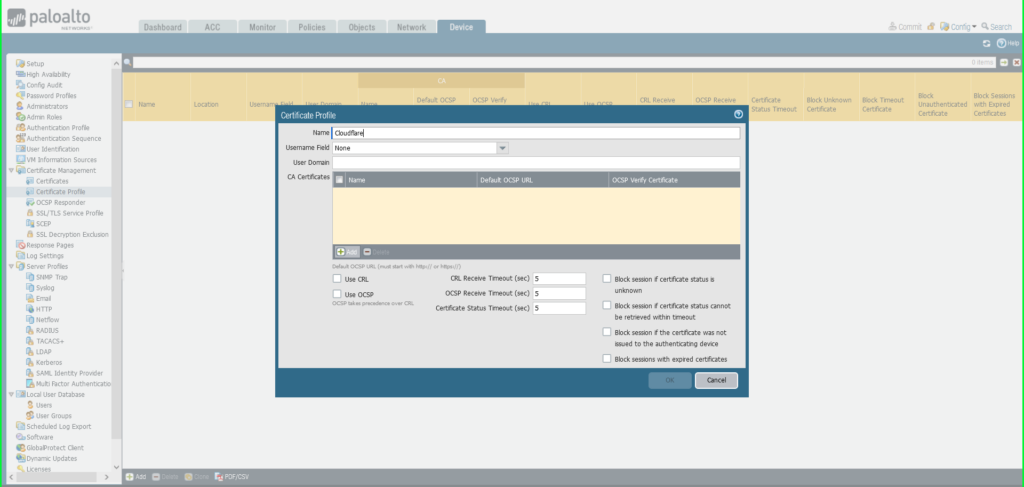
6) Log in to your Palo Alto Networks firewall interface.
7) Click on the Device tab
8) Expand Certificate Management on the left side menu and then select Certificate Profile
9) Click the +Add button at the bottom left of the screen to add a new certificate profile
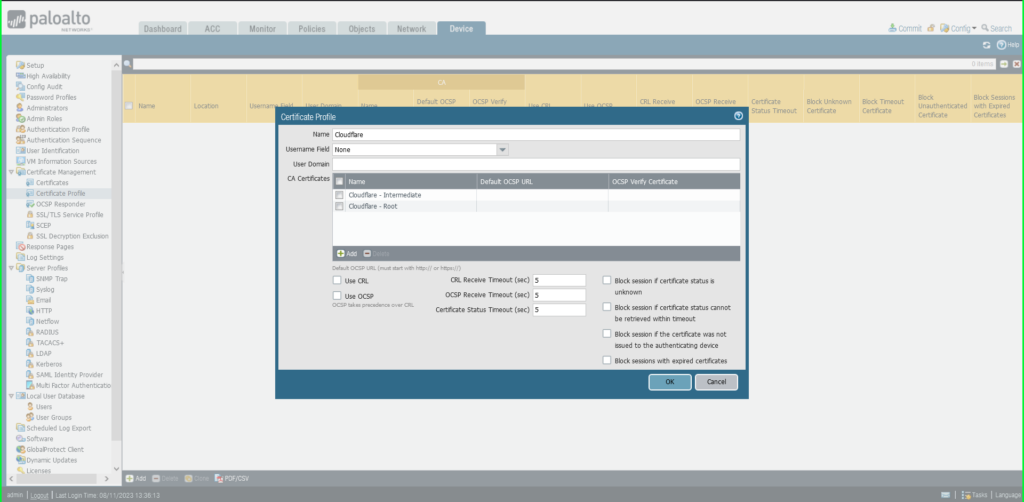
10) In the Certificate Profile dialog box:
- Name: Cloudflare
- Click the +Add button at the bottom left of the CA Certificates (yellow) section of the dialog box
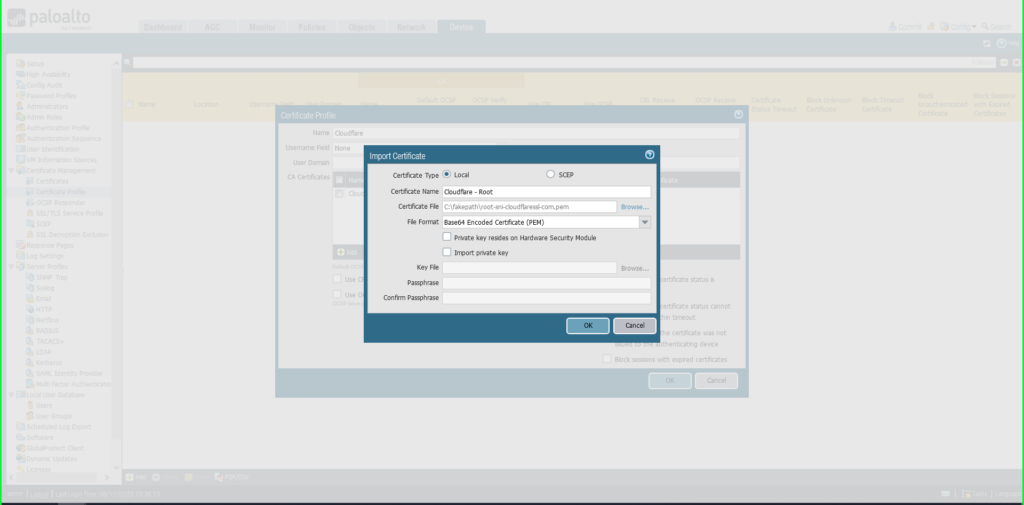
- Select Import
- Certificate Name: ‘Cloudflare – Intermediate’
- Click Browse to find and select the ‘intermediate’ certificate saved on your computer
- Click OK to save.
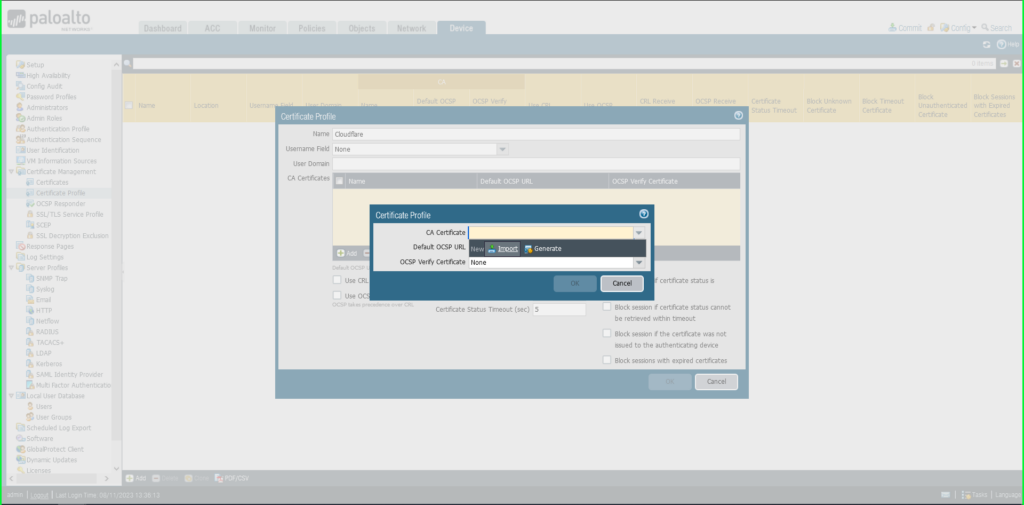

11) Repeat this process to add the second (root) certificate previously saved to your computer to the same Certificate Profile:
- Click the +Add button again at the bottom of the CA Certificates section to add the root certificate
- Select Import
- Certificate Name: ‘Cloudflare – Root’
- Click Browse to find the ‘root’ certificate saved on your computer
- Click OK to save.
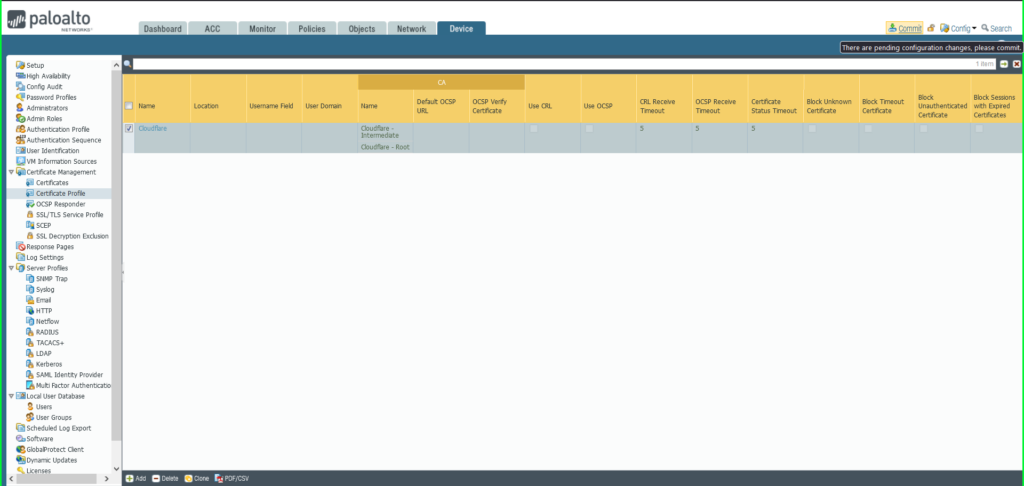
12) You will see both certificates listed in the Certificate Profile window. Click OK to exit.
13) Click Commit in the upper right hand corner to save your changes.
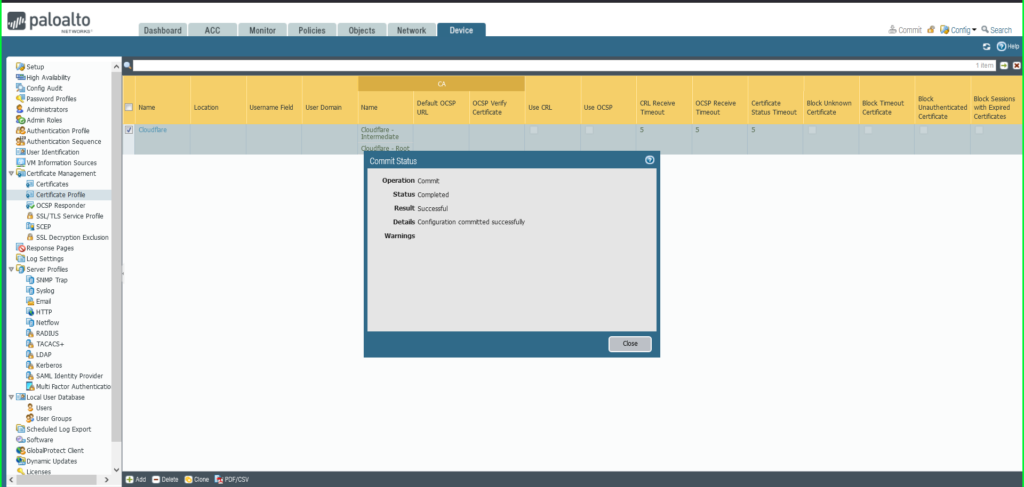
14) Once completed, a Commit Status dialog box will appear. Make sure the result is successful.
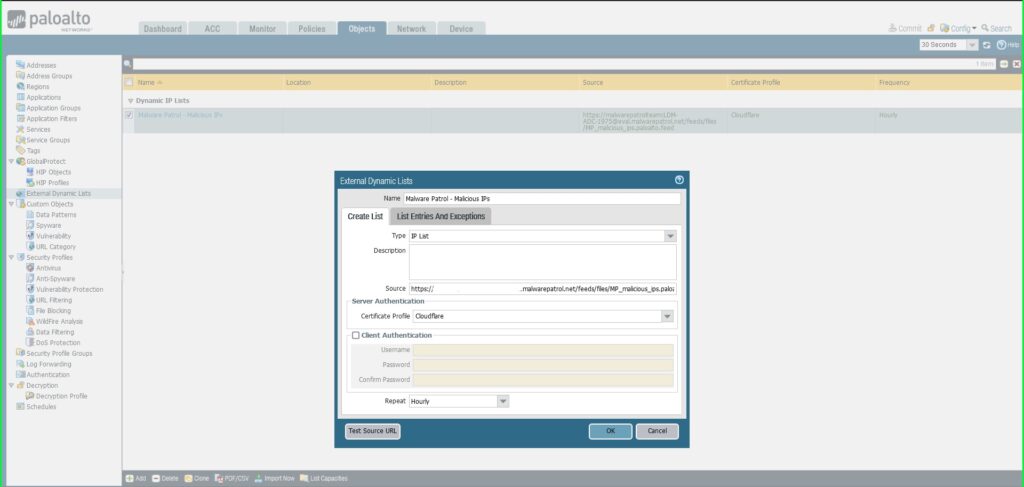
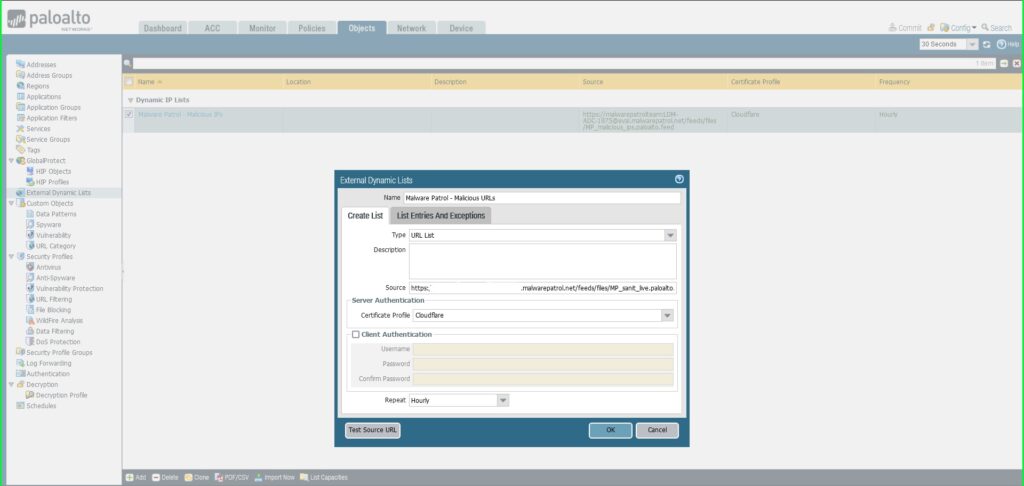
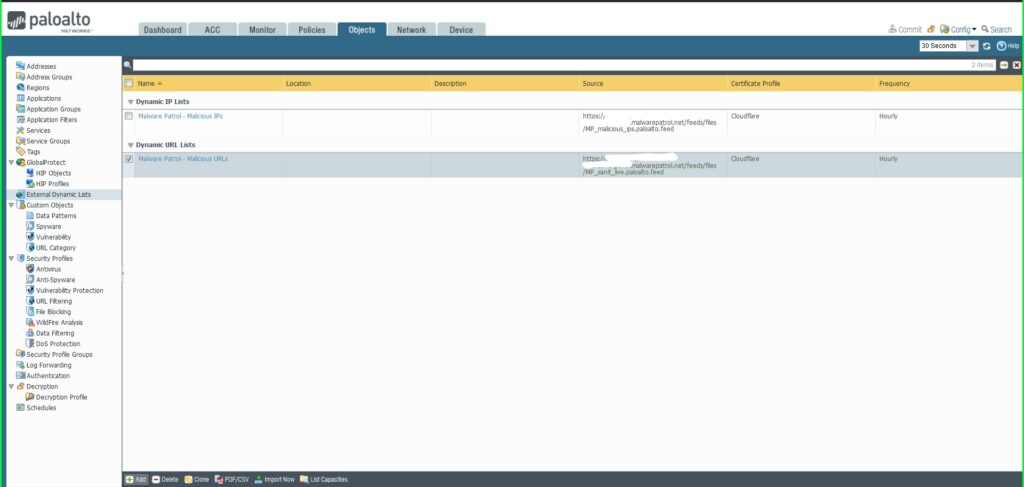
Add an IP EDL
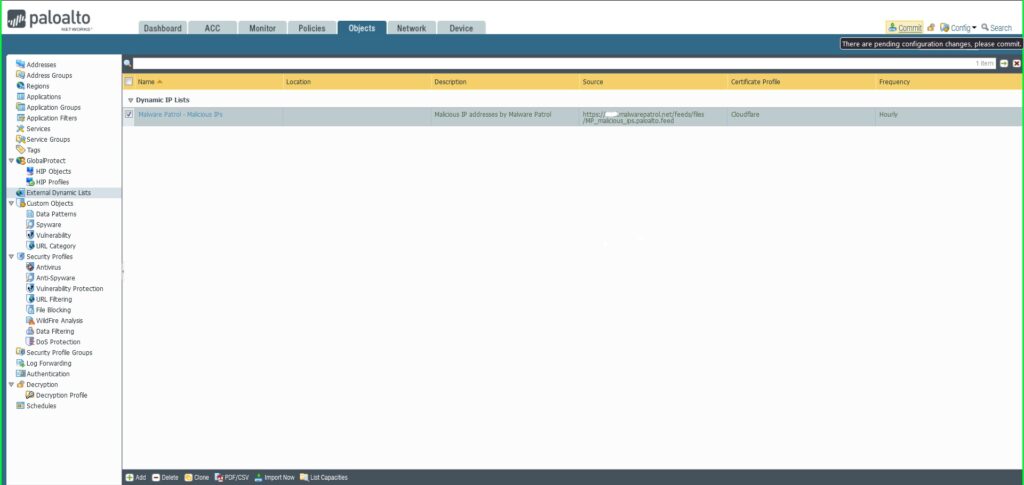
15) From the Objects tab, select External Dynamic Lists on the left side menu.
16) Click the +Add button at the bottom left of the screen to add a new EDL. A dialog box will appear.

17) In the External Dynamic Lists dialog box:
- Name: Malware Patrol – Malicious IPs
- Type: IP List
- Source: Paste the link to the IP feed from your Malware Patrol customer or evaluation portal. Insert your username and password as follows for authentication purposes: https://USERNAME:[email protected]/feeds/files/FILENAME
- Certificate Profile: Cloudflare
- Repeat: Hourly
- Click OK to save.
18) Click Commit in the upper right hand corner to save your changes. Make sure the result is successful in the Commit Status window that appears after the process has completed.
Apply a Security Policy to an IP EDL
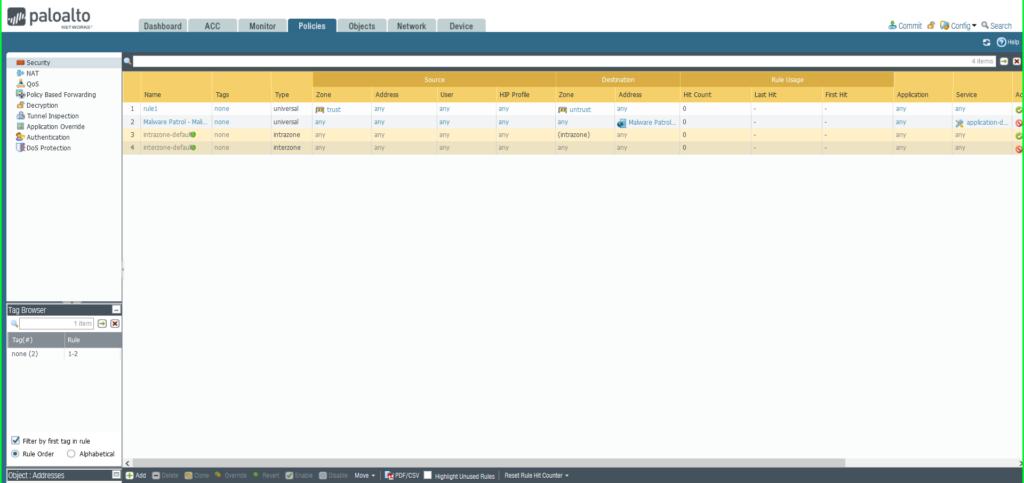
19) From the Policies tab, select Security on the left side menu
20) Click the +Add button at the bottom left of the screen to add a new security policy
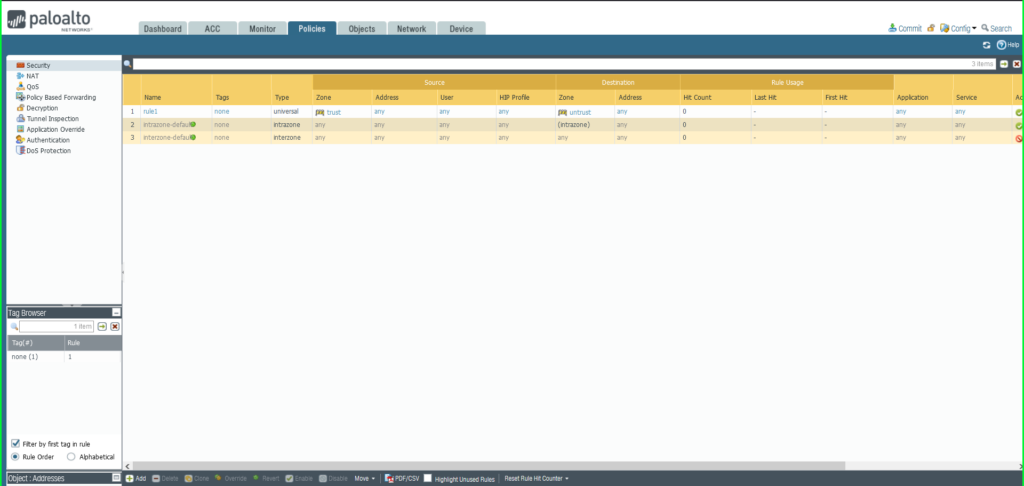
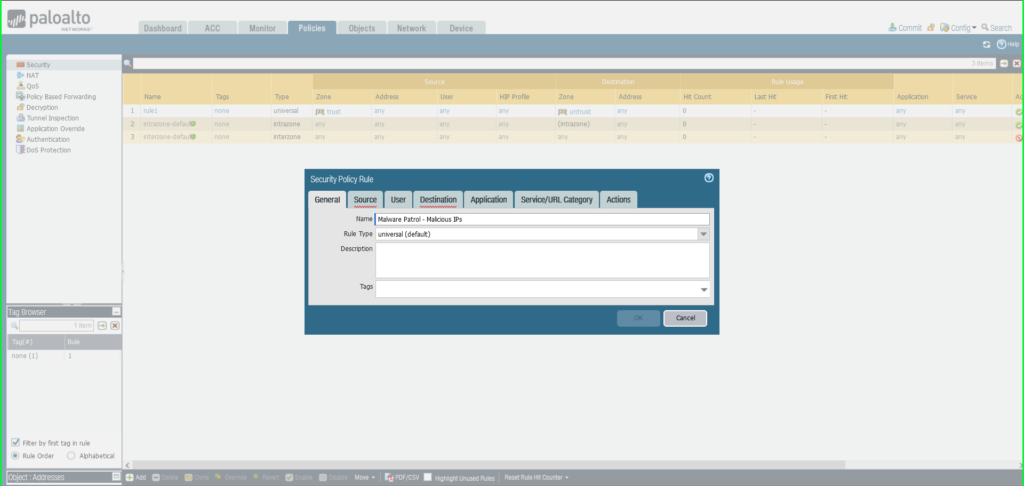
21) In the Security Policy Rule dialog box:
- Name: Malware Patrol – Malicious IPs
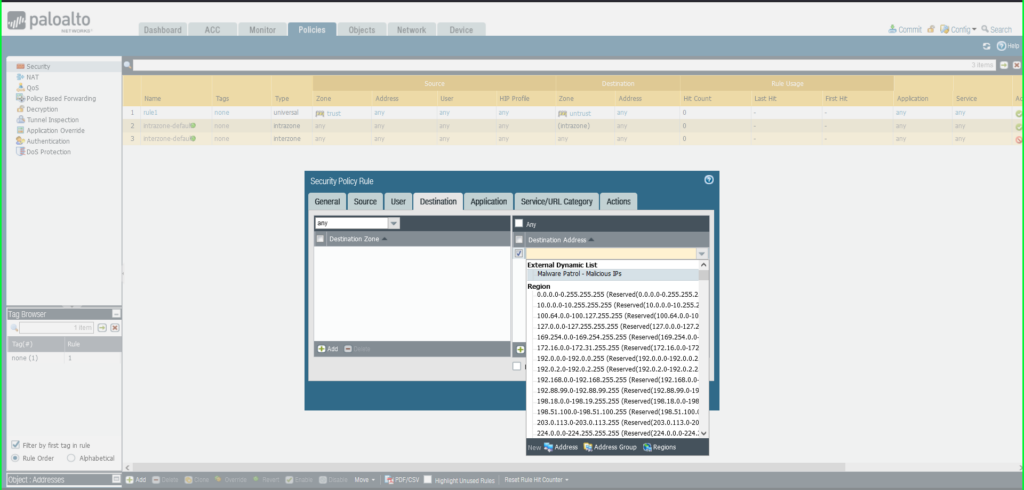
- Click Destination tab
- Destination Zone: Any
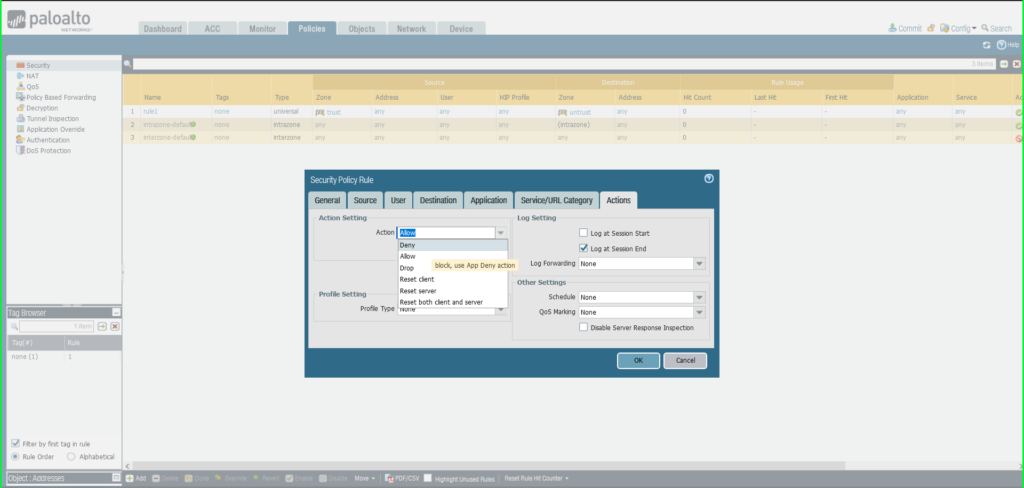
- Destination Address: External Dynamic List –> Malware Patrol – Malicious IPs
- Click Actions tab
- Action: Deny
- Click OK to save.
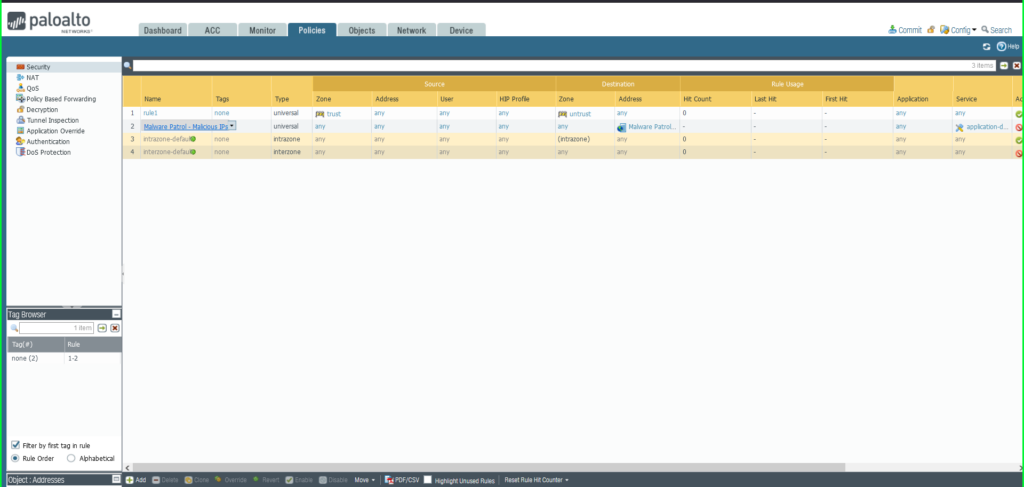
22) Once again click Commit in the upper right hand corner to save your changes. Make sure the result is successful in the Commit Status window that appears after the process has completed.
Add a URL EDL
23) From the Objects tab, select External Dynamic Lists on the left side menu.
24) Click the +Add button at the bottom left of the screen to add a new EDL. A dialog box will appear.
25) In the External Dynamic Lists dialog box:
- Name: Malware Patrol – Malicious URLs
- Type: URL List
- Source: Paste the link to the IP feed from your Malware Patrol customer or evaluation portal. Insert your username and password as follows for authentication purposes: https://USERNAME:[email protected]/feeds/files/FILENAME
- Certificate Profile: Cloudflare
- Repeat: Hourly
- Click OK to save.
26) Once again click Commit in the upper right hand corner to save your changes. Make sure the result is successful in the Commit Status window that appears after the process has completed.
Apply a Security Policy to a URL EDL
27) From the Policies tab, select Security on the left side menu.
28) Click the +Add button at the bottom left of the screen to add a new security policy.
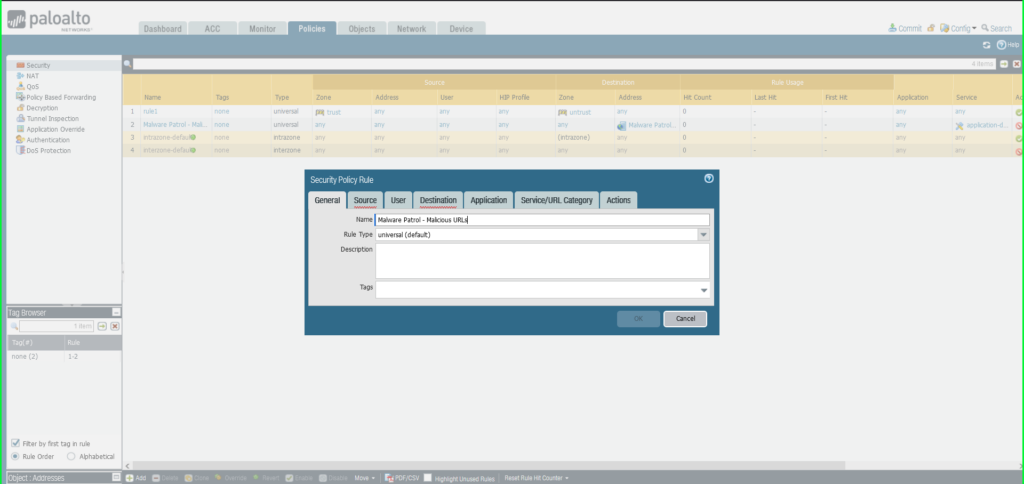
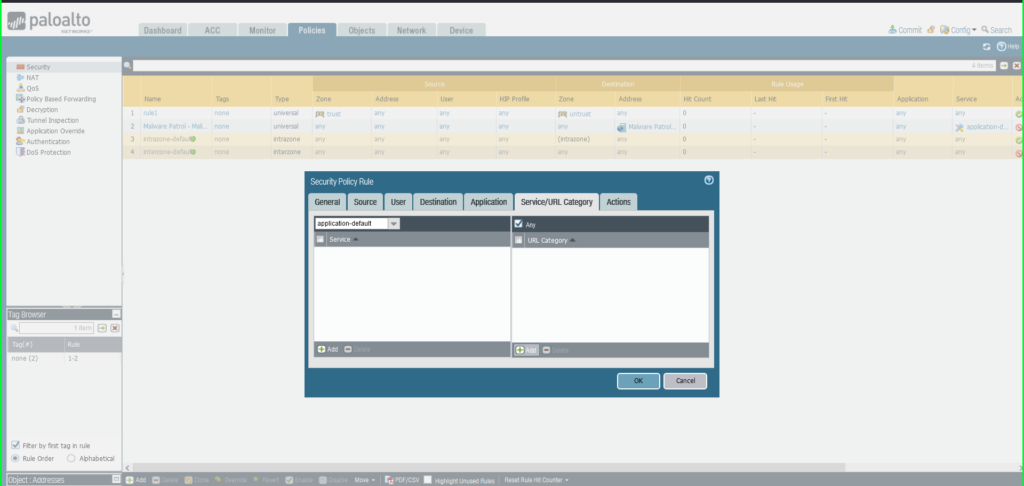
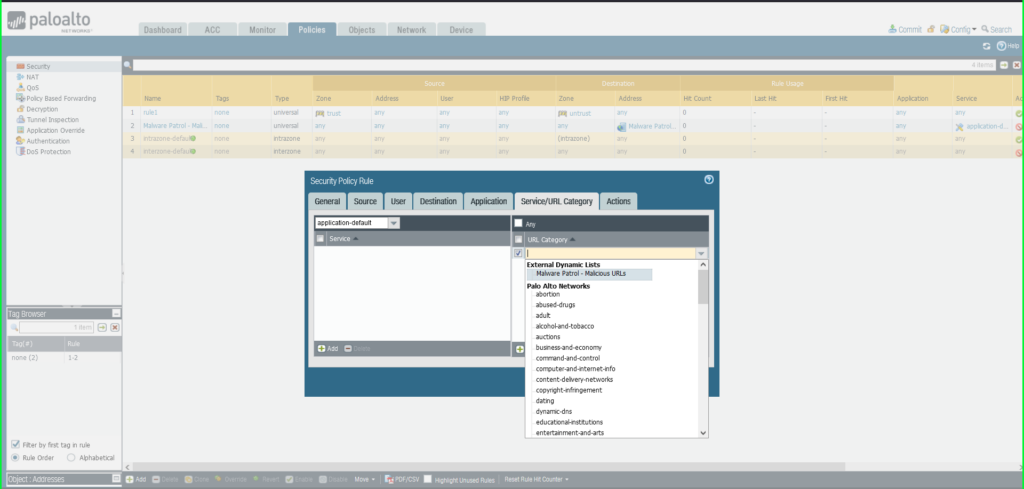
29) In the Security Policy Rule dialog box:
- Name: Malware Patrol – Malicious URLs
- Click Service/URL Caetgory tab
- Service: Application-Default
- URL Category: External Dynamic List –> Malware Patrol – Malicious URLs
- Click Actions tab
- Action: Deny
- Click OK to save.


30) Once again click Commit in the upper right hand corner to save your changes. Make sure the result is successful in the Commit Status window that appears after the process has completed.
Add a Domain EDL
“An external dynamic list of type domain allows you to import custom domain names into the firewall to enforce policy using an Anti-Spyware profile or SD-WAN policy rule. An EDL in an Anti-Spyware profile is very useful if you subscribe to third-party threat intelligence feeds and want to protect your network from new sources of threat or malware as soon as you learn of a malicious domain. […] You can also specify the firewall to include the subdomains of a specifed domain. […] When this setting is enabled, each domain in a given list requires an additional entry, effectively doubling the number of entries used by the list.” PAN-OS Administrator’s Guide
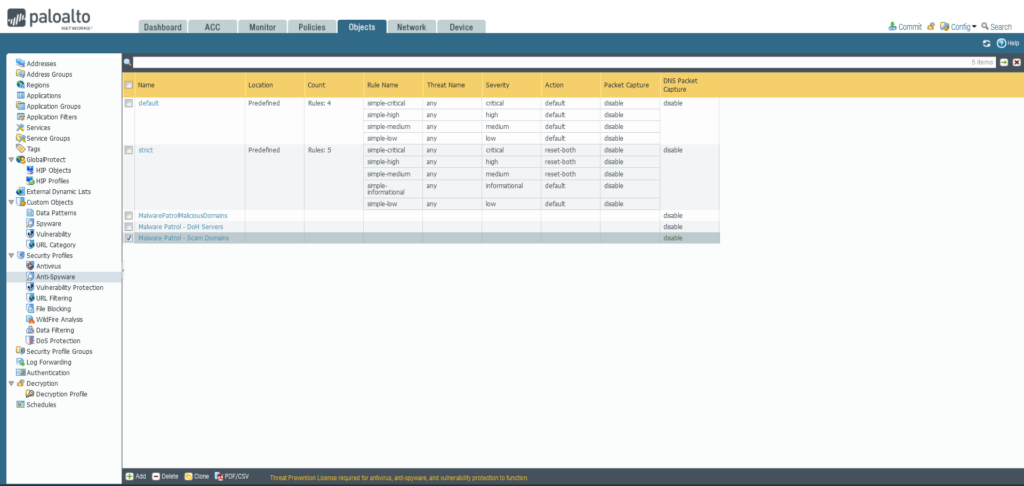
Malware Patrol offers three domain-based feeds for PAN-OS: Malicious Domains, Scam Domains, and DoH Servers.
31) From the Objects tab, select External Dynamic Lists on the left side menu.
32) Click the +Add button at the bottom left of the screen to add a new EDL. A dialog box will appear.
33) In the External Dynamic Lists dialog box:
- Name: Malware Patrol – Malicious Domains
- Type: Domain List
- Source: Paste the link to the IP feed from your Malware Patrol customer or evaluation portal. Insert your username and password as follows for authentication purposes: https://USERNAME:[email protected]/feeds/files/FILENAME
- Certificate Profile: Cloudflare
- Repeat: Hourly
- Click OK to save.
- Repeat this process to add Malware Patrol’s DNS-over-HTTPS Servers and Scam Domains feeds as EDLs.
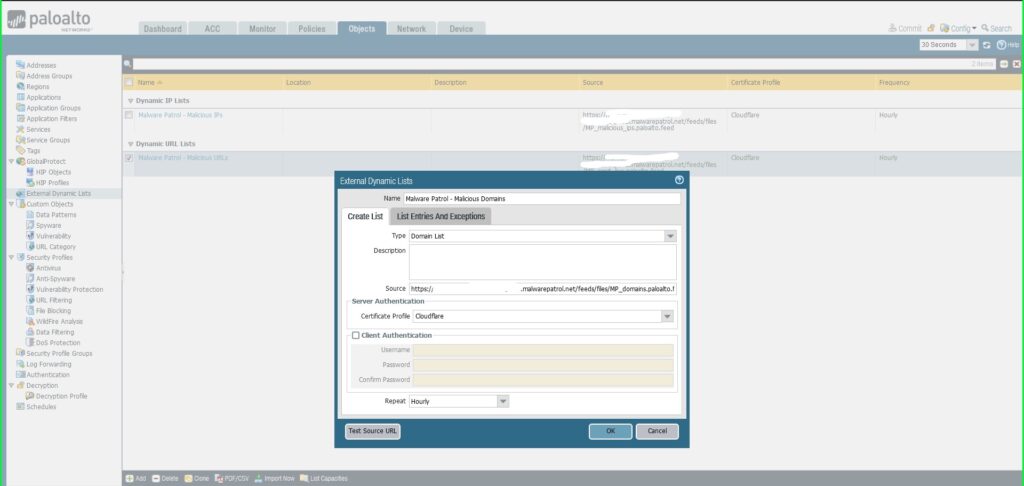
34) Once again click Commit in the upper right hand corner to save your changes. Make sure the result is successful in the Commit Status window that appears after the process has completed.
Apply a Security Policy to a Domain EDL
Note: This process is slightly different from adding a security policy to IP and URL EDLs.
Add Anti-Spyware Profile
35) From the Objects tab, select expand Security Profiles on the left side menu. Click Anti-Spyware.
36) Click the +Add button at the bottom left of the screen to add a new profile. A dialog box will appear.
37) In the Anti-Spyware Profile dialog box:
- Name: MalwarePatrolMaliciousDomains
- Select the DNS Signatures tab
- Click the +Add button at the bottom left of the External Dynamic List Domains section
- Select External Dynamic Lists > Malware Patrol – Malicious Domains from the dropdown list
- Repeat this process to add Malware Patrol – DOH Servers and/or Malware Patrol – Scam Domains
- Action on DNS Queries: Apply either Block or Sinkhole to the newly added feed(s), per your organization’s needs
- Click OK to save.
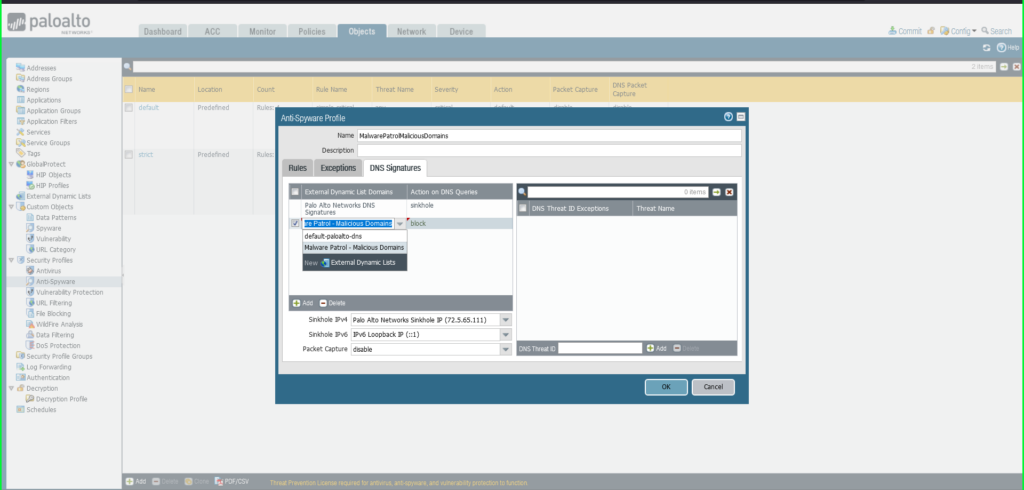
38) Once again click Commit in the upper right hand corner to save your changes. Make sure the result is successful in the Commit Status window that appears after the process has completed.
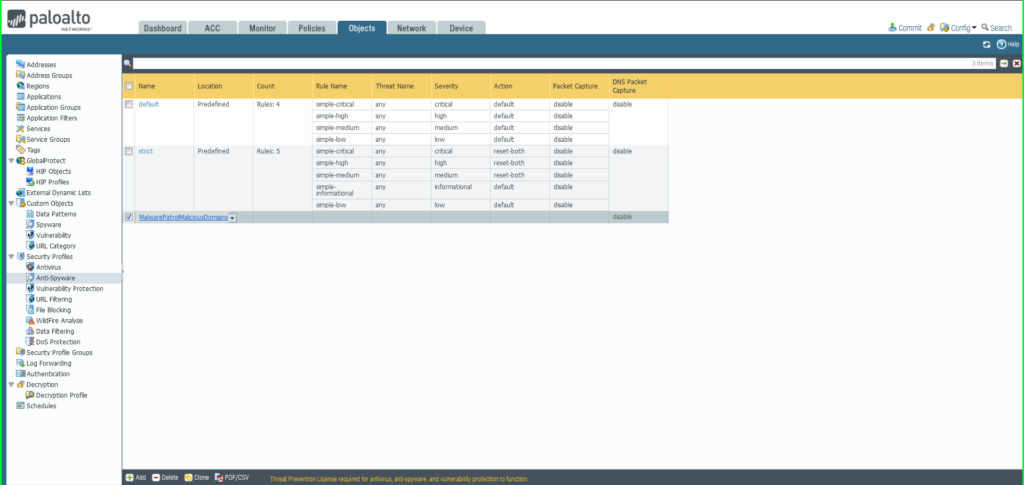
Add a Security Policy
39) From the Policies tab, select Security on the left side menu
40) Click the +Add button at the bottom left of the screen to add a new security policy
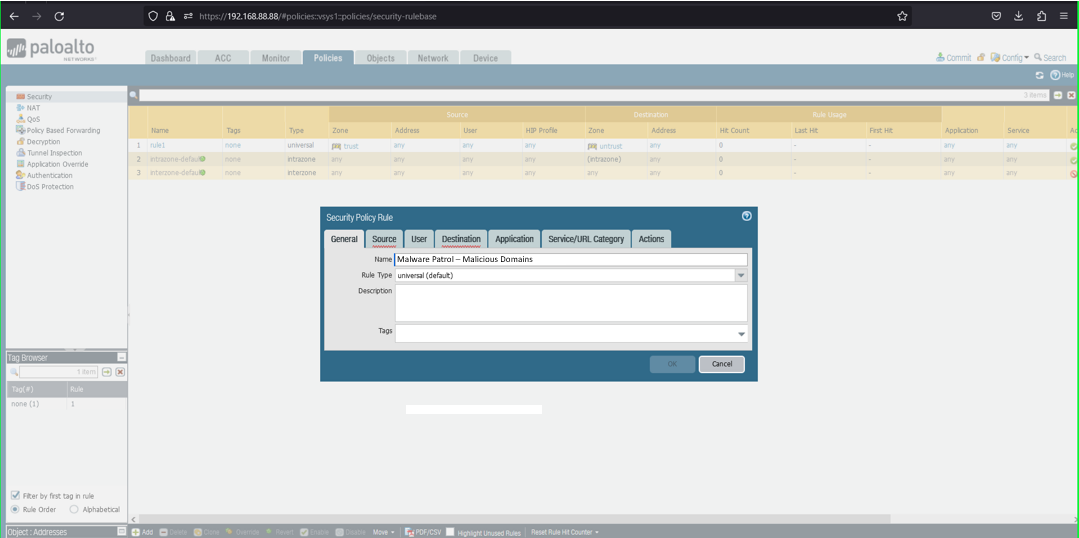
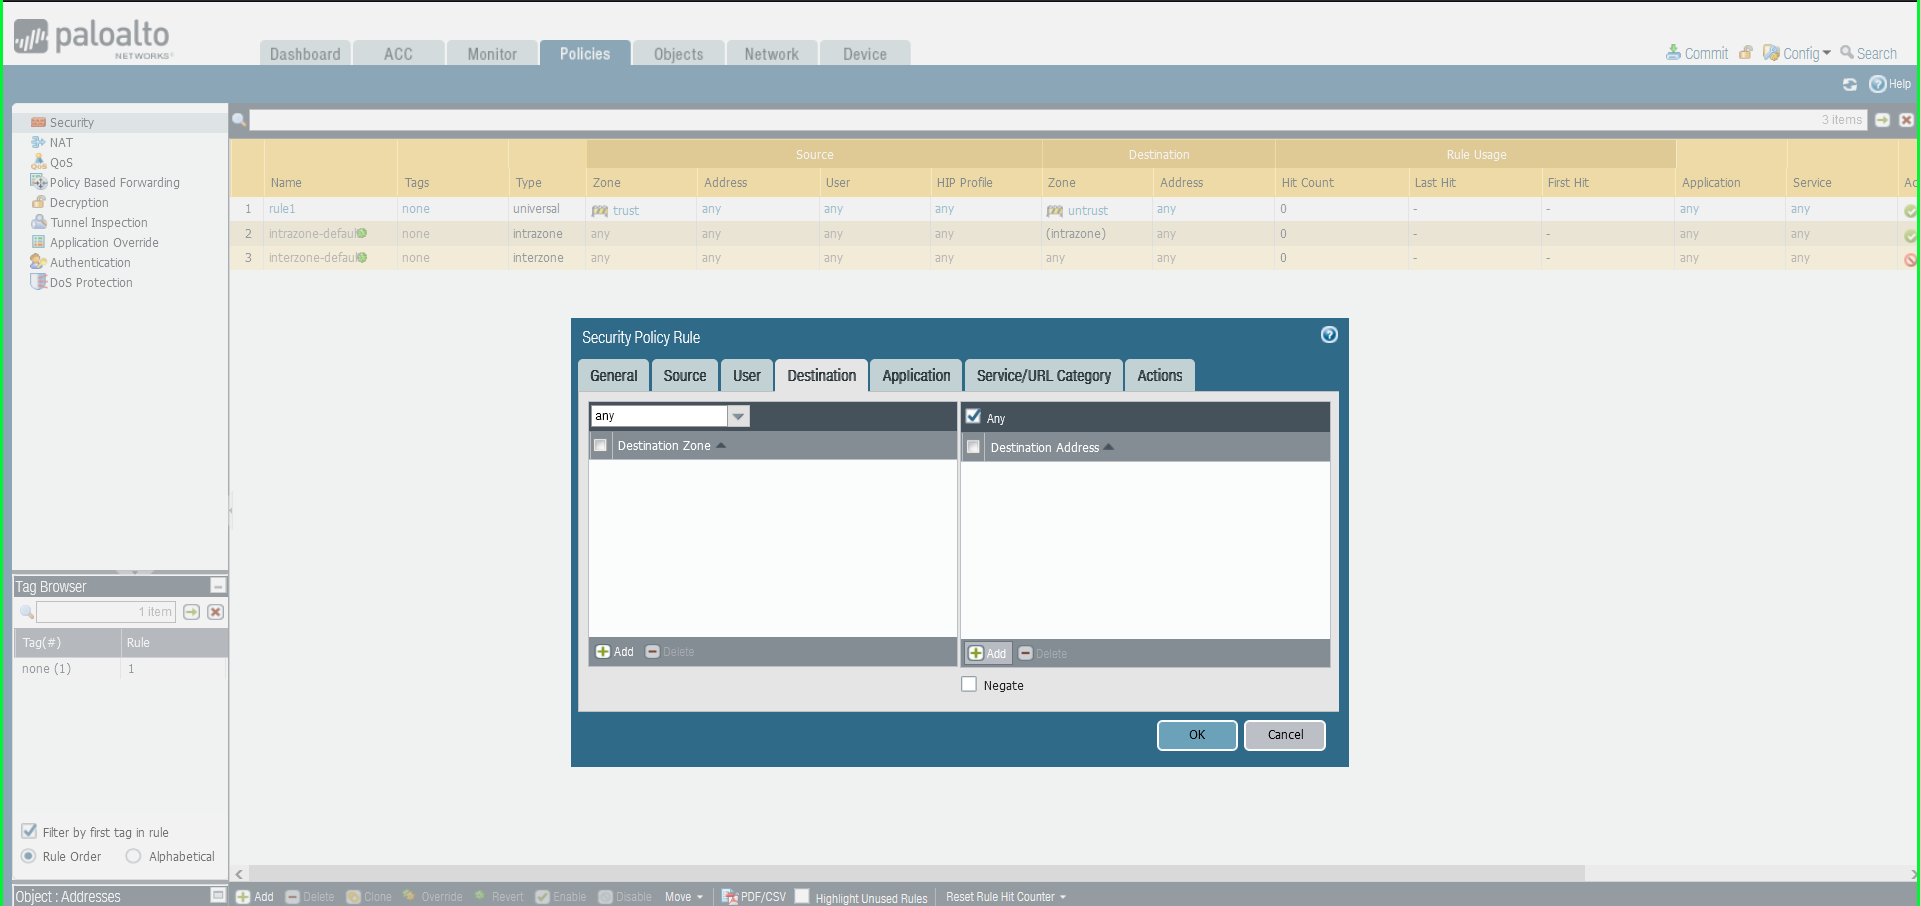
41) In the Security Policy Rule dialog box:
- Name: Malware Patrol – Malicious Domains (or Scam Domains or DoH Servers)
- Click Destination tab
- Destination Zone: Any
- Destination Address: Any
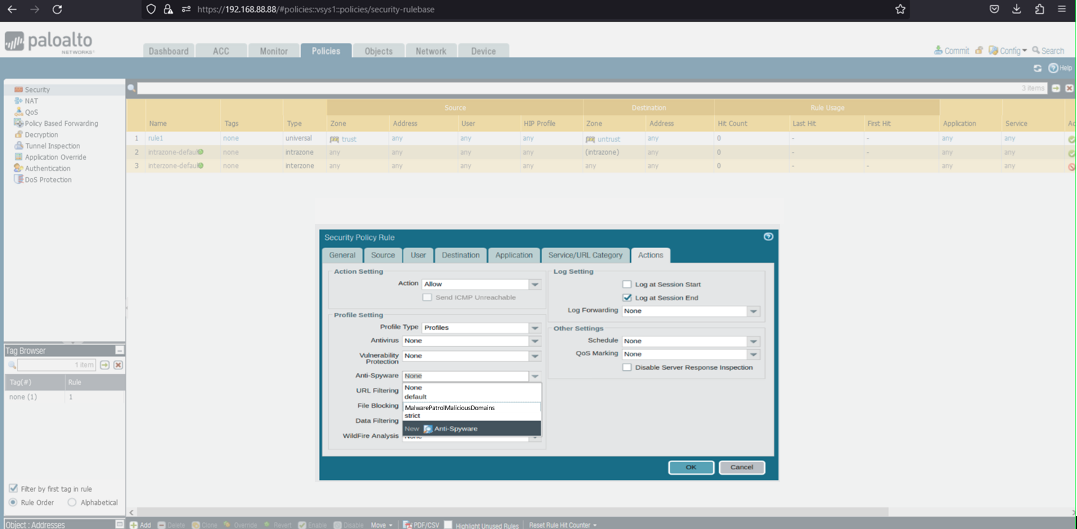
- Click Actions tab
- Profile Type: Profiles
- Anti-Spyware: Select MalwarePatrolMaliciousDomains
- Click OK to save.
42) Once again click Commit in the upper right hand corner to save your changes. Make sure the result is successful in the Commit Status window that appears after the process has completed.
PAN-OS Reference Document Links:
- External Dynamic Lists
- General Configuration
- Security Policies
- View External Dynamic List Entries
- Exclude Entries from an External Dynamic List
- Use an External Dynamic List in a URL Filtering Profile
If you need any assistance with your Palo Alto NGFW integration with Malware Patrol’s data feeds, please email support ( @ ) malwarepatrol.net or contact your Account Manager.
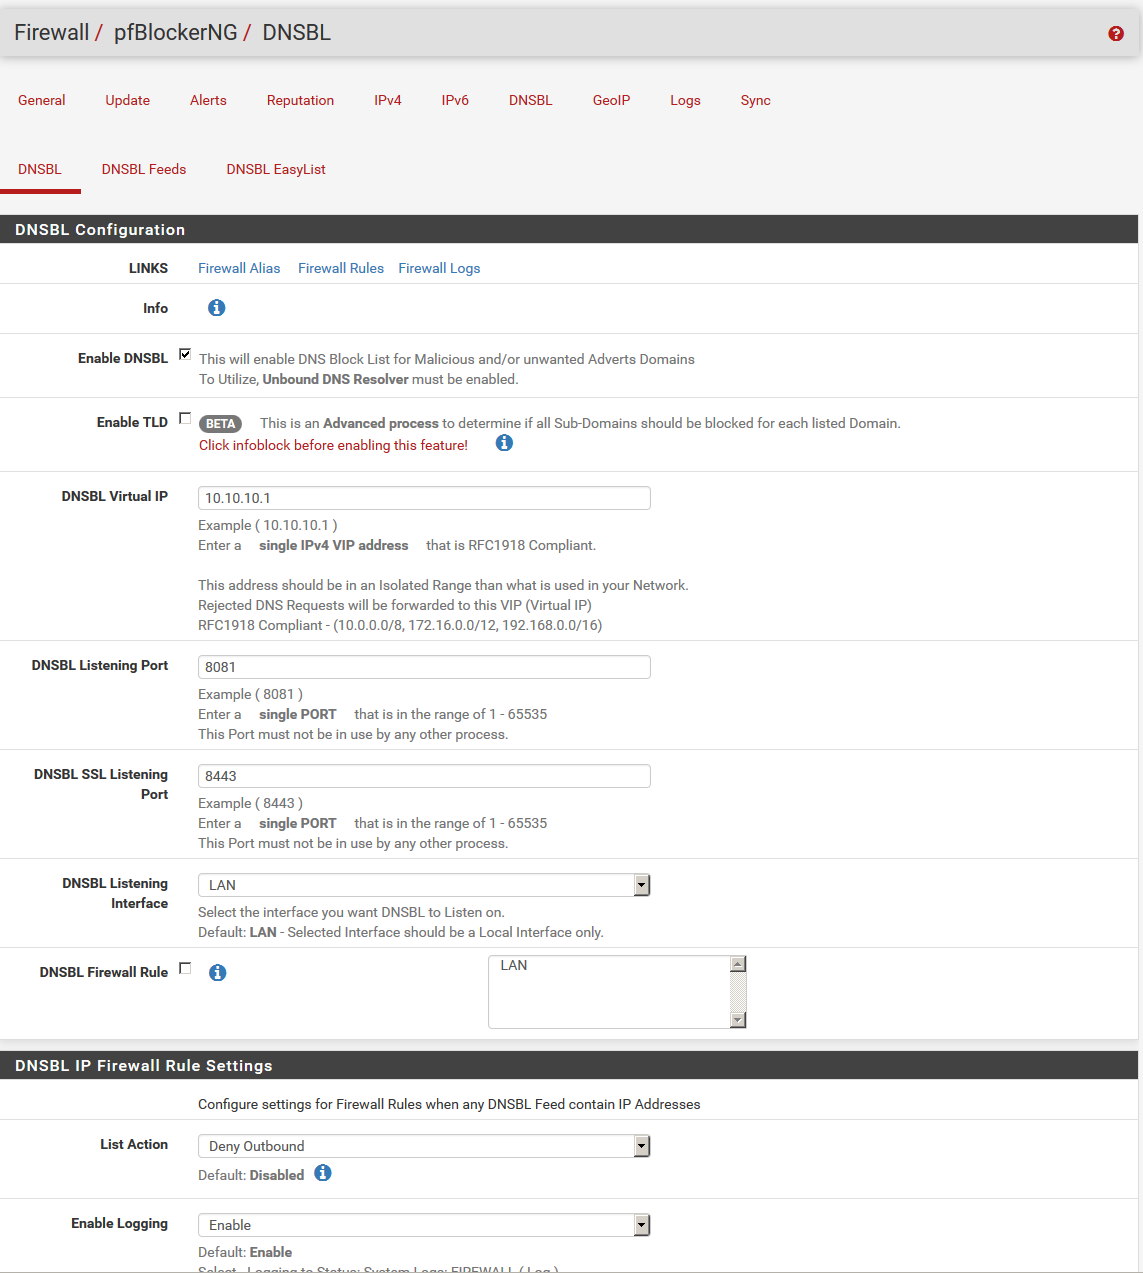
pfSense / pfBlockerNG (Business Protect Customers)
Malware Patrol provides block lists compatible with pfBlockerNG, a package for pfSense version 2.x that allows the usage of custom block list, IP filtering, and country block functionalities.
You can follow these simple steps to configure your pfBlockerNG to filter malicious URLs and protect the internal network, computers and users from getting infected by malware and ransomware.
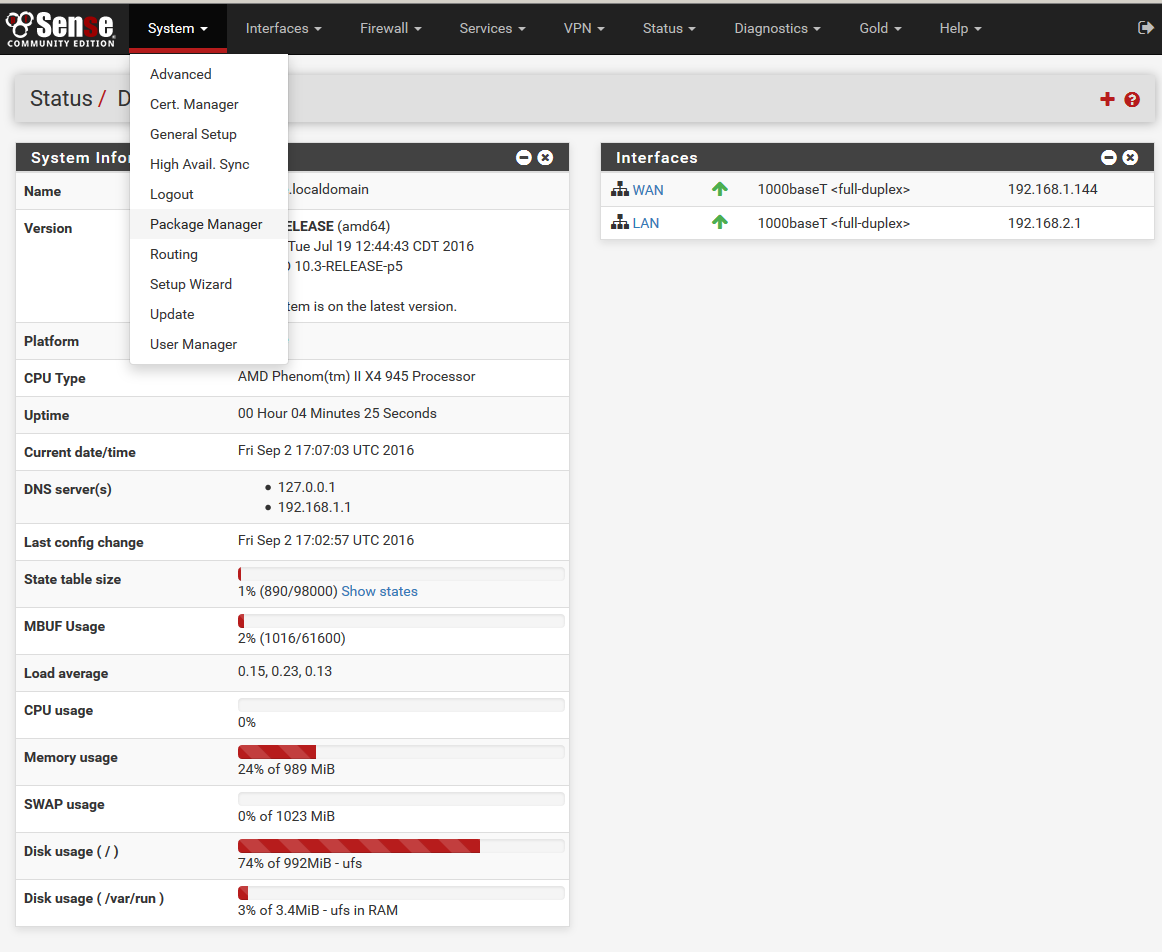
1) Log in to pfSense GUI.
2) Choose System > Package Manager.
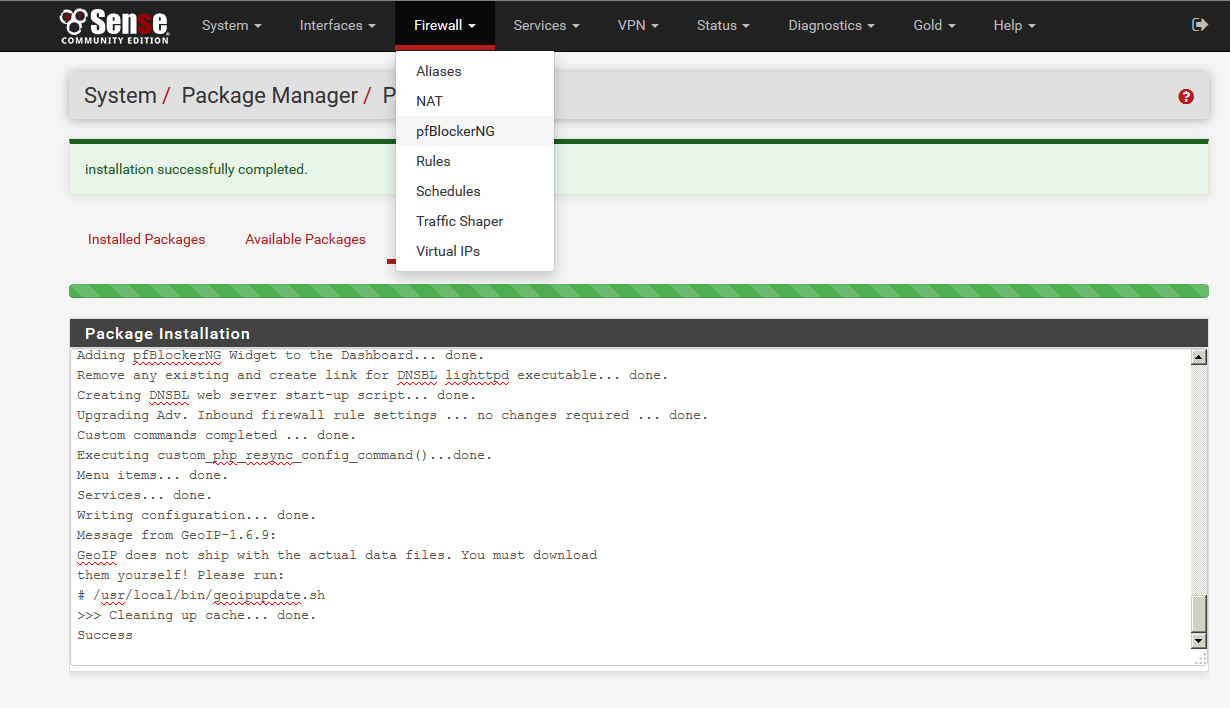
3) Choose Available packages then scroll down to pfBlockerNG and clock Save.

4) Once the package is installed, choose Firewall > pfBlockerNG.
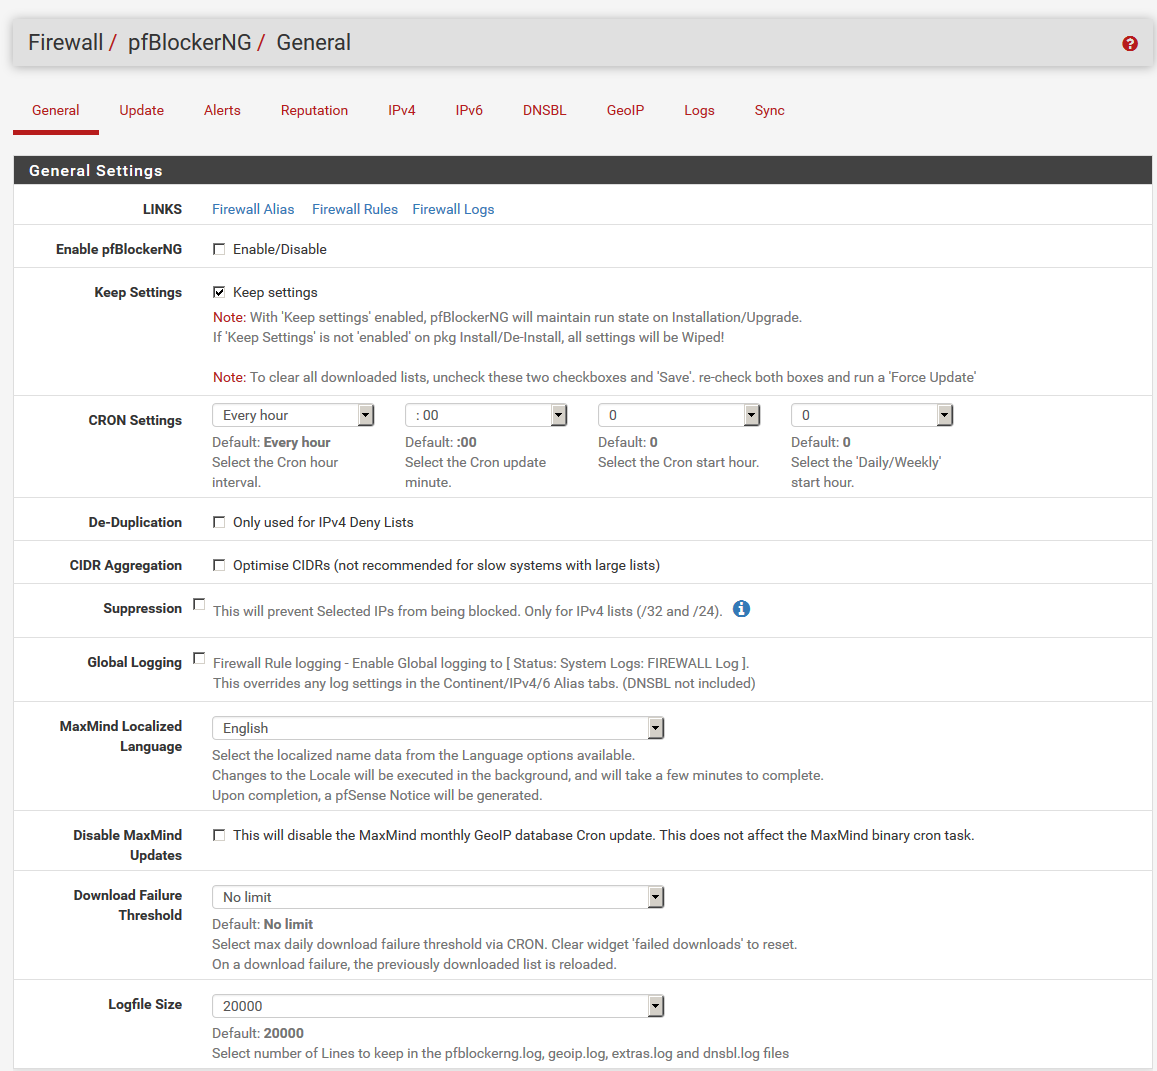
5) On the General tab, enable the following options:
-
Enable pfBlockerNG
-
De-Duplication
-
CIDR Aggregation
-
Suppression
-
Global Logging (optional)
You may also need to adjust Interface/Rules Configuration depending on your set up.
6) Choose DNSBL from the pfBlockerNG menu. Check Enable DNSBL. And under IP Firewall Rule Setting select Deny Outbound. Click Save.
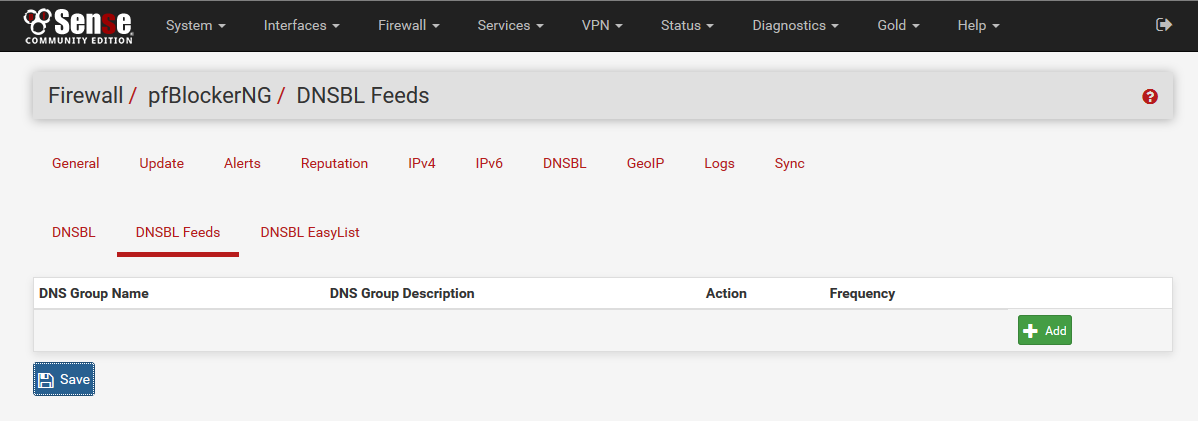
7) Click DNSBL Feeds then click +Add.
8) Enter Malware Patrol as the DNS GROUP Name.
9) Under DNSBL Source enter your URL for the pfBlockerNG block list provided by Malware Patrol. The address can be found by logging in to your account with Malware Patrol. Enter a label, MP-Aggressive for example and click +Add.
10) Set List Action to Unbound and Update Frequency to Every hour (for Malware Patrol Premium members only). Click Save.
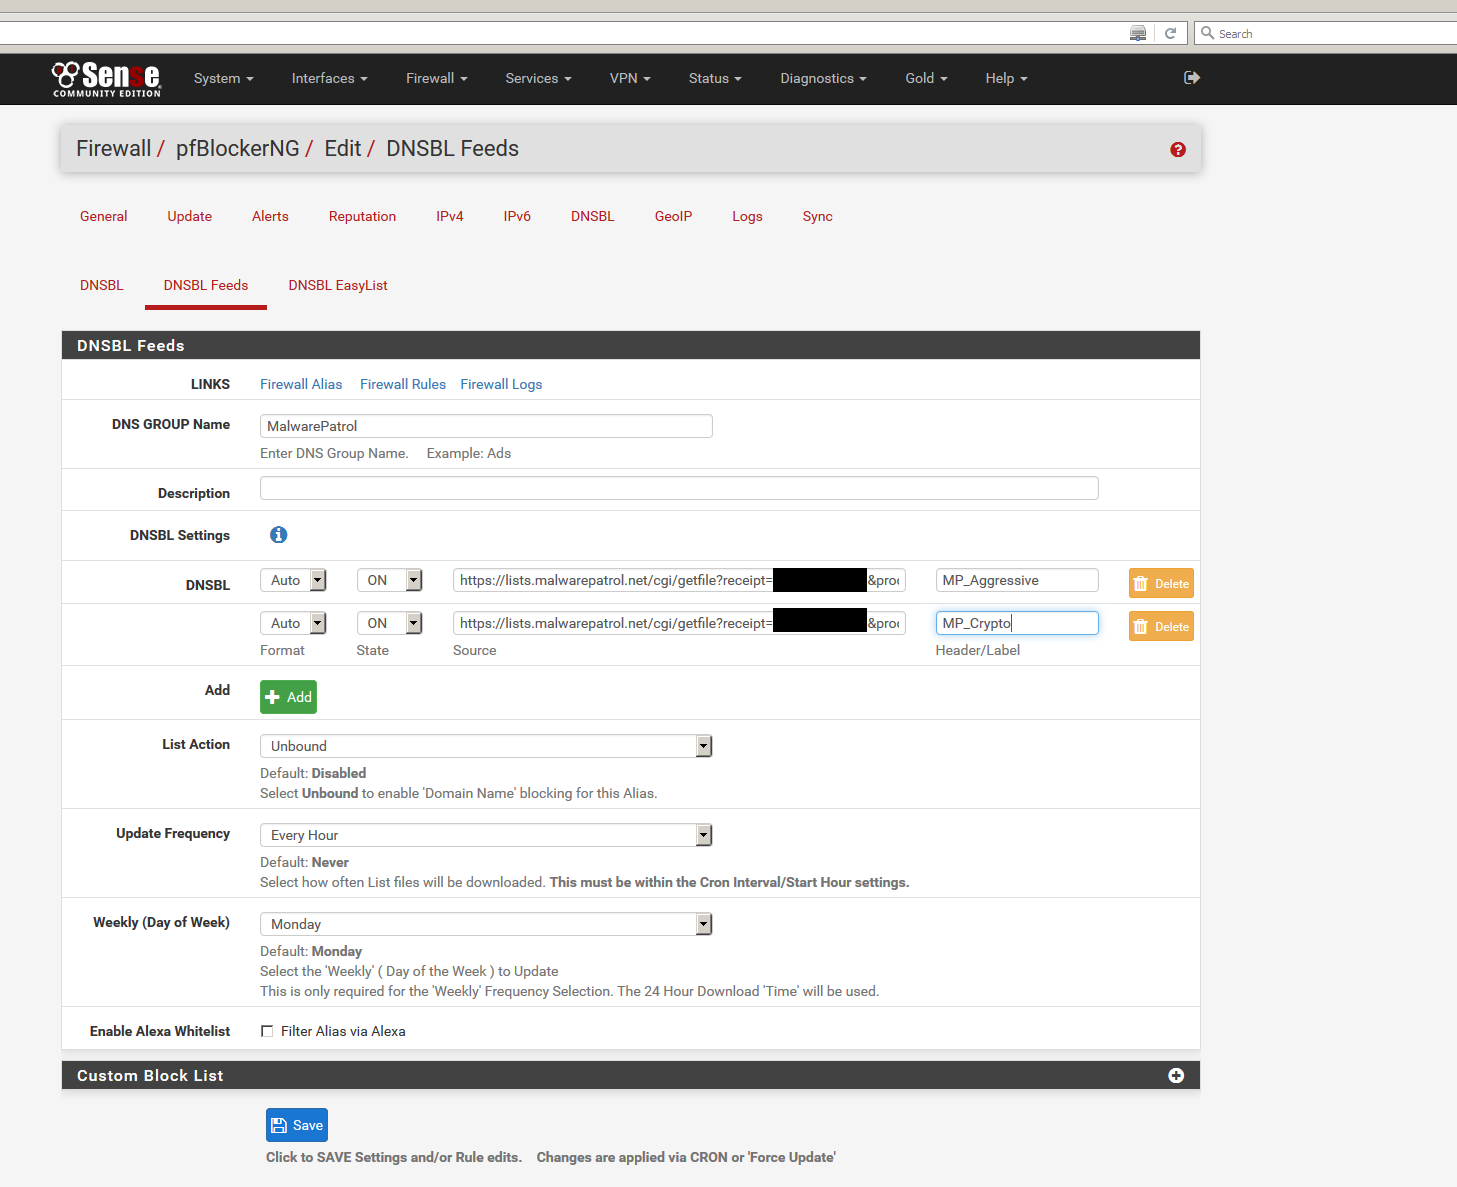
11) Click Save.
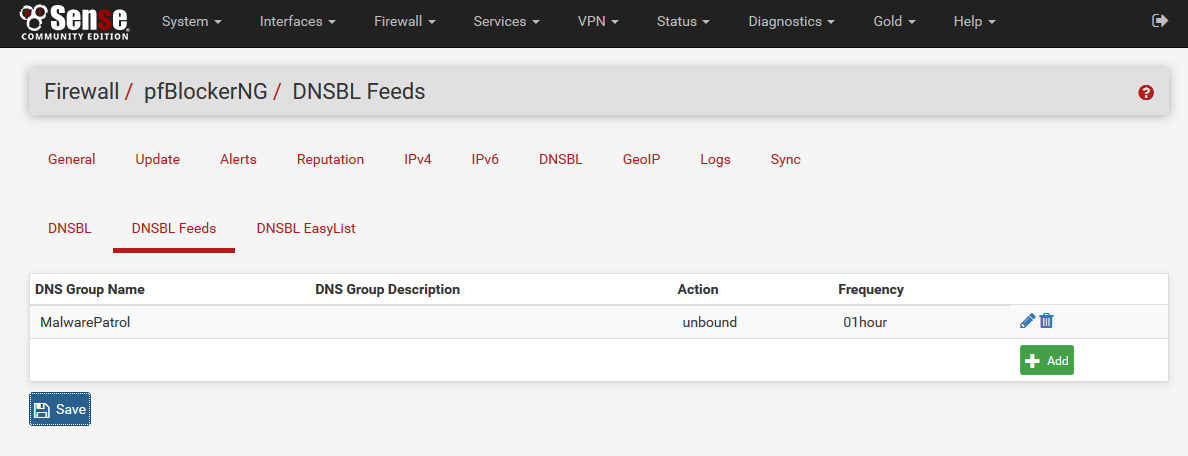
12) Choose Update from the pfBlockerNG menu. Select the Select “Force” option and mark Update, then click Run.
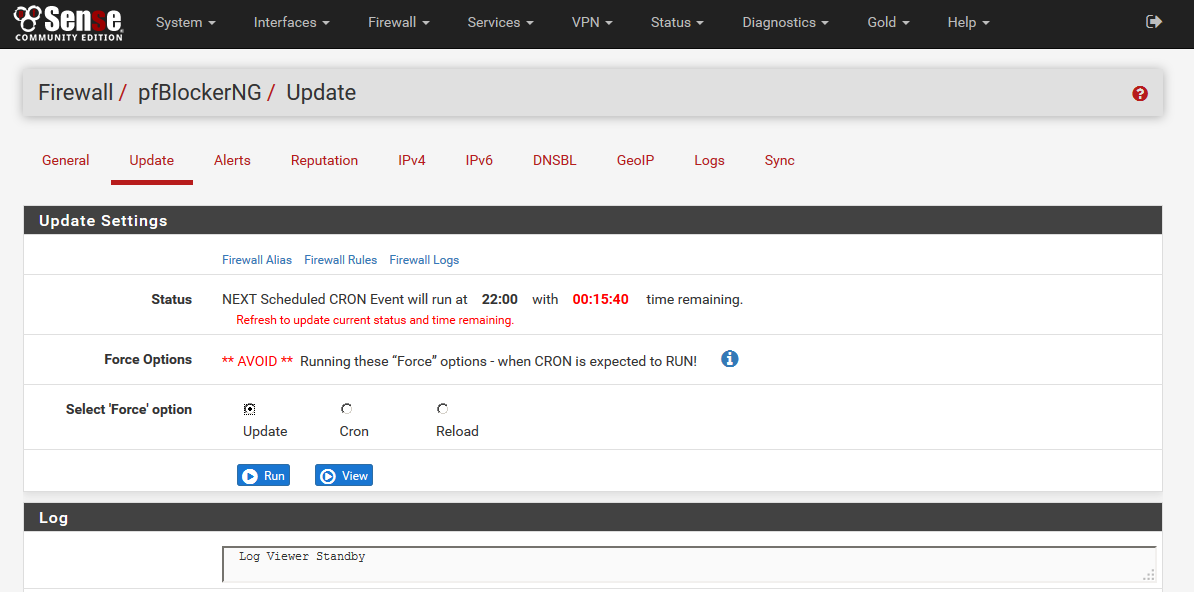
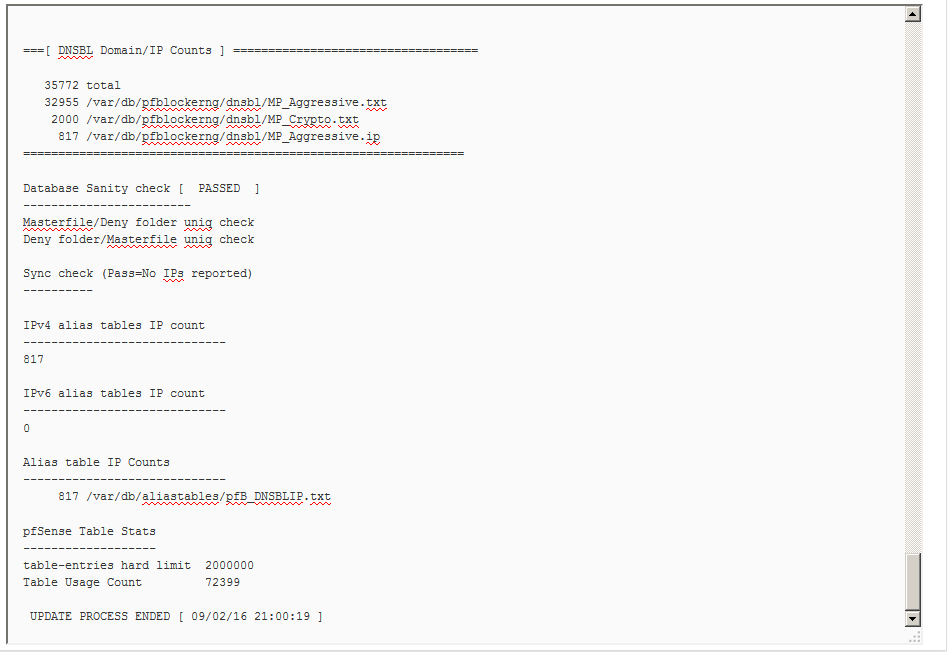
13) The logs should present messages similar to the following:
If you experience any difficulties configuring pfBlockerNG with Malware Patrol’s block lists, please make sure it is working properly and contact our tech support at [email protected]. Our special thanks to F34RInc for helping put together this configuration guide.
SpamAssassin (Business Protect Customers)
Malware Patrol provides block lists compatible with SpamAssassin.
“Apache SpamAssassin is the #1 Open Source anti-spam platform giving system administrators a filter to classify email and block spam (unsolicited bulk email).
It uses a robust scoring framework and plug-ins to integrate a wide range of advanced heuristic and statistical analysis tests on email headers and body text including text analysis, Bayesian filtering, DNS blocklists, and collaborative filtering databases.
Apache SpamAssassin is a project of the Apache Software Foundation (ASF).”
You can follow these simple steps to configure your SpamAssassin to filter malicious URLs and protect your network, computers, and users from getting infected by malware.
1) Make sure your SpamAssassin instance is installed and working properly. There are several resources on the Internet that can help you configure it in your platform. If you are experiencing trouble installing and configuring SpamAssassin, start at: https://spamassassin.apache.org/
2) On the server running SpamAssassin, create a file called malware_patrol_update.sh choosing where to place it, like:# mkdir /root/sh# vi /root/sh/malware_patrol_update.sh
3) Log into your account with Malware Patrol and look for SpamAssassin. Right click on download and select Copy link location. You will need this URL on the next step.
4) Paste the following command into the newly created file, substituting _URL_YOU_JUST_COPIED_ with the URL you copied in the previous step:
wget --no-check-certificate -O /etc/mail/spamassassin/99_malware_patrol_blocklist.cf '_URL_YOU_JUST_COPIED_'
Feel free to customize the output filename. SpamAssassin configuration files are read in an alphanumerical order, meaning 70_*.cf will be read before 99_*.cf.
5) It is very important to make sure that the URL you have copied from your account with Malware Patrol is enclosed in single quotes.
6) Add the following line to the file and save it:
systemctl restart spamassassin.service
If Amavisd is used (so SpamAssassin is managed by it) use the following line instead and save it:
systemctl restart amavisd.service
7) Add execute permissions to the recently created file, executing this command:
# chmod +755 /root/sh/malware_patrol_update.sh
8) Execute the recently created file that will download the latest block list and restart SpamAssassin or Amavisd:
# /bin/sh /root/sh/malware_patrol_update.sh
9) Make sure the new file was correctly processed by SpamAssassin by running the following command:
# spamassassin -D --lint 2>&1 | grep "malware_patrol"
... dbg: config: read file /etc/mail/spamassassin/99_malware_patrol_blocklist.cf
10) You should now create a cron job to automatically update the Malware Patrol block list. The following command should be executed every hour:
/bin/sh /root/sh/malware_patrol_update.sh
Please choose minutes not close to 00, 01 and 59 for your cron job.
If you experience any difficulties configuring SpamAssassin to use Malware Patrol block lists, please make sure it is working properly and contact our tech support at [email protected].
Special thanks to Malware Patrol user fRANz for writing this guide.
Squid3 Web Proxy (Business Protect Customers)
Squid is a proxy for the Web that provides extensive access control lists, reduces bandwidth consumption and improves response times by caching and reusing frequently requested web pages. It runs on most available operating systems, including Linux and Windows. It is licensed under the GNU GPL.
Malware Patrol provides block lists compatible with Squid3. You can follow these simple steps to configure your Squid instance and protect the internal network, computers and users from getting infected by malware.
1) Make sure your Squid3 instance is installed and working properly. There are several resources on the Internet that can help you configure Squid3 in your platform. If you are experiencing trouble installing and configuring Squid3, start at: http://www.squid-cache.org/.
2) On the server running Squid3, create a file called /etc/squid3/malware_patrol_update.sh. For example: vi /etc/squid3/malware_patrol_update.sh
3) Log into your account with Malware Patrol and look for Squid Web Proxy ACL. Right click on “download” and select “Copy link location”, you will need this URL on the next step.
4) Paste the following command into the newly created file, substituting _URL_YOU_JUST_COPIED_ by the URL you have copied on the previous step: wget –no-check-certificate -O /etc/squid3/malware_patrol_blocklist ‘_URL_YOU_JUST_COPIED_’
5) It is very important to make sure that the URL you have copied from your account with Malware Patrol is enclosed in single quotes. For example: wget –no-check-certificate -O /etc/squid3/malware_patrol_blocklist ‘https://lists.malwarepatrol.net/cgi/getfile?receipt=01234567890&product=13&list=squid’
6) Add the following line to the file and save it: /usr/sbin/squid3 -k reconfigure
7) Add execute permissions to the recently created file, executing this command: chmod +755 /etc/squid3/malware_patrol_update.sh
8) Now we need to configure Squid3 to use the block list. Edit the file /etc/squid3/squid.conf. For example: vi /etc/squid3/squid.conf
9) Add the following lines to the file, at the appropriate sections:
acl malware url_regex -i “/etc/squid3/malware_patrol_blocklist”
http_access deny malware
deny_info http://www.malwarepatrol.net/denied.shtml malware
10) Execute the recently created file that will download the latest block list and restart Squid: /bin/sh /etc/squid3/malware_patrol_update.sh
11) Notice that Squid3 will take longer than usual to start because it needs to read thousands of entries that will protect you from malware infections.
12) You should now configure a cronjob to automatically update the Malware Patrol block list. The following command should be executed every hour: /bin/sh /etc/squid3/malware_patrol_update.sh. Please choose minutes not close to 00, 01 and 59.
If you experience any difficulties configuring Squid3 to use Malware Patrol block lists, please make sure it is working properly and contact our tech support at [email protected].
FAQs
Duplicate Entries
Our lists include what we call MBL ID, a unique identifier that correlates to each entry in the database. This number assigned to each entry means our system is actually structured to detect, and therefore avoid, duplicates. Basically, the MBL_IDhelps us organize and debug the large amount of data in our lists.
The most common report of duplicate entries is related to what appears to be repeated domains or partial URLs. While it may seem that these are duplicates, it is usually the case that there is more than one malware binary in the same directory or subdirectories under it. Each instance of malware on a single domain has its own unique identifier because it represents a different URL, directory, or was detected at a different point in time, for example. So, each entry counts as a distinct malware and shows on data feeds.
If you find something else beyond this example that shows duplicate entries, please let us know!
False Positives
The quality of our data is very important to us. We ask that you send reports of false positives to fp (at) malwarepatrol.net. We will investigate promptly, update our database (if necessary), and let you know the results.
Please read this before submitting a false positive report:
We often receive false positive reports on domains like docs(.)google(.)com, drive(.)google(.)com, dropbox(.)com and github(.)com. Unfortunately, these sites host bad malware more frequently than ever. To further complicate things, systems like Google Docs serve files from their root directories, forcing some formats of block lists to affect (block) the entire domain.
We understand that it is not always possible to block these mainstream websites. We have various options, depending on your subscription type, to help with whitelisting domains to which your users require access. See FAQ topic "Whitelisting" for more details.
Whitelisting
It is common knowledge in the security industry than many well-known and frequently used websites host malware (Google Drive, DropBox, GitHub). We understand, however, that it is not always possible to block these popular websites, particularly those used for work purposes. Malware Patrol has options, depending on your subscription type, to help you whitelist domains to which your users require access.
Enterprise:
Several enterprise feeds have Cisco Umbrella top domains removed from them (top 25,000 or 100,000 or 1,000,000 domains). Enterprise customers may use these versions instead of the full feed. For other Enterprise feeds we include the Cisco Umbrella domain ranking as a field to allow for whitelisting per the customer's specific needs.
Also, Enterprise feeds can be customized at no cost. This offer includes the option to have us remove specific domains from your feed, by Cisco Umbrella ranking or otherwise. Discuss your specific needs with your Account Manager.
Non-commercial blocklist:
You can use our download script to allow for domain exclusions. These will be applied right after the lists are downloaded. The exact way to do it depends on your environment and configuration, but simple shell commands like cat _filename_ | grep -v _domain_ > _new_file_name_ can remove entries.
For help automating the removal of domains from blocklists, contact our tech support via email (support (@) malwarepatrol.net) and they will be happy to help. Please remember to mention the blocklist you use and how you download it.
How often are the feeds updated?
Each indicator is verified at least once daily. That means our systems visit each URL, for example, to make sure it is still hosting malware or otherwise considered to be malicious. DGAs are resolved four times per day.
We update most of our Enterprise feeds hourly by adding newly found entries and removing deactivated threats. Customers can find the update frequency in the data feed table in their portals.
The feeds below are updated at intervals other than hourly:
Real-time updates
- Bitcoin Transactions
- DDoS Attacks
- Malware Samples
- Phishing Screen Shots
Every 5 minutes
- DNS RPZ Firewall
Every 6 hours
- Bitcoin Blockchain Strings
Every 24 hours
- Anti-Mining
Business Protect data feeds are updated hourly.
Basic Defense blocklists are updated every 4 hours.
Does the data come in different formats?
The formats we currently offer are the most requested from our users because they work with many popular security tools.
Business Protect and non-commercial blocklists are only offered in the formats listed on their respective pages.
For Enterprise Feeds, however, we can usually customize them to fit your ingestion requirements at no additional cost. Just ask us!
How are malware samples validated?
Our system automatically downloads suspicious samples and applies a series of tests to identify if they are likely malicious. These tests include AV checks as well as proprietary tests to determine file characteristics, like PE headers and packers. This way, we can provide customers with samples that may not be classified as malware yet by AVs but are most likely malicious.
How is malware classified?
We use a mixture of systems to determine if samples are malicious or not. That includes our own classifications tools as well as information returned by multiple anti-virus systems. Once a sample is found to be bad, we use one of the classifications provided by AV vendors. Microsoft and Kaspersky are the most utilized, although others may be used.
Do I have to download the whole data feed each time?
The data feeds contain all the available data, not just the data from the latest update. Our experience is that this strategy works better than differentials/updates because no data is lost if any of our customers miss a download for some reason. We can compress the Enterprise feed files to save bandwidth.
Do you provide invoices?
We do not provide invoices for Basic Defense subscriptions. Contact your account manager or support (@) malwarepatrol.net for Business Protect and Enterprise subscription invoices.