 Malware Patrol offers five Enterprise feeds formatted for use with Palo Alto Networks NGFW (PAN-OS). Customers choose the feed(s) that meet their needs: 1) DNS-over-HTTPS (DoH) Servers: This feed gives security teams control over the use of DoH in their environment. DoH wraps DNS queries in an HTTPS request, which can disguise malicious traffic. Several malware families take advantage of this to use DoH for their C2 communications. 2) Malicious Domains: Prevent access to domains hosting malware, ransomware, phishing, cryptominers, and command and control servers (C2s) for over a hundred malware and ransomware families. Blocking C2 communication disrupts the attacker’s ability to execute malicious commands and navigate laterally within the network, essentially breaking the cyber kill chain. 3) Malicious IPs: Provides a first line of defense against threats for which signature-based indicators may not yet be available. The broad coverage of IPs may also extend protection to attacks from adversaries utilizing the same infrastructure. The feed includes IPs actively hosting malicious malware and ransomware files, phishing sites, as well as C2 servers. 4) Malware URLs: This feed contains URLs known to be hosting malware and ransomware binaries. By leveraging malicious URL feeds, security tools can block access to harmful links while still allowing legitimate services hosted on the same domain. This level of precision prevents the unnecessary blocking of popular and legitimate platforms, such as Dropbox or Google Drive, where malicious content is frequently hosted. 5) Scam Domains: Unlike other cyber threats that may rely on known patterns or malicious code, scams often leverage social engineering and psychological manipulation to deceive victims. That makes them hard to detect with conventional automated systems. This feed fills in the gaps for threat intellligence’s “gray area” with ScamAdviser’s extensive database covering online shopping, investment and crypto, identity theft, advance fees, employment, romance, subscriptions and other types of scams. Integrating external threat intelligence into your organization’s firewall is a crucial step in fortifying cybersecurity defenses. Organizations gain a more comprehensive and well-rounded view of emerging threats when they diversify their information sources. Different providers may have varying expertise and access to distinct threat data, offering a broader spectrum of insights. This multi-sourced approach enhances the firewall’s ability to detect and block a wider range of malicious activities, reducing the risk of missing critical threats. It’s a strategic move that ensures a more robust and adaptable security posture, minimizing the chances of falling victim to sophisticated cyberattacks. Malware Patrol offers free evaluations of our Enterprise feeds, including those for Palo Alto Networks NGFW (PAN-OS). Request your evaluation here.
PAN-OS External Dynamic Lists
Additional threat intelligence sources are integrated into Palo Alto Networks NGFW’s PAN-OS as “External Dynamic Lists” or EDLs. According to the PAN-OS Administrator’s Guide: “An External Dynamic List is a text file that is hosted on an external web server so that the firewall can import objects—IP addresses, URLs, domains—included in the list and enforce policy. To enforce policy on the entries included in the external dynamic list, you must reference the list in a supported policy rule or profile. When multiple lists are referenced, you can prioritize the order of evaluation to make sure the most important EDLs are committed before capacity limits are reached. As you modify the list, the firewall dynamically imports the list at the configured interval and enforces policy without the need to make a configuration change or a commit on the firewall.” Users can add up to 30 EDLs. There are per-firewall model restrictions on the number of entries allowed for each of the following object types: 1) IP address and 2) URL & Domain. Check the above referenced administrator’s guide for more details.
Pre-Integration – External Source Certificate Profiles
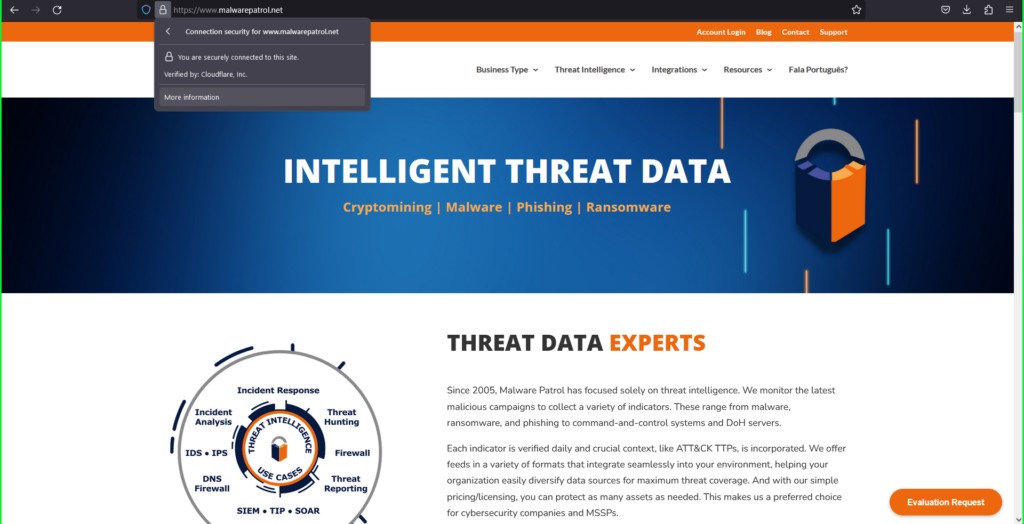
When EDL sources, such as Malware Patrol, are secured with SSL, you will need a certificate profile in order to authenticate the server hosting your data feed(s). Both the root CA (certificate authority) and intermediate CA certificates are required. Per the Administrator’s Guide (link above), you should “use the same certificate profile to authenticate external dynamic lists from the same source URL. If you assign different certificate profiles to external dynamic lists from the same source URL, the firewall counts each list as a unique external dynamic list.” To get the certificates for Malware Patrol: 1) Navigate to https://malwarepatrol.net (We used the Firefox browser – instructions will vary for others.) 2) (Left) Click on the site security padlock icon 3) Select Connection Secure –> More Information. 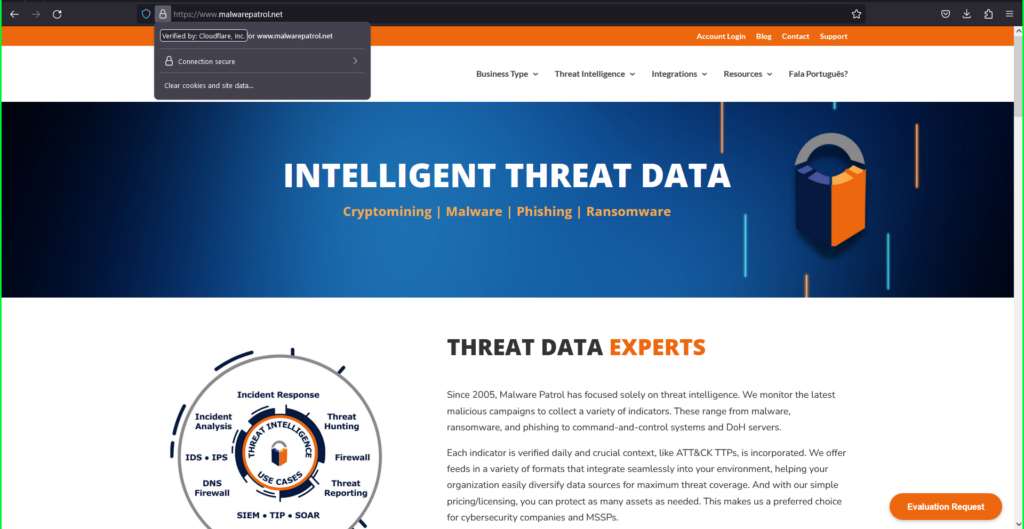
 4) Click View Certificate.
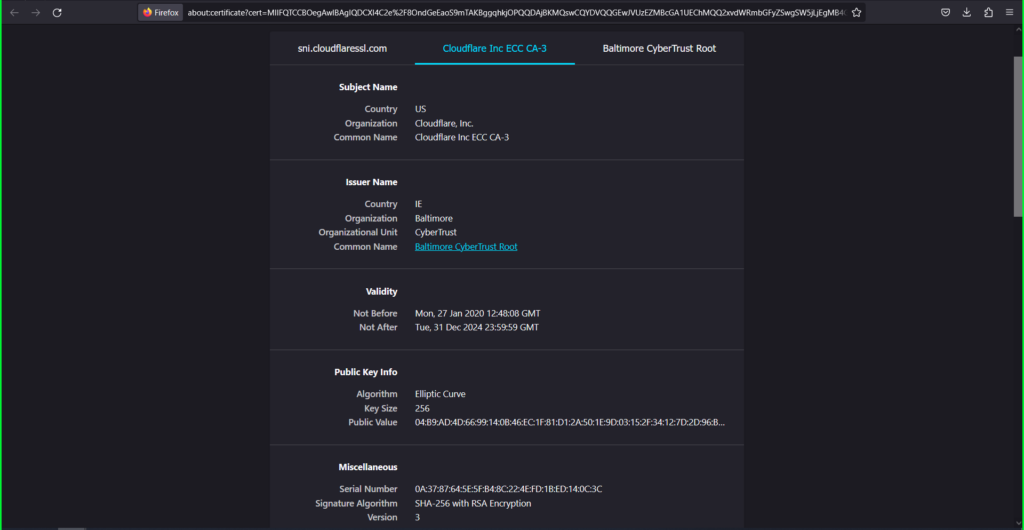
 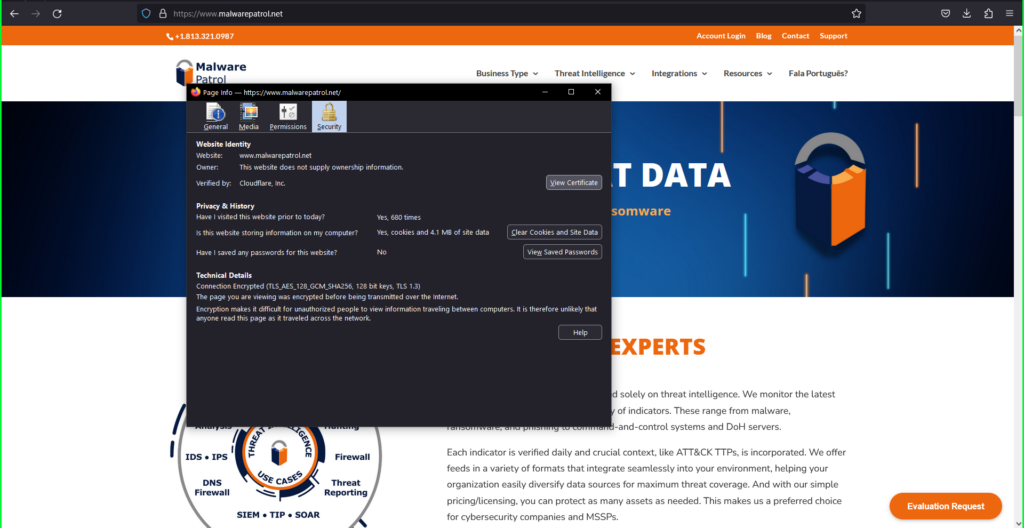 5) In the certificate information dialog box that appears:
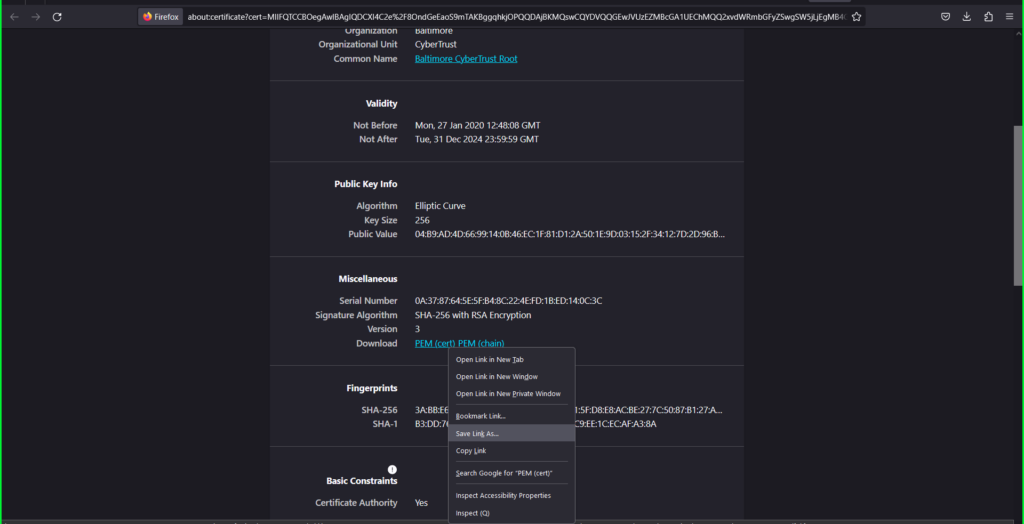
- Click on the Cloudflare Inc ECC CA-3 tab
- Right click the PEM (cert) link
- Select Save Link As and save as ‘root.pem’ to your computer
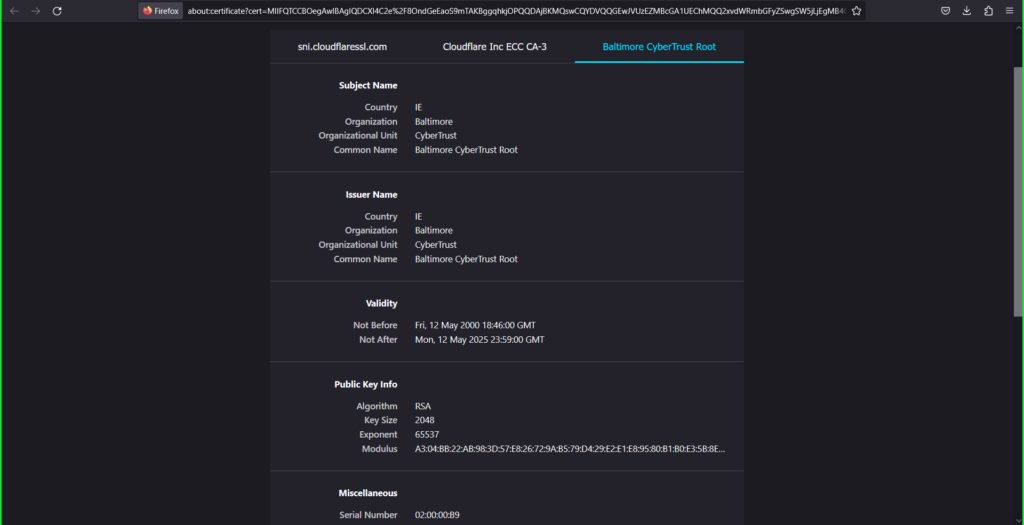
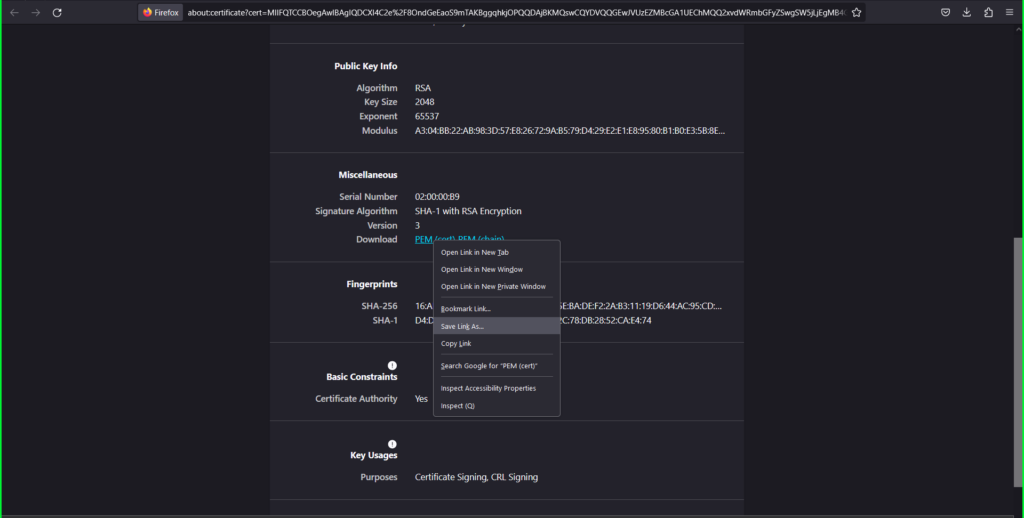
- Click on the Baltimore CyberTrust Root tab
- Right click the PEM (cert) link
- Select Save Link As and save as ‘intermediate.pem’ to your computer.
Add Certificate Profiles to PAN-OS
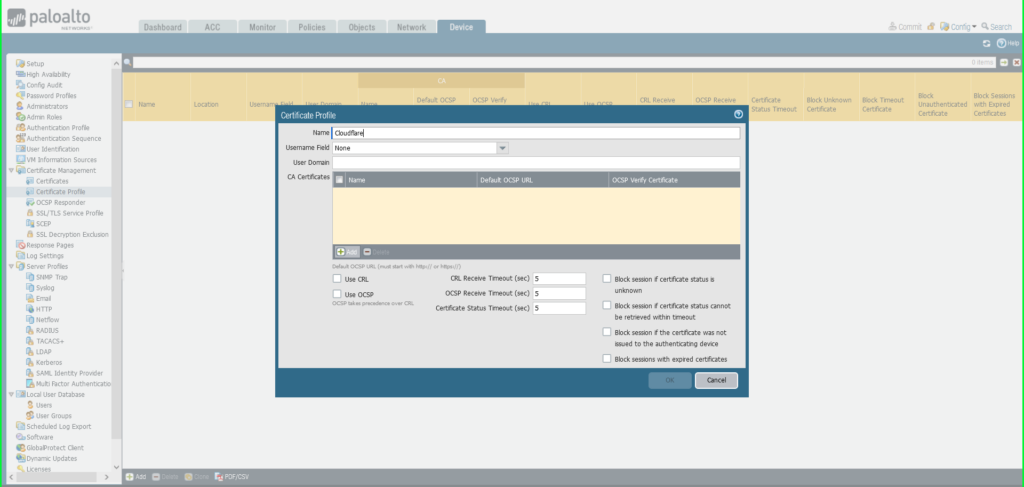
6) Log in to your Palo Alto Networks firewall interface.  7) Click on the Device tab 8) Expand Certificate Management on the left side menu and then select Certificate Profile 9) Click the +Add button at the bottom left of the screen to add a new certificate profile 10) In the Certificate Profile dialog box:
- Name: Cloudflare
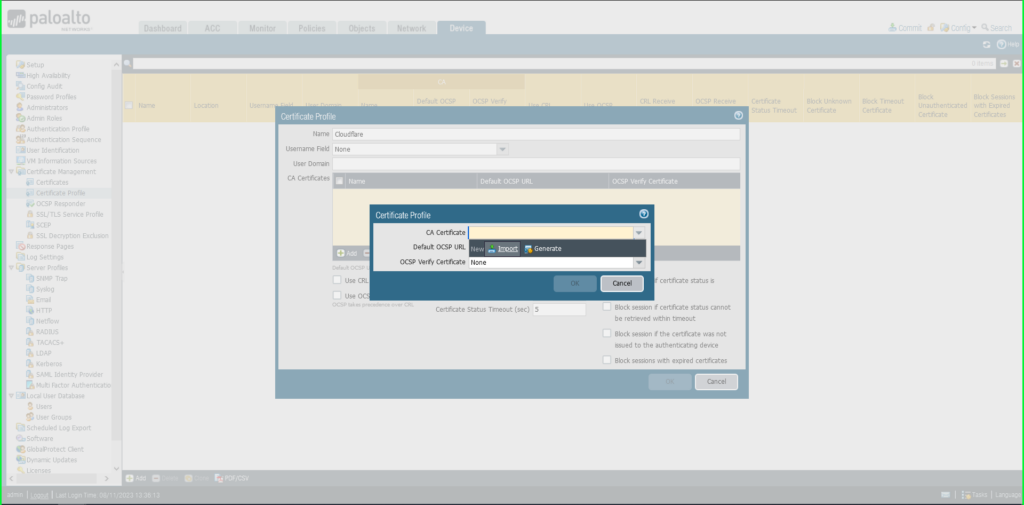
- Click the +Add button at the bottom left of the CA Certificates (yellow) section of the dialog box
- Select Import
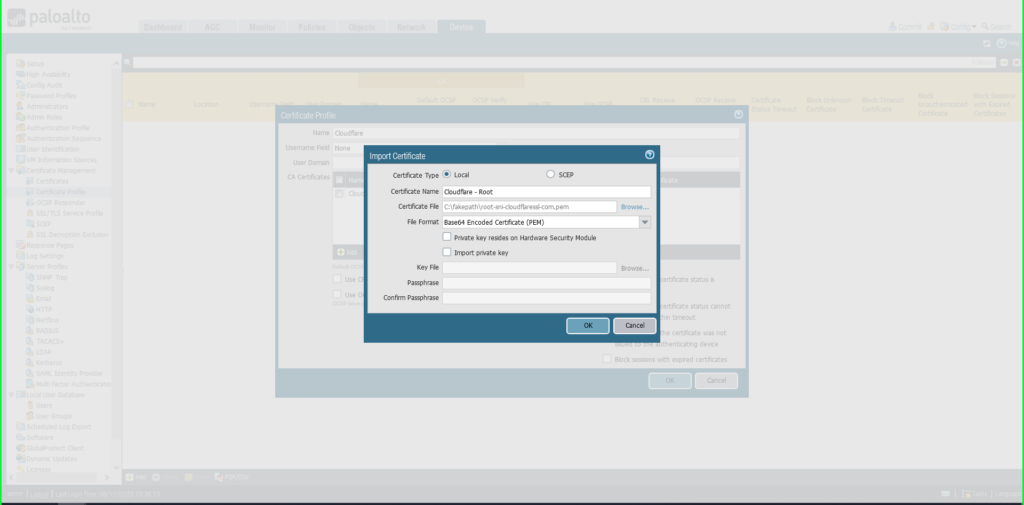
- Certificate Name: ‘Cloudflare – Intermediate’
- Click Browse to find and select the ‘intermediate’ certificate saved on your computer
- Click OK to save.
 11) Repeat this process to add the second (root) certificate previously saved to your computer to the same Certificate Profile:
- Click the +Add button again at the bottom of the CA Certificates section to add the root certificate
- Select Import
- Certificate Name: ‘Cloudflare – Root’
- Click Browse to find the ‘root’ certificate saved on your computer
- Click OK to save.
 12) You will see both certificates listed in the Certificate Profile window. Click OK to exit.
 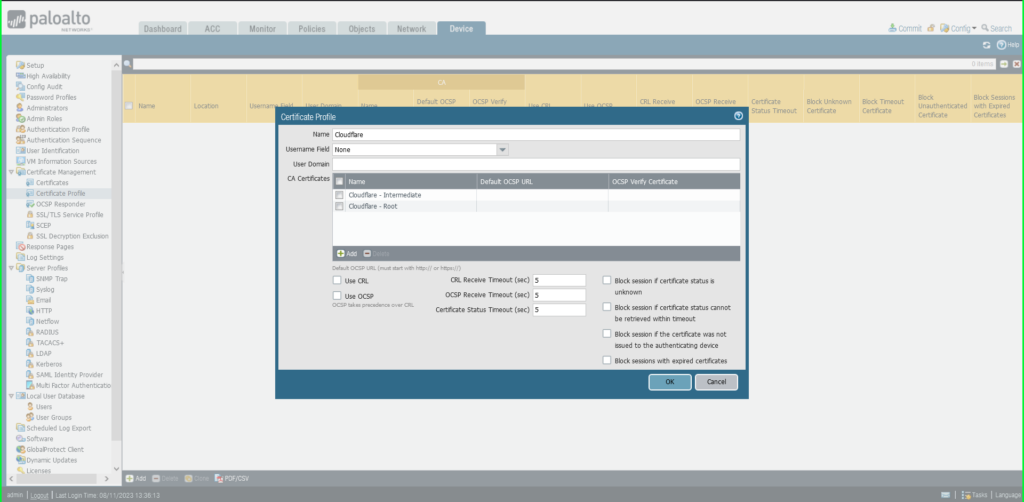 13) Click Commit in the upper right hand corner to save your changes.
 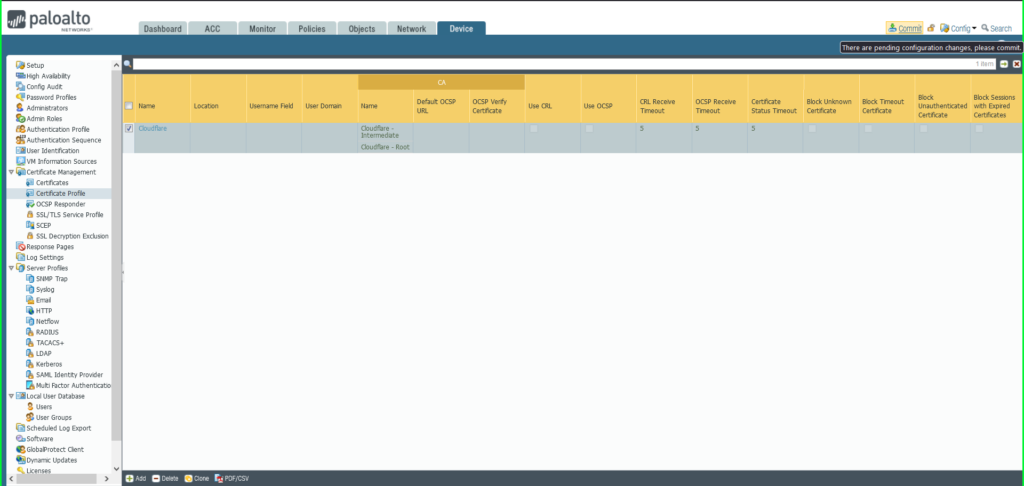 14) Once completed, a Commit Status dialog box will appear. Make sure the result is successful.
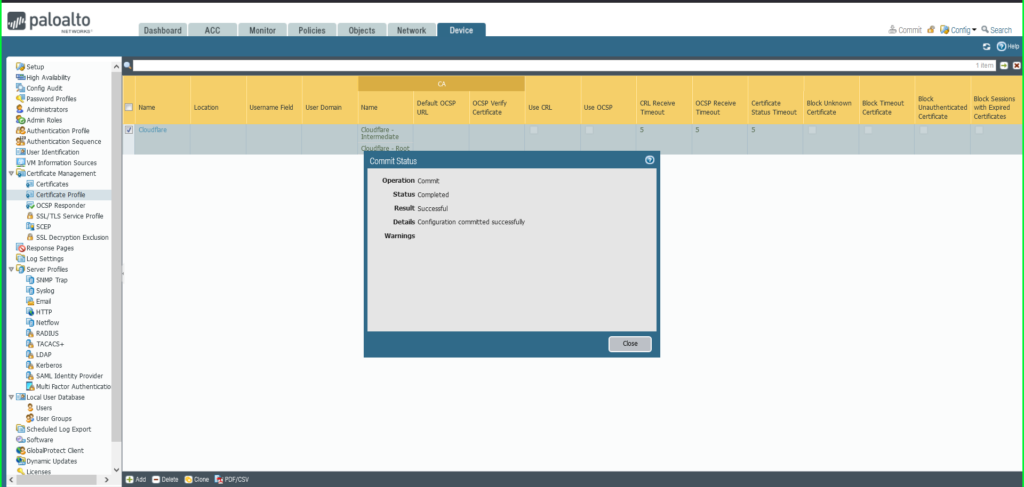
Add an IP EDL
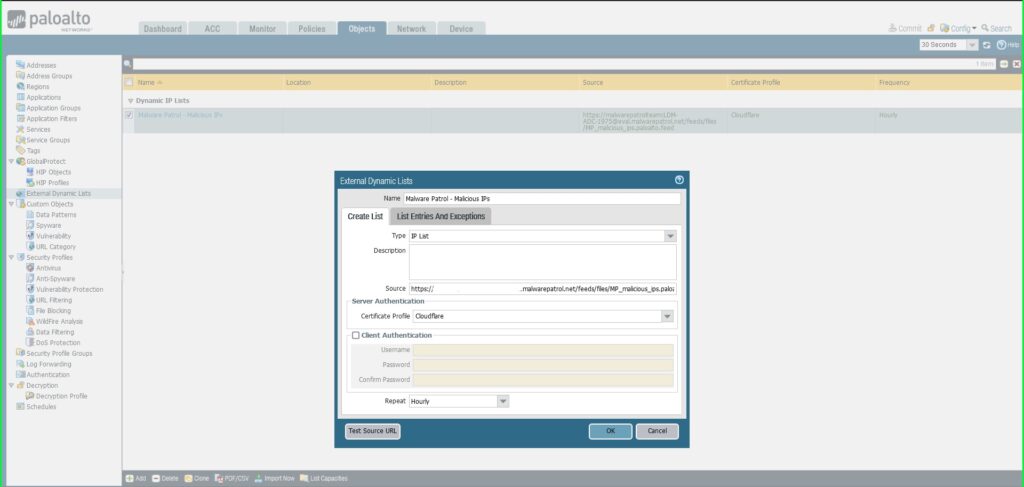
15) From the Objects tab, select External Dynamic Lists on the left side menu. 16) Click the +Add button at the bottom left of the screen to add a new EDL. A dialog box will appear.  17) In the External Dynamic Lists dialog box:
- Name: Malware Patrol – Malicious IPs
- Type: IP List
- Source: Paste the link to the IP feed from your Malware Patrol customer or evaluation portal. Insert your username and password as follows for authentication purposes: https://USERNAME:[email protected]/feeds/files/FILENAME
- Certificate Profile: Cloudflare
- Repeat: Hourly
- Click OK to save.
 18) Click Commit in the upper right hand corner to save your changes. Make sure the result is successful in the Commit Status window that appears after the process has completed.
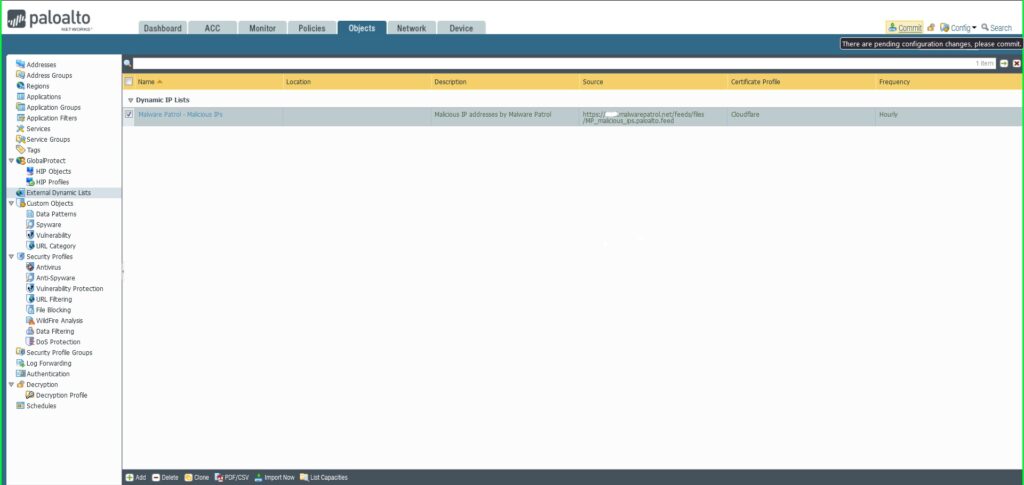
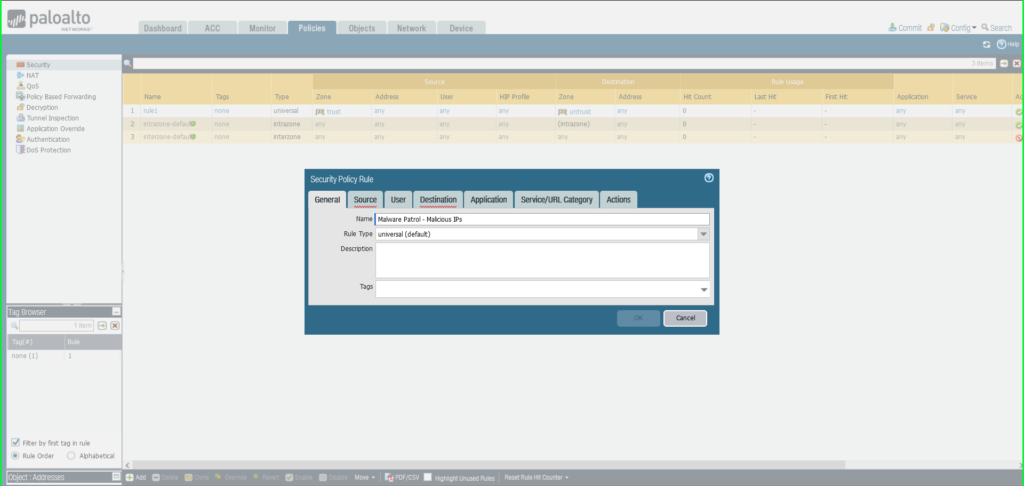
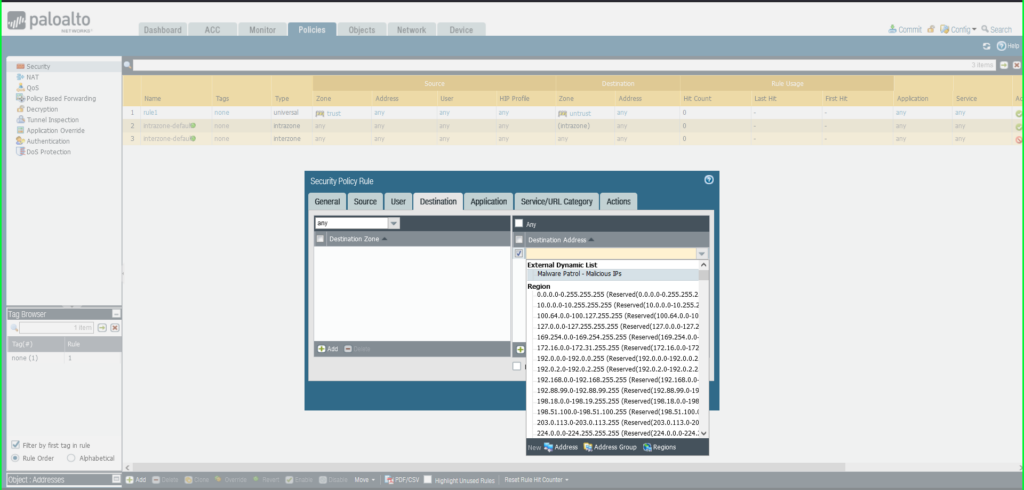
Apply a Security Policy to an IP EDL
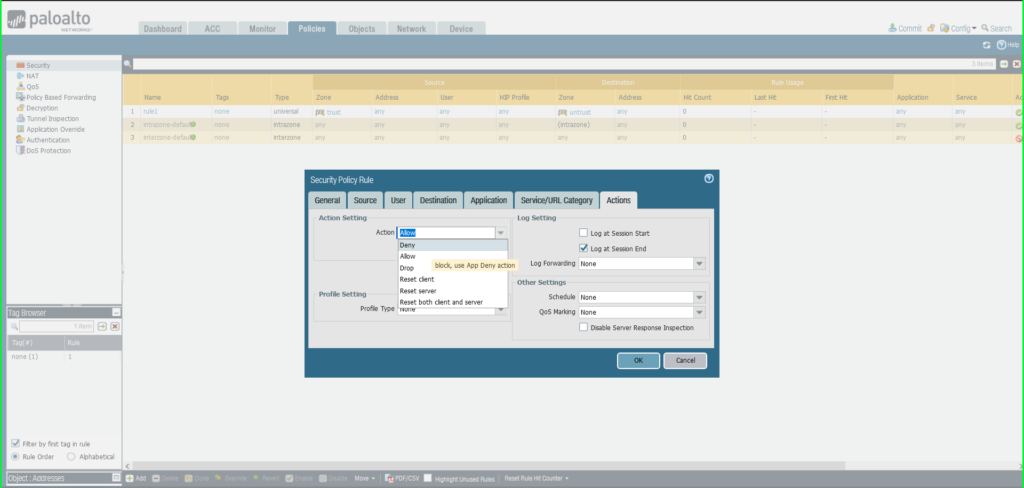
19) From the Policies tab, select Security on the left side menu 20) Click the +Add button at the bottom left of the screen to add a new security policy 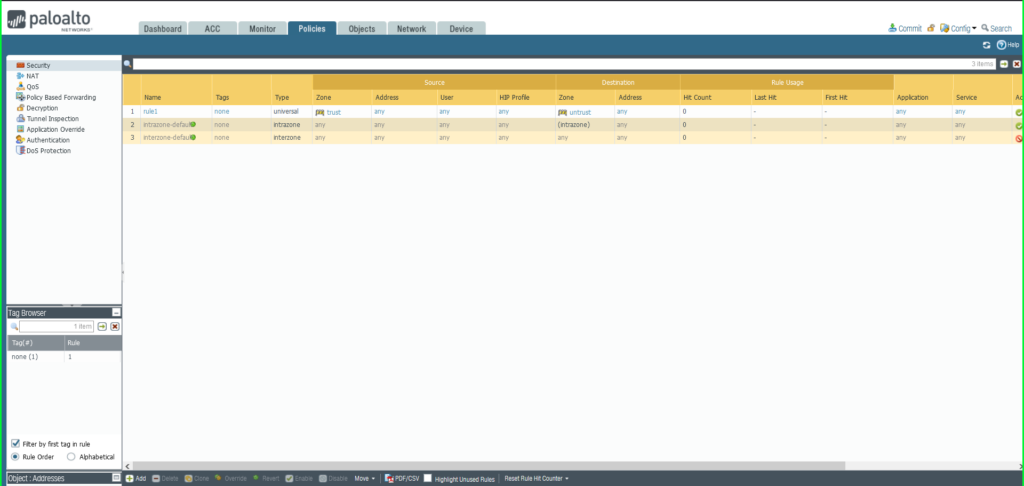 21) In the Security Policy Rule dialog box:
- Name: Malware Patrol – Malicious IPs
- Click Destination tab
- Destination Zone: Any
- Destination Address: External Dynamic List –> Malware Patrol – Malicious IPs
- Click Actions tab
- Action: Deny
- Click OK to save.
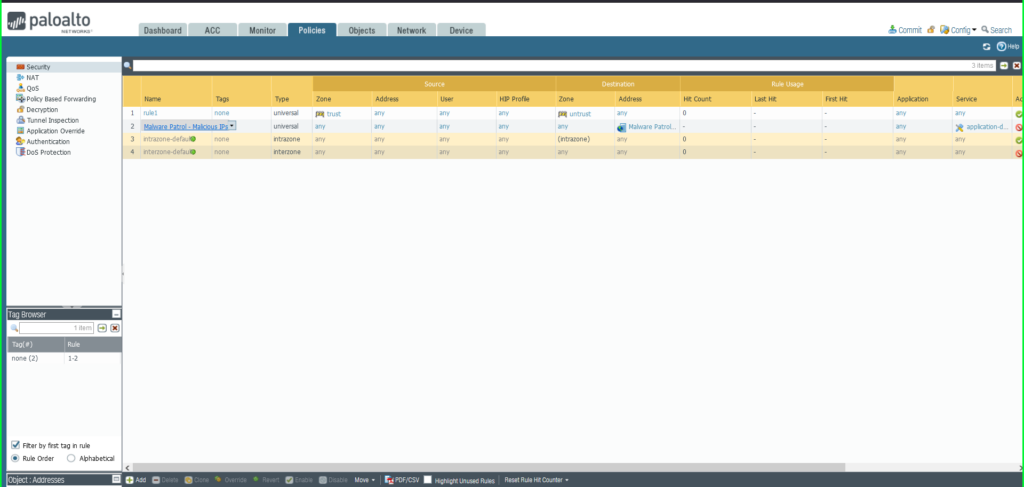 22) Once again click Commit in the upper right hand corner to save your changes. Make sure the result is successful in the Commit Status window that appears after the process has completed.
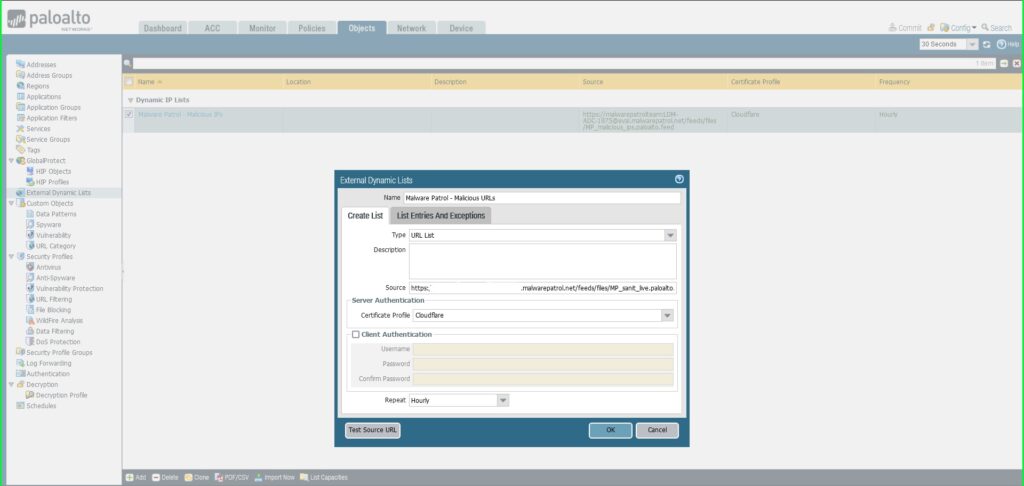
Add a URL EDL
23) From the Objects tab, select External Dynamic Lists on the left side menu. 24) Click the +Add button at the bottom left of the screen to add a new EDL. A dialog box will appear. 25) In the External Dynamic Lists dialog box:
- Name: Malware Patrol – Malicious URLs
- Type: URL List
- Source: Paste the link to the IP feed from your Malware Patrol customer or evaluation portal. Insert your username and password as follows for authentication purposes: https://USERNAME:[email protected]/feeds/files/FILENAME
- Certificate Profile: Cloudflare
- Repeat: Hourly
- Click OK to save.
 26) Once again click Commit in the upper right hand corner to save your changes. Make sure the result is successful in the Commit Status window that appears after the process has completed.
Apply a Security Policy to a URL EDL
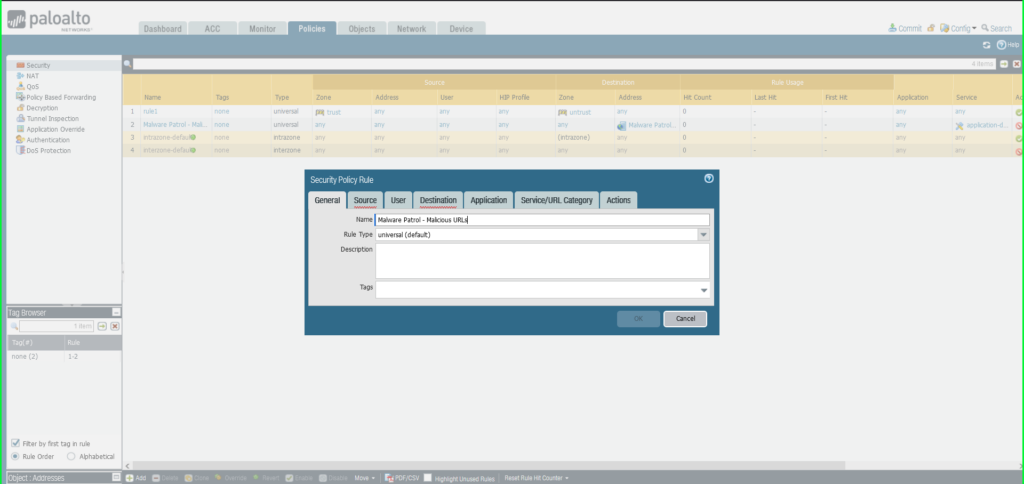
27) From the Policies tab, select Security on the left side menu. 28) Click the +Add button at the bottom left of the screen to add a new security policy. 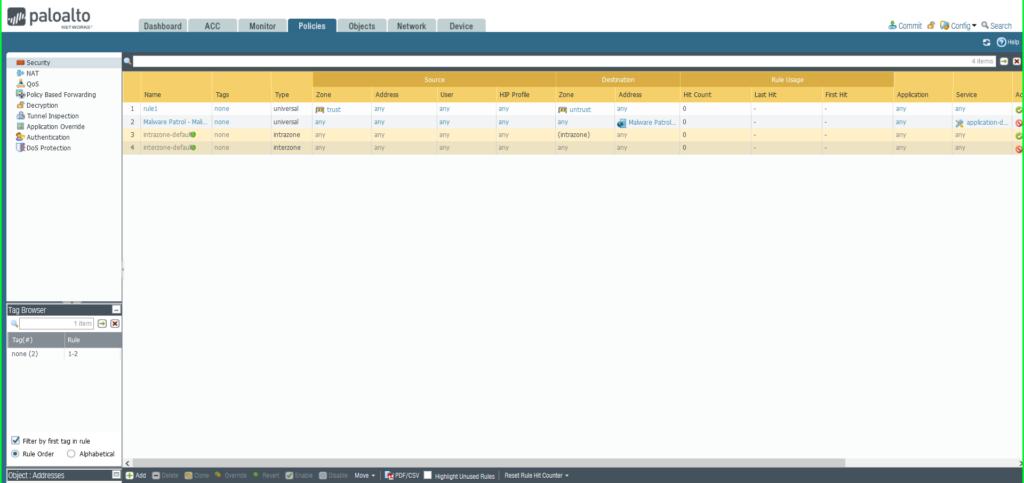 29) In the Security Policy Rule dialog box:
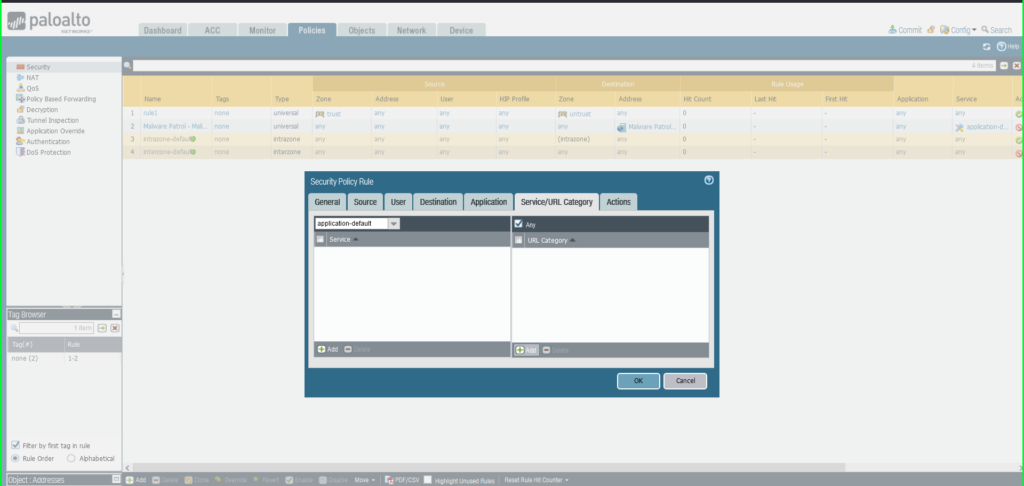
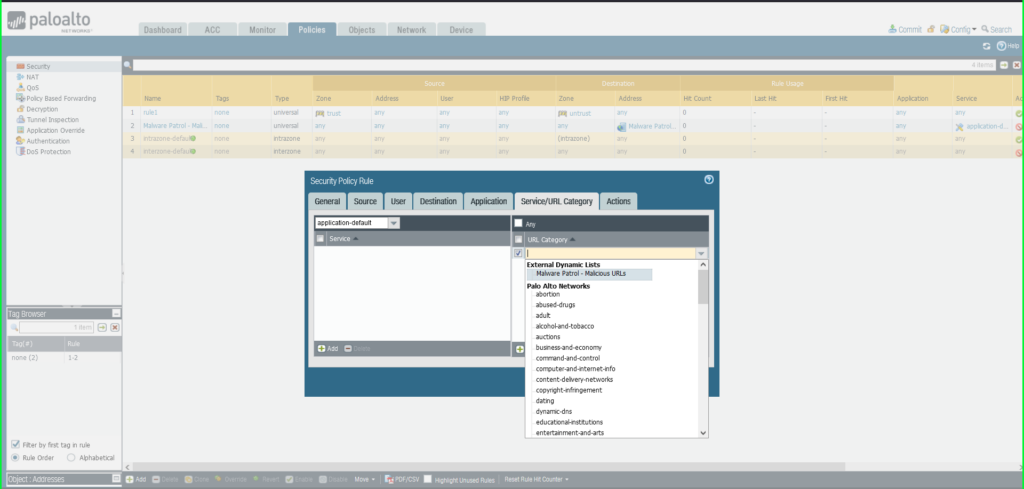
- Name: Malware Patrol – Malicious URLs
- Click Service/URL Caetgory tab
- Service: Application-Default
- URL Category: External Dynamic List –> Malware Patrol – Malicious URLs
- Click Actions tab
- Action: Deny
- Click OK to save.

 30) Once again click Commit in the upper right hand corner to save your changes. Make sure the result is successful in the Commit Status window that appears after the process has completed.
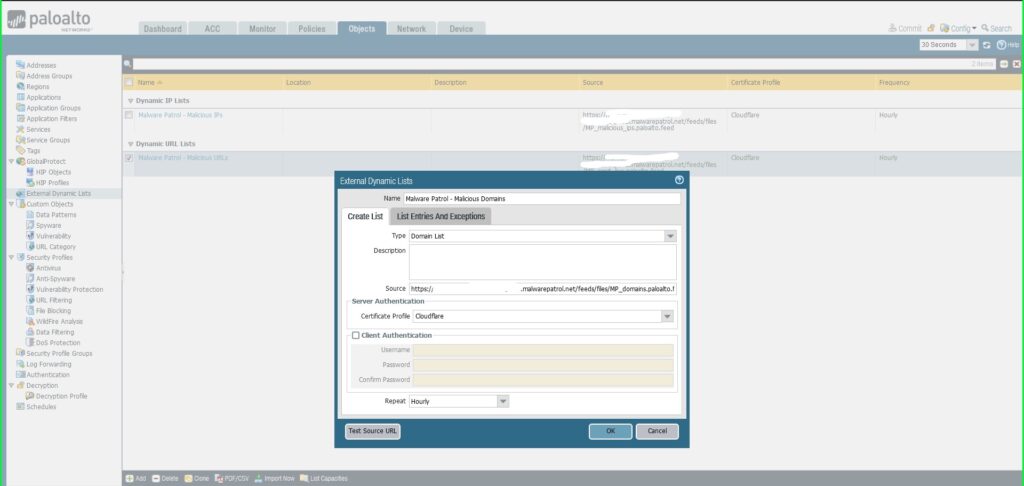
Add a Domain EDL
“An external dynamic list of type domain allows you to import custom domain names into the firewall to enforce policy using an Anti-Spyware profile or SD-WAN policy rule. An EDL in an Anti-Spyware profile is very useful if you subscribe to third-party threat intelligence feeds and want to protect your network from new sources of threat or malware as soon as you learn of a malicious domain. […] You can also specify the firewall to include the subdomains of a specifed domain. […] When this setting is enabled, each domain in a given list requires an additional entry, effectively doubling the number of entries used by the list.” PAN-OS Administrator’s Guide Malware Patrol offers three domain-based feeds for PAN-OS: Malicious Domains, Scam Domains, and DoH Servers. 31) From the Objects tab, select External Dynamic Lists on the left side menu. 32) Click the +Add button at the bottom left of the screen to add a new EDL. A dialog box will appear. 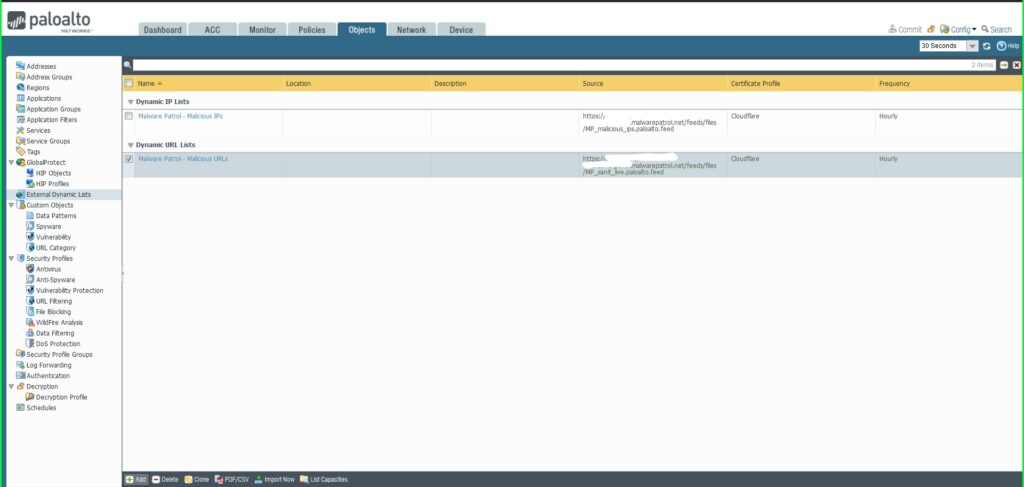 33) In the External Dynamic Lists dialog box:
- Name: Malware Patrol – Malicious Domains
- Type: Domain List
- Source: Paste the link to the IP feed from your Malware Patrol customer or evaluation portal. Insert your username and password as follows for authentication purposes: https://USERNAME:[email protected]/feeds/files/FILENAME
- Certificate Profile: Cloudflare
- Repeat: Hourly
- Click OK to save.
- Repeat this process to add Malware Patrol’s DNS-over-HTTPS Servers and Scam Domains feeds as EDLs.
 34) Once again click Commit in the upper right hand corner to save your changes. Make sure the result is successful in the Commit Status window that appears after the process has completed.
Apply a Security Policy to a Domain EDL
Note: This process is slightly different from adding a security policy to IP and URL EDLs.
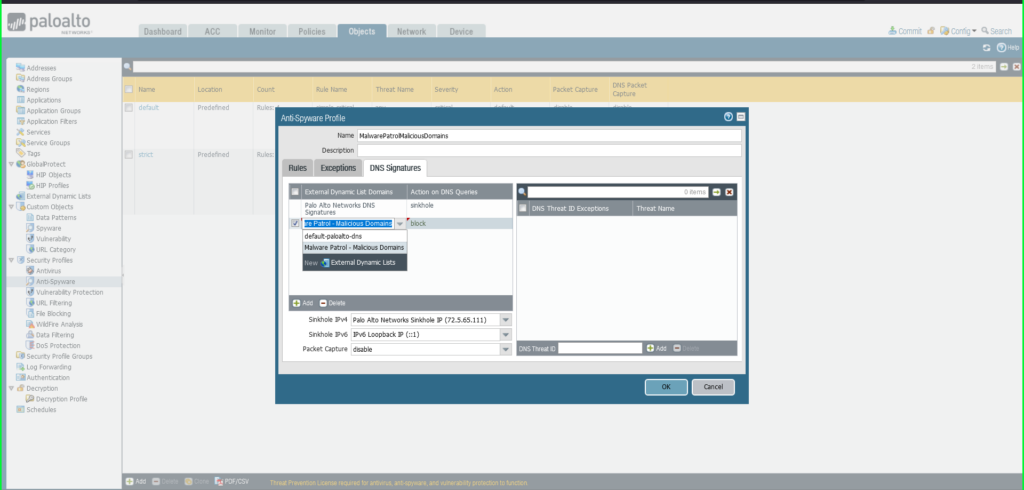
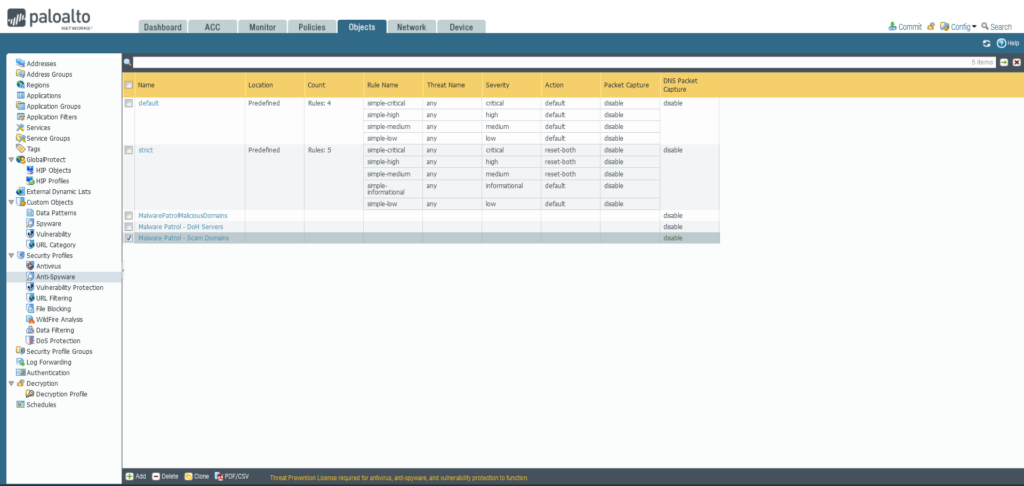
Add Anti-Spyware Profile
35) From the Objects tab, select expand Security Profiles on the left side menu. Click Anti-Spyware. 36) Click the +Add button at the bottom left of the screen to add a new profile. A dialog box will appear. 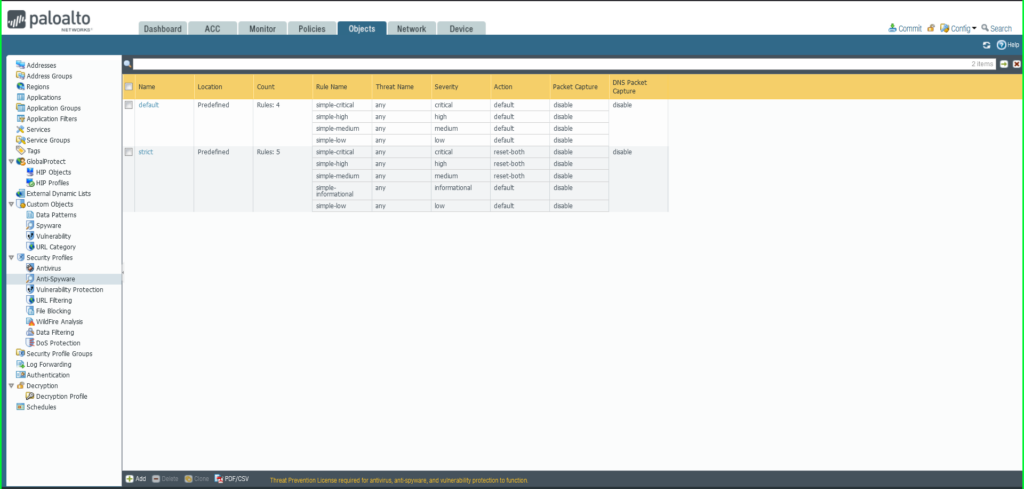 37) In the Anti-Spyware Profile dialog box:
- Name: MalwarePatrolMaliciousDomains
- Select the DNS Signatures tab
- Click the +Add button at the bottom left of the External Dynamic List Domains section
- Select External Dynamic Lists > Malware Patrol – Malicious Domains from the dropdown list
- Repeat this process to add Malware Patrol – DOH Servers and/or Malware Patrol – Scam Domains
- Action on DNS Queries: Apply either Block or Sinkhole to the newly added feed(s), per your organization’s needs
- Click OK to save.
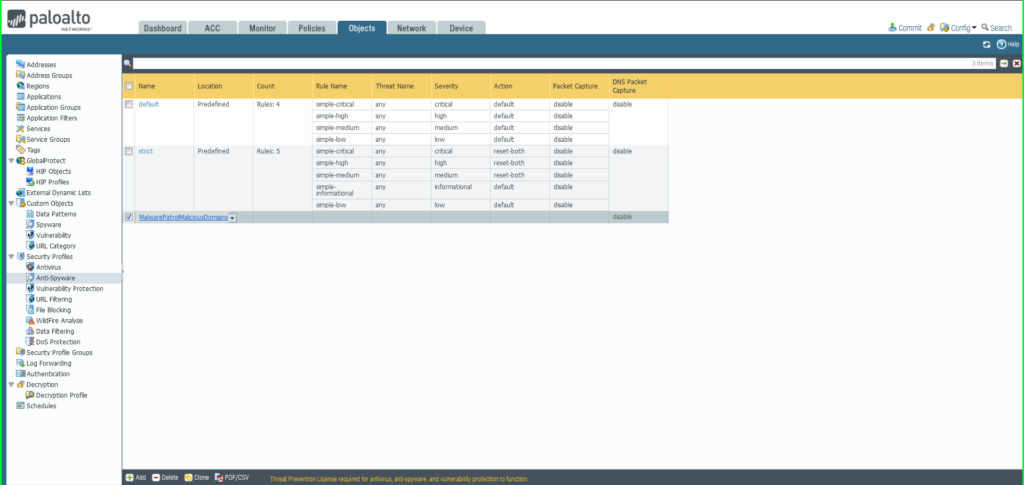
 38) Once again click Commit in the upper right hand corner to save your changes. Make sure the result is successful in the Commit Status window that appears after the process has completed.
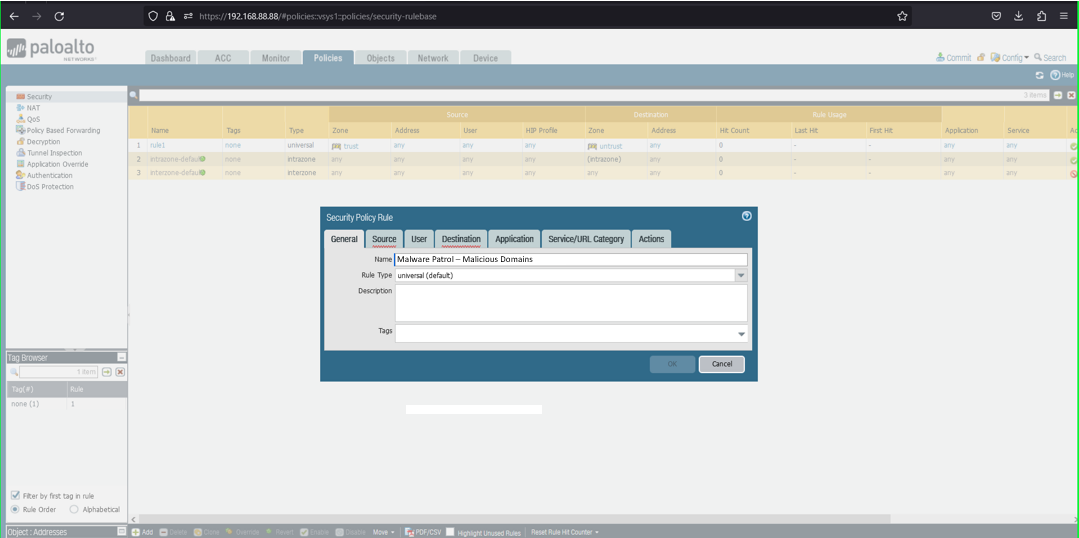
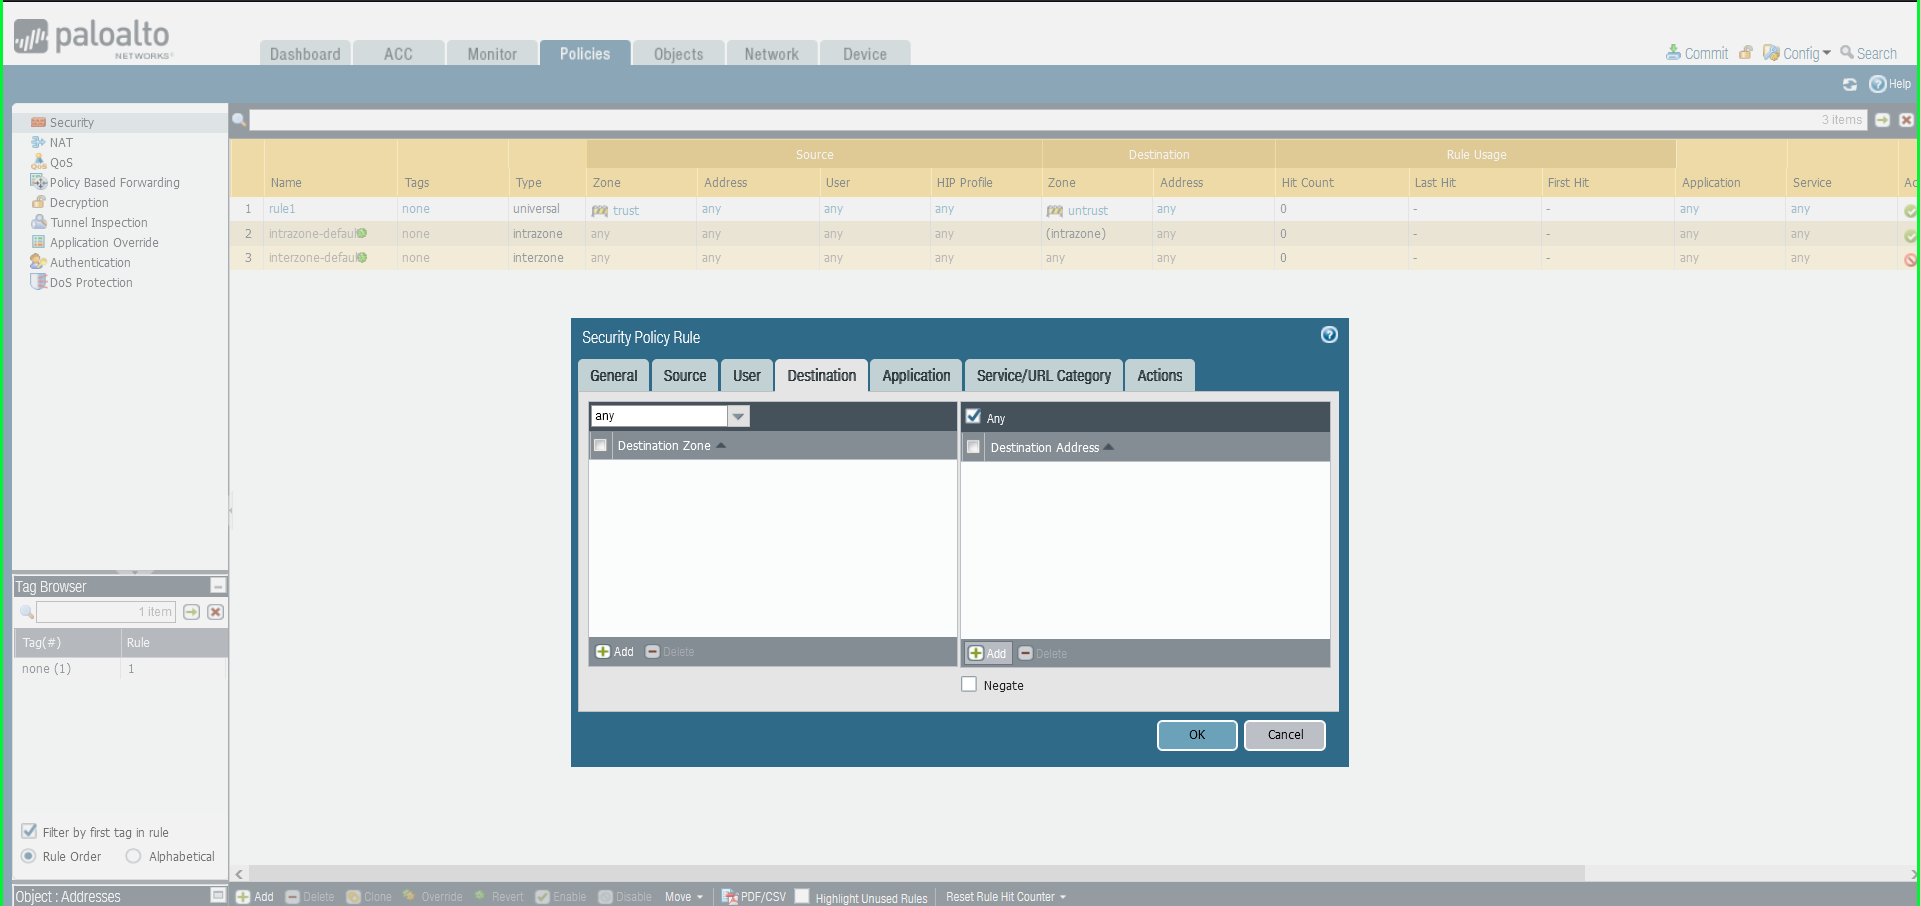
Add a Security Policy
39) From the Policies tab, select Security on the left side menu 40) Click the +Add button at the bottom left of the screen to add a new security policy 41) In the Security Policy Rule dialog box:
- Name: Malware Patrol – Malicious Domains (or Scam Domains or DoH Servers)
- Click Destination tab
- Destination Zone: Any
- Destination Address: Any
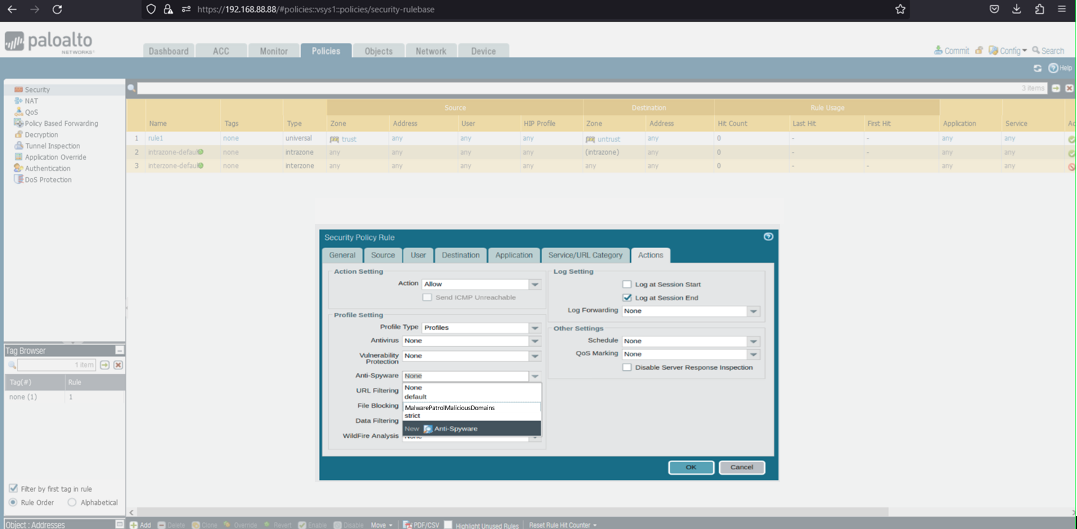
- Click Actions tab
- Profile Type: Profiles
- Anti-Spyware: Select MalwarePatrolMaliciousDomains
- Click OK to save.
 42) Once again click Commit in the upper right hand corner to save your changes. Make sure the result is successful in the Commit Status window that appears after the process has completed. PAN-OS Reference Document Links:
- External Dynamic Lists
- General Configuration
- Security Policies
- View External Dynamic List Entries
- Exclude Entries from an External Dynamic List
- Use an External Dynamic List in a URL Filtering Profile
If you need any assistance with your Palo Alto NGFW integration with Malware Patrol’s data feeds, please email support ( @ ) malwarepatrol.net or contact your Account Manager.