New OSINT Feeds: High Risk IPs – Risk Indicators – Tor Exit Nodes

?????

OSINT feed

Sharing is Caring

To our industry’s credit, there are many good OSINT feeds and data sharing platforms. Even better, they are relatively easy to find. A simple Google search for open source intelligence (OSINT) threat feeds or open source cybersecurity tools will yield many, many results. This is really a testament to the goodwill and collaborative spirit of the cybersecurity community.

Some examples of data sharing options include DHS CISA AIS, AlienVault OTX, and Abuse.ch, just to name a few. High quality open source security tools (TIP, SIEM, SOAR), such as MISP, are also readily available to help your organization utilize intelligence of all kinds.

Avoid Analysis Paralysis

As usual, there is a however to this good news: the number of available resources can be overwhelming. When faced with so many options, it can be difficult, or time consuming at the very least, to select, evaluate, and implement free intelligence and tools in your organization. Without some parameters or pre-defined goals, your research efforts may fall short.

If you are about to embark on this journey, we would like to offer a few suggestions about how to structure and organize your OSINT search process:

1) Determine your organization’s intelligence needs and priorities.

    • Review current goals or roadmaps related to threat intelligence to clarify and prioritize your needs.
    • Ask your security team – and other relevant stakeholders – for their input:
      • What are your data gaps? For example, what caused your last incident, and could it have been prevented with some additional type of data?
      • Do you know the tactics, techniques and procedures (TTPs) of threat actors targeting your organization’s industry and could OSINT help prepare for these specific kinds of attacks?
      • Is there a paid intelligence resource or tool you are unable to afford but really want? Maybe it is worth looking for a free/open source alternative?
      • Also consider other topics specific to your organization, industry, security environment, geopolitical events, and so on

2) Research and compile a list of potential sources.

    • Use one of the industry’s go-to OSINT resources as a starting point.
    • Ask around – nothing beats a firsthand recommendation.
    • Search for curated lists of OSINT feeds/sources. (Be mindful of the age and potential bias of the information source.) We found these helpful articles during our research: SOCRadar, Spiderfoot, Sunny Valley Networks and SENKI. GitHub rarely disappoints.

3) Evaluate and rate the sources for final decision making.

    • Criteria to consider:
      • Data quality – Are you familiar with the organization that generates it? Or how a crowd-sourced data community is managed, members vetted? Is the data rated or otherwise confirmed by group members in some way? How is it aged?
      • Update frequency (if applicable) – Hourly, Daily, Monthly, Other?
      • Coverage – Geography? Market vertical?
      • Aggregation/Efficiency – Does the provider aggregate multiple sources into one?
      • Ease of integration/retrieval – Do your tools ingest data in the formats provided? Can collection be easily automated or otherwise added to your team’s tasks without being burdensome?
      • Context – Does the data include context on the incident or campaign?
      • Licensing – Does it allow for your intended use of the data? Open source does not automatically mean the data can be used freely for commercial purposes.
    • Check for overlap with your current resources to prevent overloading your tools with repetitious data. For example, MISP has a Feed overlap analysis matrix. Other tools offer similar functionality.
    • Consider the reputation of the provider and any other applicable factors from your research to determine the confidence level you feel comfortable applying to the data:
      • High confidence – Decisions and alerts will be based on this data source
      • Medium confidence – Indicator must be confirmed by another source before acted upon
      • Low or N/A confidence – Not used for alerts or blocking, but useful for research and as a confirmation of an indicator’s maliciousness
    • Use all the above information to make a final list. Review and decide.

4) Decide which tool(s) and/or process(es) will use the OSINT feed or unstructured data and for what purpose. (Use details from step 1 to help with this.)

    • Integrate the threat data into your security tool(s) and processes. Set up automatic downloads and/or assign manual tasks.
    • Update documentation/SOPs to include your new resources.
    • Inform security teams and provide any necessary training on how to use/interpret the data.
    • Schedule a review (30, 60, 90 days) to evaluate the usefulness and quality of the data.
    • Wash, rinse, repeat to keep expanding your OSINT at regular intervals.

OSINT Feeds from Malware Patrol

If acquiring open source intelligence is a goal for your organization, we invite you to check out Malware Patrol’s free OSINT feeds. The curated data is derived from our internal research well as trusted third-party sources.

  • High Risk IPs: Addresses involved in a range of malicious activities, such as spam, malware distribution, botnets, and command-and-control communications.
  • Risk Indicators: A variety of threat related IoCs, including: MD5, SHA1, and SHA256 hashes, email addresses, cryptocurrency addresses, and CVEs.
  • Tor Exit Nodes: Addresses of active Tor exit nodes as reported by the Tor Project. Frequently involved in malicious activities, it is advisable to monitor, if not block, traffic from these IPs.

Here’s how Malware Patrol does OSINT:

  • We enrich the feeds with decision-enhancing context such as the associated malware family, threat actor, article links, and any other available metadata.
  • Entries are aged and removed at regular intervals to make sure the data stays fresh.
  • Our team manages the data quality and sources closely.

To find out more about our OSINT feeds, visit our Enterprise page.


OSINT feed
?

Malware Hashes and Hash Functions

???

An Introduction to Malware Hashes and Hash Functions

Malware hashes are found everywhere in our industry. And for a good reason. They very efficiently help identify malware samples and standardize the exchange of information among researchers, to name a couple of use cases.

The topic of hash functions is an enormous and complex one. There are dozens of them, if not more, with significant variations in base computation methods, applications, security, and outputs. So, for time and sanity’s sake, we will only discuss hashes in the context of information security and cybersecurity.

What is a Hash Function?

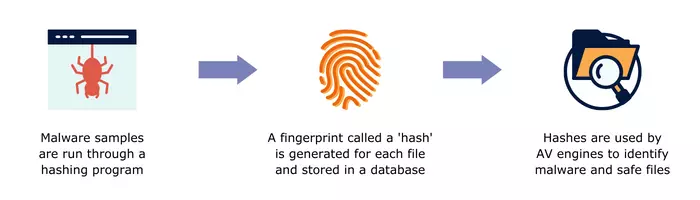
A hash function is an algorithm that takes an arbitrary input of bits of any size and produces a unique, fixed-size output. The output is known as a hash, hash code, hash sum, hash value, checksum, digital fingerprint, or message digest. A hash calculated for a malware file is a malware hash.

The hashing process is mathematically guaranteed to only work in one direction – from a string of bits of varied size to a fixed-size output – and cannot be reversed. And the output’s uniqueness is meant to be absolute, that means no two distinct inputs can generate the same output; modifying only one bit of the input generates a completely different hash sum.

It Takes All Kinds

The most common hash functions are MD5, SHA-1, SHA-256, and SHA-512. Their main purpose in cybersecurity is to generate unique identifiers for their inputs, such as malware files, that can be cataloged, shared or (re)searched with relative ease.

Other types of hash functions are used for granular identification, grouping, comparison, and analysis of malware. For example, fuzzy hashes were developed to identify files that share characteristics or have been modified only slightly. One common type of fuzzy hash is SSDEEP.

Are Hashes Really Secure?

It depends. Some hashes once believed unbreakable are now considered to be insecure. This can mean that it’s possible to reverse, generate a collision (create the same hash value for two different inputs) or otherwise manipulate the algorithm and/or its output.

Of the hashing functions previously mentioned, the MD5 is no longer considered secure. According to some sources, the SHA-1, SHA-256, and SHA-512 functions can also be considered insecure, depending on the intended use.

For protecting data, like passwords, strong hashing algorithms are necessary. A common-sense best practice is to make sure that any hash function you are considering meets the security requirements of your 1) use case and 2) organization/industry.

How are Hashes Used?

Hash functions have many uses in cybersecurity and elsewhere. Their overall most popular uses are in the areas of data confidentiality and integrity as well as authentication and non-repudiation. The following characteristics make them ideal for the job:

1) They are not reversible
2) The output is unique and of fixed length
3) They significantly – exponentially even – reduce the amount of original data they represent.

A few examples of uses that rely heavily on the features above include:

Hash table – A data structure that utilizes hash values to represent large amounts of data or large files. Both the reduction in the amount of data to query and the quick cross-referencing facilitated by unique identifiers allow for rapid data lookup.

File integrity – A hash is computed and then compared with the stored hash of the original data. If the two values match, the data has not been modified.

Malware Hashes and Hash Functions

Password security – User-created passwords are run through a hashing algorithm and the hash is stored instead of the plaintext version. This protects passwords in the event of unauthorized access. Any password entered for logging in is hashed and compared with the stored hash for verification purposes.

Hashes in Cybersecurity

In the cybersecurity industry, hashes are primarily used to identify, share, and group malware samples. One of the first use cases for them was in antivirus (AV) software. AVs use a database of malware hashes as a sort of blocklist. During the scanning process, the blocklist is compared against the hashes calculated for the executable files on the system. A match indicates a malicious file is present.

A drawback to this detection method is that the list of known malware hashes is already huge and grows larger every day. This amount of data can easily overload the storage and processing capacity of personal computers, IDS/IPS and firewalls. A best practice when using blocklists of any kind is to make sure your threat intelligence is fresh, not full of inactive indicators or false positives. Quality over quantity!

As the industry evolved, security tools began to additionally make use of heuristic/behavioral analysis to detect malware. Without this capability, polymorphic malware, for example, would go undetected.

Beyond the AV

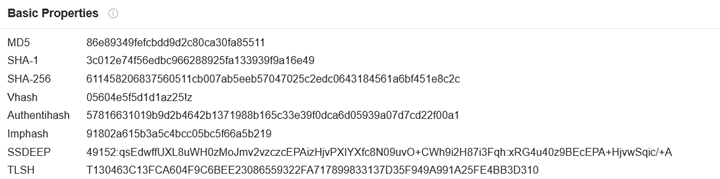
Malware hashes have several uses beyond signature-based detection tools. They standardize and simplify the exchange of IoCs (Indicators of Compromise) among researchers. (And we all know that our malware naming conventions are far from standardized!) This list of hashes from a VirusTotal search result probably looks familiar to you:

malware hashes

And just as AV software uses malware hashes to look for infected machines, threat hunters and SOC teams use them for the same purpose. In fact, being able to search for a hash value instead of looking for evidence of the malware itself saves a lot of time. Having quality malware hashes data in a TIP or SIEM to assist with investigations is invaluable.

Researchers utilize hashes to analyze and compare malware, such as with fuzzy hashes that try to find similarities between samples. Machine learning models can use perceptual hash data from screenshots, for example, to learn how to recognize screenshots of web pages that have similar content, such as phishing sites.

Conclusion

While hashes have limitations when used for perimeter-based malware detection, they are still extremely helpful. It’s all about layered security and not ever depending on one tool or type of indicator to protect your network. As for the exchange of IoCs, threat research, and machine learning, hashes have a multitude of applications. Some of these are still new and very promising.

If you want to learn more about hashes, there are many good resources out there. Some articles we encountered during our research are listed below:

  • Calculate Your Own Hashes with CyberChef: https://gchq.github.io/CyberChef/
  • https://blog.jscrambler.com/hashing-algorithms
  • https://resources.infosecinstitute.com/topic/threat-hunting-for-file-hashes-as-an-ioc/
  • https://www.gdatasoftware.com/blog/2021/09/an-overview-of-malware-hashing-algorithms
  • https://www.sentinelone.com/cybersecurity-101/hashing/
  • https://blog.securitybreak.io/fifty-shades-of-malware-hashing-3783d98df59c


Looking for Quality Malware Hashes Data?

Malware Patrol offers the three hashes feeds below. You can request a free evaluation here.

1) Malware Hashes Feed. Includes MD5, SHA-1, and SHA-256 hashes, as well as classification of verified active malware and ransomware samples.

2) Risk Indicators Feed. Composed of a variety of IoCs, including MD5, SHA-1, and SHA-256 hashes, email addresses, cryptocurrency addresses, and CVEs. The curated data in this feed is derived from our network of honeypots as well as trusted third-party sources.

3) Phishing Screenshots & Perceptual Hashes Feed. Malware Patrol collects phishing URLs from various sources – crawlers, emails, spam traps, and more – to ensure coverage of the most current campaigns. We take screenshots of the phishing pages and the corresponding perceptual hashes are calculated. These can later be compared with hashes of other screenshots to determine a match likelihood.

?

MISP Project – A free & robust open source threat intelligence platform

?????

MISP and Malware Patrol logos on a image with a grey and white background used for the misp blog post

The MISP project is a free open source threat intelligence platform (TIP) that stores, analyzes, and shares information about malware.

It is co-financed by the European Union and a wide variety of organizations, including law enforcement agencies, private companies, and academic institutions, rely on MISP.

The platform has several features that make it an invaluable tool. For example, a searchable database of known malware samples allows organizations to find information on specific threats quickly. In addition, MISP includes a variety of other options such as a collection of OSINT feeds, API access, and integration with other security products.

Another reason why MISP is a crucial tool for malware researchers and security professionals is that it allows them to share information about new threats and samples quickly. This helps researchers keep up with the latest threats and allows them to work together to better understand and protect against new attacks.

MISP Threat Sharing Project Features

“Support” refers to the ability of a software or service to integrate with MISP. This is accomplished through an API or by using a MISP-compatible format. Many different types of industry software and services offer support. These include but are not limited to various SIEMs, TIPs, and incident response tools.

MISP modules are expansion modules that can be used to add new functionality to MISP. They are developed by the MISP community and are available for anyone to use. There are currently over 40 MISP modules available! They cover a wide range of topics, such as malware analysis, incident response, and threat intelligence. For example, the platform can use Splunk for log analysis or TheHive for incident response.

For customization purposes, MISP has flexible taxonomies for describing and tagging events. There is also support for exporting data in the MISP format or in STIX/MAEC formats, as well as an advanced correlation engine to identify relationships between indicators. Hierarchical tag inheritance is yet another feature.

To support its mission of enabling the sharing of information, the tool allows the creation of private groups for sensitive information. This is ideal for sharing information about new threats and vulnerabilities within a company so that everyone can be aware and take appropriate action.

pyMISP

The pyMISP project is an open-source toolbox written in Python 3 and serves as the official library for the MISP project. It is designed to support the MISP threat intelligence platform by providing a flexible and powerful platform for ingests, exports, queries, and analyses. The project is led by Alexandre Dulaunoy (@adulau), who is also the main developer of the MISP software.

pyMISP is released under the GNU Affero General Public License v3.0. The toolbox currently contains 19 different tools, each of which performs a specific function related to MISP.

Some of the more popular tools included in pyMISP are:

  • Ingest: This tool allows you to ingest data from a variety of sources, including text files, JSON files, and even generic SQL databases. Export: This tool allows you to export data from MISP in a variety of formats, including CSV, XML, and HTML.
  • Query: This tool allows you to perform simple queries against the data in MISP. For example, you can use this tool to search for all incidents that contain a specific IP address.
  • Analysis: This tool allows you to perform various analyses on the data in MISP. For example, you can use this tool to generate a timeline of all events in MISP.

Training Options

There are many super thorough training videos on YouTube. The official options, linked below, are provided by the team at CIRCL (Computer Incident Response Center Luxembourg), the creators of the platform. A YouTube search will yield even more results for MISP training sessions and usage tips.

Conclusion

Overall, the MISP Threat Sharing project is a powerful and feature-rich threat intelligence platform. The API and impressively long list of current integrations and services make it a super flexible TIP/tool that any team should consider if they have a need for one.

Malware Patrol offers several feeds formatted for MISP, as well as the option to sync with our MISP servers. The feeds available include:

You can request a free evaluation of our MISP services here. If you’re already a customer using MISP, we have a handy configuration guide available.

?

FortiSIEM Configuration Guide

?

Fortinet Configuration

FortiSIEM Configuration Guide for Malware Patrol Threat Intel Feeds

Malware Patrol offers the following threat intelligence feeds formatted for integration into FortiSIEM. This allows users to combine the quality of Fortinet’s SIEM security platform with the protection from our threat intelligence. Customers can choose the feed(s) that meet their needs:

We offer free evaluations of our Enterprise feeds, including those for FortiSIEM. To request your evaluation, complete our request form.

About FortiSIEM

“FortiSIEM brings together visibility, correlation, automated response, and remediation in a single, scalable solution. It reduces the complexity of managing network and security operations to effectively free resources, improve breach detection, and even prevent breaches. What’s more is that [the] architecture enables unified data collection and analytics from diverse information sources including logs, performance metrics, security alerts, and configuration changes. FortiSIEM combines the analytics traditionally monitored in separate silos of the security operations center (SOC) and network operations center (NOC) for a more holistic view of the security and availability of the business.” “FortiGuard Threat Intelligence and Indicators of Compromise (IOC) and Threat Intelligence (TI) feeds from commercial, open source, and custom data sources integrate easily into the security TI framework. This grand unification of diverse sources of data enables organizations to rapidly identify root causes of threats, and take the steps necessary to remediate and prevent them in the future. Steps can often be automated with new Threat Mitigation Libraries for many Fortinet products. External Threat Intelligence Integrations

  • APIs for integrating external threat feed intelligence – Malware domains, IPs, URLs, hashes, Tor nodes
  • Built-in integration for popular threat intelligence sources – ThreatStream, CyberArk, SANS, Zeus, ThreatConnect
  • Technology for handling large threat feeds – incremental download and sharing within cluster, real-time pattern
    matching with network traffic. All STIX and TAXII feeds are
    supported”

Adding External TI – A FortiSIEM Configuration Guide

The following are instructions to configure each of our data feeds on FortiSIEM version 6.4.0 (1412) using the web interface.

DNS-over-HTTPS (DoH) Domains

Benefits of the Malware Patrol DoH Data Feed

We developed this feed to help security teams monitor the use of DoH in their environment. Our tools actively search for new DoH servers on a continuous basis to keep this data fresh. DoH allows users to bypass the DNS-level controls and internet usage policies put in place to protect your network against known threats and threat actors are taking advantage of this by using DoH for C2 server connections, for example. As such, both incoming and outgoing DoH traffic should be closely monitored for indications of malicious activity.

Intro Step in the the Malware Patrol Fortisiem configuration guide

1) From the FortiSIEM dashboard, navigate to Resources in the top navigation menu. On the left side menu that appears, you will see the types of IoC feeds that can be integrated.

2) Select Malware Domains from the menu on the left.

3) Click + button at the upper left-hand side of this side menu to add a new Malware Domains group. Step 3 in the DNS-over-HTTPS (DoH) Domains section of the Malware Patrol Fortisiem configuration guide blog post

4) Enter a group name. We will use Malware Patrol – DoH to distinguish this feed from the Malware Patrol Malicious Domains previously entered.

5) Click save. The Malware Patrol – DoH group will now appear under the Malware Domains section. Step 5 in the DNS-over-HTTPS (DoH) Domains section of the Malware Patrol Fortisiem configuration guide blog post

6) Select/highlight the Malware Patrol group and then More from the top menu.

7) Select Update from the drop-down menu. Step 7 in the DNS-over-HTTPS (DoH) Domains section of the Malware Patrol Fortisiem configuration guide blog post

8) On the screen that pops up choose Update via API and click on the edit (pencil) button. Step 8 in the DNS-over-HTTPS (DoH) Domains section of the Malware Patrol Fortisiem configuration guide blog post

9) Enter the following to set up the feed update:

  • URL of your Malware Patrol DoH feed or evaluation feed. This can be obtained by right clicking on the feed’s link in the Malware Patrol customer or evaluation portal.
  • Your Malware Patrol portal username and password
  • Plugin Class: no changes
  • Field separator: ,
  • Data format: CSV
  • Data update: Full

Step 9 in the DNS-over-HTTPS (DoH) Domains section of the Malware Patrol Fortisiem configuration guide blog post 10) In the Data Mapping section, match the following:

  • Domain Name, Position 1
  • Description, Position 2
  • Last Seen, Position 3

11) Click Save Step 11 in the DNS-over-HTTPS (DoH) Domains section of the Malware Patrol Fortisiem configuration guide blog post

12) Click on the Schedule: + button Step 12 in the DNS-over-HTTPS (DoH) Domains section of the Malware Patrol Fortisiem configuration guide blog post

13) On the screen that pops up, enter:

  • Start Time: Set a start time a few minutes from the current time. This will cause the data to be updated after your setup is complete
  • Recurrence Pattern: Hourly, Every 1 Hour (Malware Patrol feeds are updated on an hourly basis)
  • Recurrence:
    • Start From: Today’s Date
    • End Date: No End Date
  • Click Save

Step 13 in the DNS-over-HTTPS (DoH) Domains section of the Malware Patrol Fortisiem configuration guide blog post 14) The data will populate at the start time set above. If it does not, click the Refresh button at the top of the data display area. Another option is to go back to the schedule settings to verify the time you set for the updates to begin. You can set another time a few minutes in the future. Step 14 in the DNS-over-HTTPS (DoH) Domains section of the Malware Patrol Fortisiem configuration guide blog post

15) To change the columns displayed once the data populates, click on the Select Columns button located beside the refresh button. Use the data mapping information from the setup process to know which fields are available in the Malware Patrol feed.

Malicious Domains

Benefits of the Malware Patrol Malicious Domains Data Feed

This Malware Patrol feed contains domains actively involved in malicious activities. The data is derived from five of our Enterprise feeds: 1) Anti-Mining, 2) Command & Control (C2) Addresses, 3) Domain Names Generated via DGAs, 4) Malware & Ransomware URLs, and 5) Phishing URLs. Network traffic associated with these domains is highly likely to be malicious.

Pre-step image in the Malicious Domains section of the Malware Patrol Fortisiem configuration guide

1) From the FortiSIEM dashboard, navigate to Resources in the top navigation menu. On the left side menu that appears, you will see the types of IoC feeds that can be integrated.

2) Select Malware Domains from the menu on the left.

3) Click + button at the upper left-hand side of this side menu to add a new Malware Domains group.

4) Enter a group name. We will use Malware Patrol for this guide.

5) Click save. The Malware Patrol group will now appear under the Malware Domains section.

Step 5 image in the Malicious Domains section of the Malware Patrol Fortisiem configuration guide 6) Select/highlight the Malware Patrol group and then More from the top menu.

7) Select Update from the drop-down menu.

Step 7 image in the Malicious Domains section of the Malware Patrol Fortisiem configuration guide 8) On the screen that pops up choose Update via API.

9) Click on the edit (pencil) button for the URL. Step 9 image in the Malicious Domains section of the Malware Patrol Fortisiem configuration guide

10) Enter the following to set up the feed update:

  • URL of your Malware Patrol Malicious Domains feed or evaluation feed. This can be obtained by right clicking on the feed’s link in the Malware Patrol customer or evaluation portal.
  • Your Malware Patrol portal username and password
  • Plugin Class: no changes
  • Field separator: ,
  • Data format: CSV
  • Data update: Full

Step 10 image in the Malicious Domains section of the Malware Patrol Fortisiem configuration guide 11) In the Data Mapping section, match the following:

  • Domain Name, Position 1
  • Malware Type, Position 2
  • Description, Position 3
  • Date Found, Position 4
  • Last Seen, Position 5

12) Click Save

Step 12 image in the Malicious Domains section of the Malware Patrol Fortisiem configuration guide

13) Click on the Schedule: + button

Step 13 image in the Malicious Domains section of the Malware Patrol Fortisiem configuration guide

14) On the screen that pops up, enter:

  • Start Time: Set a start time a few minutes from the current time. This will cause the data to be updated after your setup is complete
  • Recurrence Pattern: Hourly, Every 1 Hour (Malware Patrol feeds are updated on an hourly basis)
  • Recurrence:
    • Start From: Today’s Date
    • End Date: No End Date
  • Click Save

Step 14 image in the Malicious Domains section of the Malware Patrol Fortisiem configuration guide 15) The data will populate at the start time set above. If it does not, click the Refresh button at the top of the data display area. Another option is to go back to the schedule settings to verify the time you set for the updates to begin. You can set another time a few minutes in the future. Step 15 image in the Malicious Domains section of the Malware Patrol Fortisiem configuration guide

16) To change the columns displayed once the data populates, click on the Select Columns button located beside the refresh button. Use the data mapping information from the setup process for each feed to know which fields are available in the Malware Patrol feed. 

Malicious IPs

Benefits of the Malware Patrol Malicious IPs Data Feed

This feed contains IP addresses known to actively host malicious files and C2 systems for malware and ransomware. Monitoring traffic destined to them is an effective network protection measure and provides valuable information for threat hunting purposes.

Pre-step image in the Malicious IPs section of the Malware Patrol Fortisiem configuration guide

1) From the FortiSIEM dashboard, navigate to Resources in the top navigation menu. On the left side menu that appears, you will see the types of IoC feeds that can be integrated. Step 1 image in the Malicious IPs section of the Malware Patrol Fortisiem configuration guide

2) Select Malware IPs from the menu on the left.

3) Click + button at the upper left-hand side of this side menu to add a new Malware IPs group.

4) Enter a group name. We will use Malware Patrol for this guide.

5) Click save. The Malware Patrol group will now appear under the Malware IPs section. Step 5 image in the Malicious IPs section of the Malware Patrol Fortisiem configuration guide

6) Select/highlight the Malware Patrol group and then More from the top menu.

7) Select Update from the drop-down menu. Step 7 image in the Malicious IPs section of the Malware Patrol Fortisiem configuration guide

8) On the next screen, choose Update via API and click on the edit (pencil) button. Step 8 image in the Malicious IPs section of the Malware Patrol Fortisiem configuration guide

9) Enter the following to set up the feed update:

  • URL of your Malware Patrol Malicious IPs feed or evaluation feed. This can be obtained by right clicking on the feed’s link in the Malware Patrol customer or evaluation portal.
  • Your Malware Patrol portal username and password
  • Plugin Class: no changes
  • Field separator: ,
  • Data format: CSV
  • Data update: Full

Step 9 image in the Malicious IPs section of the Malware Patrol Fortisiem configuration guide

  •  

10) In the Data Mapping section, match the following:

  • Name, Position 1
  • Low IP, Position 2
  • Malware Type, Position 3
  • Description, Position 4
  • Date Found, Position 5
  • Last Seen, Position 6

11) Click Save

12) Click on the Schedule: + button Step 12 image in the Malicious IPs section of the Malware Patrol Fortisiem configuration guide

13) On the next screen, enter:

  • Start Time: Set a start time a few minutes from the current time. This will cause the data to be updated after your setup is complete
  • Recurrence Pattern: Hourly, Every 1 Hour (Malware Patrol feeds are updated on an hourly basis)
  • Recurrence:
    • Start From: Today’s Date
    • End Date: No End Date
  • Click Save

Step 13 image in the Malicious IPs section of the Malware Patrol Fortisiem configuration guide

14) The data will populate at the start time set above. If it does not, click the Refresh button at the top of the data display area. Another option is to go back to the schedule settings to verify the time you set for the updates to begin. You can set another time a few minutes in the future. Step 14 image in the Malicious IPs section of the Malware Patrol Fortisiem configuration guide

15) To change the columns displayed once the data populates, click on the Select Columns button located beside the refresh button. Use the data mapping information from the setup process for each feed to know which fields are available in the Malware Patrol feed.

Malware Hashes

Benefits of the Malware Patrol Malware Hashes Data Feed

This feed contains the SHA-1 hashes of malware and ransomware samples currently available on the internet. Encountering these signatures in your environment is a sign of malicious activity.

Pre-step image in the Malicious Hashes section of the Malware Patrol Fortisiem configuration guide

1) From the FortiSIEM dashboard, navigate to Resources in the top navigation menu. On the left side menu that appears, you will see the types of IoC feeds that can be integrated. Step 1 image in the Malicious Hashes section of the Malware Patrol Fortisiem configuration guide

2) Select Malware Hash from the menu on the left.

3) Click + button at the upper left-hand side of this side menu to add a new Malware Hash group.

Step 3 image in the Malicious Hashes section of the Malware Patrol Fortisiem configuration guide

4) Enter a group name. We will use Malware Patrol for this guide.

5) Click save. The Malware Patrol group will now appear under the Malware Hash section.

Step 5 image in the Malicious Hashes section of the Malware Patrol Fortisiem configuration guide

6) Select/highlight the Malware Patrol group and then More from the top menu.

7) Select Update from the drop-down menu.

Step 7 image in the Malicious Hashes section of the Malware Patrol Fortisiem configuration guide

8) On the next screen, choose Update via API and click on the edit (pencil) button.

Step 8 image in the Malicious Hashes section of the Malware Patrol Fortisiem configuration guide

9) Enter the following to set up the feed update:

  • URL of your Malware Patrol Malware Hashes feed or evaluation feed. This can be obtained by right clicking on the feed’s link in the Malware Patrol customer or evaluation portal.
  • Your Malware Patrol portal username and password
  • Plugin Class: no changes
  • Field separator: ,
  • Data format: CSV
  • Data update: Full

Step 9 image in the Malicious Hashes section of the Malware Patrol Fortisiem configuration guide

10) In the Data Mapping section, match the following:

  • Description, Position 1
  • Algorithm, Position 2
  • HashCode, Position 3
  • Malware Type, Position 4
  • Date Found, Position 5
  • Last Seen, Position 6

11) Click Save

Step 11 image in the Malicious Hashes section of the Malware Patrol Fortisiem configuration guide

12) Click on the Schedule: + button

Step 12 image in the Malicious Hashes section of the Malware Patrol Fortisiem configuration guide

13) On the next screen, enter:

  • Start Time: Set a start time a few minutes from the current time. This will cause the data to be updated after your setup is complete
  • Recurrence Pattern: Hourly, Every 1 Hour (Malware Patrol feeds are updated on an hourly basis)
  • Recurrence:
    • Start From: Today’s Date
    • End Date: No End Date
  • Click Save

Step 13 image in the Malicious Hashes section of the Malware Patrol Fortisiem configuration guide

14) The data will populate at the start time set above. If it does not, click the Refresh button at the top of the data display area. Another option is to go back to the schedule settings to verify the time you set for the updates to begin. You can set another time a few minutes in the future. Step 14 image in the Malicious Hashes section of the Malware Patrol Fortisiem configuration guide

15) To change the columns displayed once the data populates, click on the Select Columns button located beside the refresh button. Use the data mapping information from the setup process for each feed to know which fields are available in the Malware Patrol feed.

Malware URLs

Benefits of the Malware/Ransomware URLs Data Feed

This feed contains URLs known to be hosting malware binaries. It is updated hourly to remove inactive URLs and add newly detected ones. Correlating this feed with network traffic can pinpoint a potential malware infection.

Pre-step image in the Malware URLS section of the Malware Patrol Fortisiem configuration guide

1) From the FortiSIEM dashboard, navigate to Resources in the top navigation menu. On the left side menu that appears, you will see the types of IoC feeds that can be integrated.

Step 1 image in the Malware URLS section of the Malware Patrol Fortisiem configuration guide 2) Select Malware URLs from the menu on the left.

3) Click + button at the upper left-hand side of this menu to add a new Malware URLs group.

Step 3 image in the Malware URLS section of the Malware Patrol Fortisiem configuration guide 4) Enter a group name. We will use Malware Patrol for this guide.

5) Click save. The Malware Patrol group will now appear under the Malware URLs section.

Step 5 image in the Malware URLS section of the Malware Patrol Fortisiem configuration guide

6) Select/highlight the Malware Patrol group and then More from the top menu.

7) Select Update from the drop-down menu. Step 7 image in the Malware URLS section of the Malware Patrol Fortisiem configuration guide

8) On the next screen, choose Update via API and click on the edit (pencil) button.

Step 8 image in the Malware URLS section of the Malware Patrol Fortisiem configuration guide

9) Enter the following to set up the feed update:

  • URL of your Malware Patrol Malware URLs feed or evaluation feed. This can be obtained by right clicking on the feed’s link in the Malware Patrol customer or evaluation portal.
  • Your Malware Patrol portal username and password
  • Plugin Class: no changes
  • Field separator: ,
  • Data format: CSV
  • Data update: Full

Step 9 image in the Malware URLS section of the Malware Patrol Fortisiem configuration guide

10) In the Data Mapping section, match the following:

  • URL, Position 1
  • Malware Type, Position 2
  • Last Seen, Position 3

11) Click Save Step 11 image in the Malware URLS section of the Malware Patrol Fortisiem configuration guide

12) Click on the Schedule: + button Step 12 image in the Malware URLS section of the Malware Patrol Fortisiem configuration guide

13) On the next screen, enter:

  • Start Time: Set a start time a few minutes from the current time. This will cause the data to be updated after your setup is complete
  • Recurrence Pattern: Hourly, Every 1 Hour (Malware Patrol feeds are updated on an hourly basis)
  • Recurrence:
    • Start From: Today’s Date
    • End Date: No End Date
  • Click Save

Step 13 image in the Malware URLS section of the Malware Patrol Fortisiem configuration guide

14) The data will populate at the start time set above. If it does not, click the Refresh button at the top of the data display area. Another option is to go back to the schedule settings to verify the time you set for the updates to begin. You can set another time a few minutes in the future. Step 14 image in the Malware URLS section of the Malware Patrol Fortisiem configuration guide

15) To change the columns displayed once the data populates, click on the Select Columns button located beside the refresh button. Use the data mapping information from the setup process for each feed to know which fields are available in the Malware Patrol feed.

If you need any assistance with this FortiSIEM configuration guide, please email support (@) malwarepatrol.net or contact your Account Manager.

?

pfSense Configuration guide

pfSense Configuration guide

pfSense The pfSense project is a free network firewall distribution, based on the FreeBSD operating system with a custom kernel and it also includes third-party free software packages for additional functionality. pfSense software, with the help of the package system, can provide the same functionality or more as common commercial firewalls, without any of the artificial limitations. In addition to being a powerful, flexible firewalling and routing platform, it includes a long list of related features and a package system allowing further expandability without adding bloat and potential security vulnerabilities to the base distribution. pfSense software uses Squid and SquidGuard to filter web traffic.

pfSense software includes a web interface for the configuration of all included components. There is no need for any UNIX knowledge, no need to use the command line for anything, and no need to ever manually edit any rule sets. Consequently, users familiar with commercial firewalls catch on to the web interface quickly, though there can be a learning curve for users not familiar with commercial-grade firewalls.

Malware Patrol provides block lists compatible with pfSense software. Most importantly our pfSense free valuation can be requested here. Now you can simply follow these simple steps to configure your pfSense instance and protect your internal network, computers, and users from getting infected by malware.

Installing Squid3 and SquidGuard on pfSense 2.1.x

1) Open Packages list: click System, next, Packages, Available Packages tab.

2) Install the Squid package, if not already installed.

3) Install the SquidGuard package, if not already installed

4) Configure the Squid package.

5) Configure the SquidGuard package.

6) Log into your account with Malware Patrol, then, look for SquidGuard. Right-click on Download and select Copy link location. You will need this URL in the next step.

7) Open the General Settings tab in SquidGuard package GUI, found at Service, next Proxy Filter.

8) Check Blacklist to enable the use of our blocklists.

9) Enter the URL you have copied on step 6.

10) If pfSense is behind a proxy, enter the proxy information in Blacklist proxy (this step is not necessary for most situations)

11) Click Save after that.

12) Navigate to the Blacklist tab inside of SquidGuard.

13) Click the Download button.

14) Wait while our block list is downloaded and processed (may take a while). Progress will be displayed.

If you experience any difficulties configuring Squid3 to use Malware Patrol blocklists, please make sure it is working properly and contact our tech support or at support@malwarepatrol.net.