FortiGate Configuration Guide

?

Fortinet Configuration

FortiGate Configuration Guide for Malware Patrol Threat Intel Feeds
FortiGate NGFW delivers industry-leading enterprise security for any edge at any scale with full visibility and threat protection. Organizations can weave security deep into the hybrid IT architecture and build security-driven networks to achieve:

  • Ultra-fast security, end to end
  • Consistent real-time defense with FortiGuard Services
  • Excellent user experience with security processing units
  • Operational efficiency and automated workflows

Malware Patrol offers (5) feeds formatted for integration into the FortiGate Security Fabric (External Connectors/Threat Feeds). Customers can choose the feed(s) that meet their needs:

  • DNS-over-HTTPS (DoH) Servers (domains)
  • Malicious Domains
  • Malicious Hashes
  • Malicious IPs
  • Malware/Ransomware URLs

We have written this FortiGate configuration guide for both connecting and enabling protection with Malware Patrol feeds. Please note that some of the functionalities covered in this guide require a subscription, such as FortiGuard AntiVirus for using Malicious Hashes.

Also, following the instructions in the FortiGate Administration Guide, we have mostly modified default settings and policies whenever adding Malware Patrol’s feeds. For logging or other purposes you may wish to create new ones instead. Additional resources are included at the end of this guide, including a link to FortiGate’s manual.

Adding External Threat Data Feeds – A FortiGate Configuration Guide

1) From inside the FortiGate interface, select Security Fabric > External Connectors. For this configuration guide, we have already added the Malware Patrol Malicious Hashes feed as an example, seen below.

2) Click Create New

Step 2 in the Malware Patrol Fortinet Configuration Guide

3) Scroll down to Threat Feeds section

Step 3 in the Malware Patrol Fortinet Configuration Guide

4) Select feed type to be added. Options are:

a. FortiGuard Category (for URL lists)
b. IP Address
c. Domain Name (for this example)
d. Malware Hash

Step 4 in the Malware Patrol Fortinet Configuration Guide

5) Complete the following in the fields on the next page:

  • Feed name: We will use Malware Patrol Malicious Domains
  • URL: You can find the URL of the Malware Patrol Malicious Domains data feed in the evaluation or customer portal
  • Login credentials: Username and password for Malware Patrol evaluation or customer portal
  • Refresh rate: We use 61 minutes as our feeds are updated hourly

Step 5 in the Malware Patrol Fortinet Configuration Guide

6) Click OK to save. You will now see the new feed added to the list of connectors.

Step 6 in the Malware Patrol Fortinet Configuration Guide

7) Click Create New to add any additional feed(s) you have. Instructions for each are the same as the previous example. For the examples in this how-to, we use the names below:

a. FortiGuard Category (for URL lists) – Malware Patrol Malicious URLs
b. IP Address – Malware Patrol Malicious IPs
c. Domain Name – Malware Patrol Malicious Domains
d. Malware Hash – Malware Patrol Malicious Hashes

8) Click the refresh button and hover over any feed to see details, including number of valid/invalid entries

Step 8 in the Malware Patrol Fortinet Configuration Guide

9) Click View Entries to see the feed’s entries

Step 9 in the Malware Patrol Fortinet Configuration Guide

Adding IP data feeds to firewall policies

1) Navigate to Policy & Objects > Firewall Policy

2) Click Create New

Step 2 in Adding IP data feeds to firewall policies in the Malware Patrol Fortinet Configuration Guide

3) Complete the following in the fields on the next page:

  • Name: We will use Malware Patrol IP Deny List
  • Select incoming and outgoing interfaces: per your needs/environment
  • Source: All
  • Destination: Malware Patrol Malicious IPs list (menu appears on right, scroll down)
  • Schedule: Always
  • ServiceAll
  • Action: Deny

Step 3 in Adding IP data feeds to firewall policies in the Malware Patrol Fortinet Configuration Guide

4) Click OK to save. New policy will appear in list

Step 4 in Adding IP data feeds to firewall policies in the Malware Patrol Fortinet Configuration Guide

FortiGate policy details: https://docs.fortinet.com/document/fortigate/7.0.2/administration-guide/118003/policies

FortiGate video: https://youtu.be/dpvlQ0xU2NU

Adding an external malware blocklist (hashes) to the AntiVirus

1) Navigate to Security Profiles > AntiVirus

2) Click to edit the default profile

Step 2 in Adding an external malware blocklist (hashes) to the Antivirus in the Malware Patrol Fortinet Configuration Guide

3) Enable Use external malware block list (toward bottom of page). Also enable Quarantine if desired.

4) Select ‘Specify’ in the Virus Outbreak Prevention

Step 4 in Adding an external malware blocklist (hashes) to the Antivirus in the Malware Patrol Fortinet Configuration Guide

5) Click the + and select the Malware Patrol Malicious Hashes feed from the menu

Step 5 in Adding an external malware blocklist (hashes) to the Antivirus in the Malware Patrol Fortinet Configuration Guide

Step 5.2 in Adding an external malware blocklist (hashes) to the Antivirus in the Malware Patrol Fortinet Configuration Guide

6) Click OK to save

FortiGate AntiVirus details: https://docs.fortinet.com/document/fortigate/7.0.2/administration-guide/913906/external-blocklist-file-hashes

Adding a URL blocklist to the web filter

1) Navigate to Security Profiles > Web Filter

2) Click to edit the default profile

Step 2 in Adding a URL blocklist to the web filter in the Malware Patrol Fortinet Configuration Guide

3) Select Malware Patrol Malicious URLs from FortiGuard Category Based Filter menu

Step 3 in Adding a URL blocklist to the web filter in the Malware Patrol Fortinet Configuration Guide

4) Right click on Disable and select Block from dropdown menu

Step 4 in Adding a URL blocklist to the web filter in the Malware Patrol Fortinet Configuration Guide

Step 4.1 in Adding a URL blocklist to the web filter in the Malware Patrol Fortinet Configuration Guide

5) Click OK to save

FortiGate Web Filter details: https://docs.fortinet.com/document/fortigate/7.0.2/administration-guide/833698/web-filter


Adding a domain blocklist to the DNS filter

1) Navigate to Security Profiles > DNS Filter

2) Double click to edit the default profile

Step 2 in Adding a domain blocklist to the DNS filter in the Malware Patrol Fortinet Configuration Guide

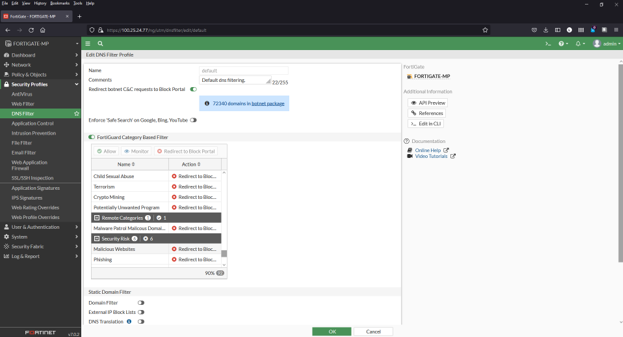
3) Select Malware Patrol Malicious Domains from FortiGuard Category Based Filter menu (scroll down to Remote Categories section)

Step 3 in Adding a domain blocklist to the DNS filter in the Malware Patrol Fortinet Configuration Guide

4) Right click on Allow and select Redirect to Block Portal from dropdown menu

Step 4 in Adding a domain blocklist to the DNS filter in the Malware Patrol Fortinet Configuration Guide

Step 4.1 in Adding a domain blocklist to the DNS filter in the Malware Patrol Fortinet Configuration Guide

5) Click OK to save

FortiGate DNS Filter details: https://docs.fortinet.com/document/fortigate/7.0.2/administration-guide/605868/dns-filter

Additional resources

FortiGate Administration Guide: https://docs.fortinet.com/document/fortigate/7.0.2/administration-guide/954635/getting-started

FortiGate Administration Guide, threat data feeds: https://docs.fortinet.com/document/fortigate/7.0.2/administration-guide/9463/threat-feeds

Excellent walk-through video for adding and enabling external threat feeds: Configure and use 3rd Party threat feeds on a FortiGate Firewall by GraniteDan https://youtu.be/CarI6_URN90

If you need any assistance with this FortiGate configuration guide, please email support (@) malwarepatrol.net or contact your Account Manager.

?

MikroTik Router Configuration

??

Malware Patrol offers MikroTik-compatible versions of our Malicious Domains, DNS-over-HTTPS (DoH) Servers, and Tor Exit Nodes data feeds. This guide walks you through each step to configure your MikroTik router accordingly. If you need assistance at any point, our support team is here to help.

“MikroTik is a Latvian company founded in 1996 to develop routers and wireless ISP systems. MikroTik now provides hardware and software for Internet connectivity in most countries around the world. Our experience in using industry-standard PC hardware and complete routing systems allowed us in 1997 to create the RouterOS software system that provides extensive stability, controls, and flexibility for all kinds of data interfaces and routing.”

You can follow these simple steps to configure your MikroTik to filter malicious domains to protect your network, computers, and users from getting infected by malware and ransomware. This includes domains derived from C2s, DGAs, and URLs hosting malware and ransomware binaries.

1) You will need the username and password provided to you by Malware Patrol. If you are evaluating, this will be your evaluation portal credentials. If you are a customer, you will use your account login details and portal URL.

2) Execute the following commands in MikroTik’s CLI:

Malicious Domains

/system script  add name=”MP_UpdateMaliciousDomains” owner=”admin” policy=ftp,read,write dont-require-permissions=no source={
/tool fetch url=”https://_username_:_password@eval.malwarepatrol.net/feeds/files/MP_malicious_domains.mikrotik.rsc” mode=https

/ip firewall address-list remove [find where comment=”MP_Malicious_domain”]
/import file-name=MP_malicious_domains.mikrotik.rsc ;
}

/ip firewall filter add chain=forward action=drop protocol=tcp dst-address-list=MP_MaliciousDomains log=yes log-prefix=”Blocked_by_MP_MaliciousDomains”

/system scheduler add name=MP_UpdateMaliciousIPsFeed interval=1h on-event=MP_UpdateMaliciousIPs owner=admin policy=ftp,read,write

The code above will create a script that downloads and updates the Malicious Domains list. The system scheduler portion will schedule the download and update processes to happen on an hourly basis. We advise this frequency because our lists are updated every hour.

If you encounter any difficulties during the Mikrotik router configuration process, feel free to contact our tech support at support (@) malwarepatrol.net

Configuration guides for other systems can be found on our Tech Support page.

?

SpamAssassin Configuration Guide

??

Malware Patrol provides block lists compatible with SpamAssassin.
 

“Apache SpamAssassin is the #1 Open Source anti-spam platform giving system administrators a filter to classify email and block spam (unsolicited bulk email).

It uses a robust scoring framework and plug-ins to integrate a wide range of advanced heuristic and statistical analysis tests on email headers and body text including text analysis, Bayesian filtering, DNS blocklists, and collaborative filtering databases.

Apache SpamAssassin is a project of the Apache Software Foundation (ASF).”
 

You can follow these simple steps to configure your SpamAssassin to filter malicious URLs and protect your network, computers, and users from getting infected by malware.

1) Make sure your SpamAssassin instance is installed and working properly. There are several resources on the Internet that can help you configure it in your platform. If you are experiencing trouble installing and configuring SpamAssassin, start at: https://spamassassin.apache.org/

2) On the server running SpamAssassin, create a file called malware_patrol_update.sh choosing where to place it, like:
# mkdir /root/sh
# vi /root/sh/malware_patrol_update.sh

3) Log into your account with Malware Patrol and look for SpamAssassin. Right click on “download” and select “Copy link location”. You will need this URL on the next step.

4) Paste the following command into the newly created file, substituting _URL_YOU_JUST_COPIED_ with the URL you copied in the previous step:

wget --no-check-certificate -O /etc/mail/spamassassin/99_malware_patrol_blocklist.cf '_URL_YOU_JUST_COPIED_'

Feel free to customize the output filename. SpamAssassin configuration files are read in an alphanumerical order, meaning 70_*.cf will be read before 99_*.cf.

5) It is very important to make sure that the URL you have copied from your account with Malware Patrol is enclosed in single quotes.

6) Add the following line to the file and save it:

systemctl restart spamassassin.service

If Amavisd is used (so SpamAssassin is managed by it) use the following line instead and save it:

systemctl restart amavisd.service

7) Add execute permissions to the recently created file, executing this command:

# chmod +755 /root/sh/malware_patrol_update.sh

8) Execute the recently created file that will download the latest block list and restart SpamAssassin or Amavisd:

# /bin/sh /root/sh/malware_patrol_update.sh

9) Make sure the new file was correctly processed by SpamAssassin by running the following command:

# spamassassin -D --lint 2>&1 | grep "malware_patrol"
... dbg: config: read file /etc/mail/spamassassin/99_malware_patrol_blocklist.cf

10) You should now create a cron job to automatically update the Malware Patrol block list. The following command should be executed every hour:

/bin/sh /root/sh/malware_patrol_update.sh

Please choose minutes not close to 00, 01 and 59 for your cron job.

If you experience any difficulties configuring SpamAssassin to use Malware Patrol block lists, please make sure it is working properly and contact our tech support at support (@) malwarepatrol.net.
 

Special thanks to Malware Patrol user fRANz for writing this guide.

Share this post:

?

Protection Against Crypto Mining Abuse

??

Monero cryptocurrency orange, white and grey logo in the crypto mining javascript blog postCryptocurrency mining delivered via websites, a monetization model where JavaScript or WebAssembly code runs within a victim’s browser to mine cryptocurrencies, has reemerged in a quieter-but-still-problematic form. While early tools like Coinhive (2017–2019) made headlines, today’s active platforms include CryptoTab Browser, Pi Network, and YouHolder, which offer mining-like experiences via browsers or mobile devices.

Yet, despite renewed interest, browser-based mining remains largely unprofitable for individuals. High electricity costs and limited CPU-based yields mean that users often earn only a few cents per day, far less than what traditional mining setups deliver. More efficient miners rely on WebAssembly to boost performance, but this also raises the stealth factor and the potential for misuse.

Media outlets once spotlighted Coinhive, particularly after a high profile case in which sources such as BleepingComputer and Gizmodo reported on the presence of Coinhive’s Monero Blockchain JavaScript miner on two of Showtime’s websites. The script was removed though it was unconfirmed if this was intentional or the result of a hack. Most sources also stated that Showtime had refused to comment. This undisclosed miner script usage was coined as ‘drive-by mining’ by Malware Intelligence Analyst Jerome Segura in his article on the subject:

“Because mining happens in the browser via JavaScript without user interaction, we could compare it to drive-by downloads. As publishers need to retain the visitor’s attention so that the JavaScript code runs uninterrupted for as long as possible, this is where the type of content matters. We know that for example gaming or video streaming sites tend to keep people on their page much longer than others.”

screenshot of coinhive.com user documentation website page

Coinhive’s closure in March 2019 marked a shift in the cryptojacking landscape. Cryptojacking persists today via new script variants and injection techniques, but the overall volume of attacks remains lower than during the Coinhive peak. However, as browser-based cryptomining evolves, with more efficient script types and new distribution channels, visibility into which domains host these resource-draining scripts is more important than ever. That’s why Malware Patrol created our Cryptojacking Data Feed: a curated, updated list of domains running active mining scripts.

This feed enables security teams to:

  • Block access to cryptojacking domains before resource abuse impacts user experience or infrastructure.

  • Monitor your environment for emerging threats or suspicious mining behavior.

  • Conduct threat research using real-time domain data.

Note: This feed is strictly focused on browser-based cryptomining scripts – it does not include cryptomining malware.

The feed is updated twice daily and included for free with any commercial subscription. Existing customers can contact their account manager to enable integration in your portal. Not a customer yet? Contact us to discuss your threat data needs or to arrange a free data evaluation period.

Andre Correa

Founder, Malware Patrol

An image of the Founder of Malware Patrol Andrea Correa

Information Security and Cyber Threat Intelligence Professional whose qualifications include in-depth knowledge of Internet technologies, current cyber security landscape, incident response, security mechanisms and best practices. He founded Malware Patrol in 2005. The company helps enterprises around the world to correlate, detect, and prevent cyber attacks through some of the most comprehensive threat intelligence feeds and blocklists on the market.

?

DNS RPZ Firewall Configuration Guide

?????

BIND is the world’s most used DNS server and can be configured as a DNS Firewall using RPZ files (DNS RPZ). Response Policy Zone (RPZ) enables DNS administrators to selectively block name resolution of Internet resources known to be used by cyber criminals.

Malware Patrol provides three zone files compatible with BIND 9 RPZ as one of our commercial feed options. They contain domains used to host C&Cs (command and control servers), domain names generated via DGAs (domain generation algorithms) used by malware and ransomware and domains hosting malware binaries. Its usage as a DNS firewall denies access to resources involved in malware and ransomware activities. DNS queries for these domains return a special address that advises users on why the access was blocked and prevents malware and ransomware infections, communications with C&Cs and drop zones commonly used to exfiltrate information. You can implement any or all zone files at your discretion. Follow these simple steps to configure your BIND 9 instance and protect the internal network, computers and users.

Please be advised that the usage of the malware RPZ zone may result in blocking large well known websites that are actively hosting malware and ransomware samples. The use of the DGAs and C&C zone files is less likely to deny access to renowned websites.

It is also worth noting that at this point Malware Patrol offers RPZ zone files for download AS WELL AS via access to our DNS servers for RPZ zone transfers.

1) Make sure your BIND 9 is installed and working properly. There are several resources on the Internet that can help you install it depending on your platform. If you are experiencing trouble, start at: https://www.isc.org/downloads/bind/. You should also be able to use distribution specific tools like apt-get and yum. For example: apt-get install bind9.
2) Determine the path to the configuration files used by BIND. This most likely will be /etc/bind or /etc/named. One way to find the path is to issue this command: find / -name named.conf
3) Notice: the path /etc/bind will be used throughout this How To, please adapt the commands shown here appropriately if your path is different.
4) Change to the directory that contains BIND configuration files, for example: cd /etc/bind
5) Set up cron jobs to regularly download the appropriate zone file(s) to the BIND configuration directory. URLs for the zone files can be found in your DNS RPZ data feeds portal. The DNS RPZ Firewall data feeds are updated every five minutes. You can use the MD5 hashes to validate the file’s integrity.
Add the following lines to named.conf.default-zones, according to the zones you want to use:
zone “mp_rpz_c2” {
type master;
file “/etc/bind/mp_rpz_c2.db”;
};
zone “mp_rpz_dga” {
type master;
file “/etc/bind/mp_rpz_dga.db”;
};
zone “mp_rpz_malware” {
type master;
file “/etc/bind/mp_rpz_malware.db”;
};
Add the following lines to named.conf.optionsunder the œoptions section, according to the zones you want to use:
response-policy {
zone “mp_rpz_c2”; zone “mp_rpz_dga”; zone “mp_rpz_malware”; };
Restart BIND with the following command: service bind9 restart

To make this set up effective, you should configure your customers’ DNS server(s) to point to this BIND instance. This can be easily achieved via DHCP. Still, customers may manually configure their systems to use external DNS servers, therefore bypassing this protection mechanism. To avoid that, apply firewall rules that properly deny traffic to external DNS servers.

This should be all you need to do. After that, browsers and applications that query your DNS server to resolve malicious domains will receive a safe response and won’t reach bad content.

If you experience any difficulties configuring BIND 9 to use Malware Patrol, please make sure it is working properly and contact our tech support at support (@) malwarepatrol.net.

?